Advertisement
Universal
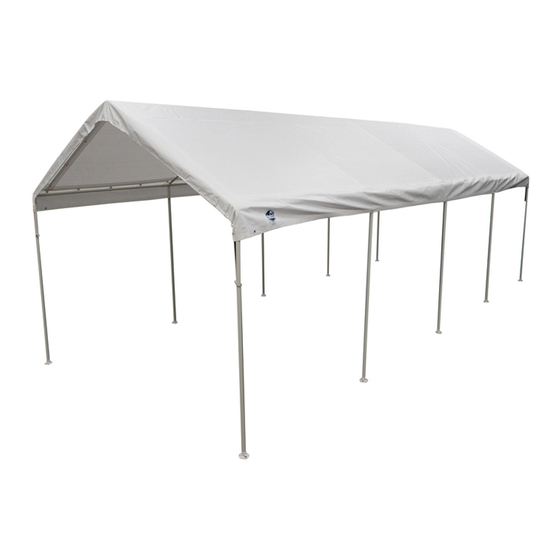
10ft X 27ft
™
10ft8in Wide x 27ft Deep x 6ft8in Side Height /
9ft9in Center Height
King Canopy Item #: C81027PC
With 10 Legs, White Drawstring Cover,
Elastic Ball Straps & Foot Pads.
WARNING:
Keep all flame and heat sources
away from this tent fabric. Meets
the flammability requirements of
Distributed by:
CPAI-84 Sec 6 and NFPA701. It is not
PIC America, LTD.
fire proof. The fabric will burn if left in
8009 Purfoy Road • Fuquay-Varina, NC 27526
continuous contact with any flame source.
1-800-800-6296 • www.kingcanopy.com
Advertisement
Table of Contents

Subscribe to Our Youtube Channel
Related Manuals for KING CANOPY Universal 10ft X 27ft


Summary of Contents for KING CANOPY Universal 10ft X 27ft
- Page 1 10ft X 27ft ™ 10ft8in Wide x 27ft Deep x 6ft8in Side Height / 9ft9in Center Height King Canopy Item #: C81027PC With 10 Legs, White Drawstring Cover, Elastic Ball Straps & Foot Pads. WARNING: Keep all flame and heat sources away from this tent fabric.
- Page 2 PARTS LIST 6X6PC 22 pc 78” Powder Coated Pipe 5X8PC 10 pc 68” Powder Coated Pipe 3WPC 6 pc 3-way connectors 4WPC 9 pc 4-way connectors BALLW 54 pc Elastic ball straps PFOOT 10 pc Plastic Foot pads TDS1027-5 1 pc White Drawstring Cover CCLIP 4 pc...
- Page 3 FRAME ASSEMBLY Step 1 Separate all pieces according to size and shape and arrange per the illustration shown below. Please note: • The 68” (10 ) pipes are used to form the roof rafters • The 78” pipes are used for the roof and for the legs 78’’...
- Page 4 COVER ASSEMBLY Step 1 Unfold the cover with the grommets toward the cover’s bottom and place over the frame. The flared edges should be located at each of the 4 corners of the frame. Step 2 Begin attaching the cover with the elastic ball straps by inserting the elastic cord of the ball strap underneath the cover and through the grommet.
- Page 5 LEGS ASSEMBLY NOW, CONNECT THE LEG POLES TO THE ROOF ASSEMBLY WITH THE COVER ALREADY POSITIONED ON TOP OF THE UNIT. Insert Second Insert First Step A: First insert the pipes for the middle poles into the 3- and 4-way connectors, and then connect the end leg pipes in the same way.
- Page 6 ANCHORING YOUR UNIT This canopy is designed for use as a temporary structure. After assembly, the canopy MUST BE securely anchored to the ground to prevent damage from winds. Your canopy will act like a kite in the wind if not properly and securely anchored to the ground.
- Page 7 IMPORTANT NOTICE: PLEASE READ CAREFULLY We are confident that you will be completely satisfied with your King Canopy unit. Please take a moment to read the very important information below, and call us with any questions you may have. King Canopy/PIC America, LTD. has no control over wind, snow, ice, rain or any other weather condition and we are in no way responsible for any damage caused by the canopy or to the canopy.
- Page 8 Improper Anchoring, Strong Winds, Rain, Snow, Ice NOT put away your Instant Canopy while wet or damp. This King Canopy/ PIC America, LTD. does not guarantee these promotes mildew. Store DRY. For best results in keeping your canopies under strong weather conditions (including snow top clean and avoiding small tears, it is recommended that &...
Need help?
Do you have a question about the Universal 10ft X 27ft and is the answer not in the manual?
Questions and answers