Table of Contents
Advertisement
Available languages
Available languages
Quick Links
Het toestel-identifi catieplaatje bevindt zich aan de onderkant van het toestel.
The appliance identifi cation card is located on the bottom of the appliance.
Plak hier het toestel-identifi catieplaatje.
Stick the appliance identifi cation card here.
Houd, wanneer u contact opneemt met de serviceafdeling, het complete typenummer bij de hand.
When contacting the service department, have the complete type number to hand.
Adressen en telefoonnummers van de serviceorganisatie vindt u op de garantiekaart.
You will fi nd the addresses and phone numbers of the service organisation on the guarantee card.
gebruiksaanwijzing
gaskookplaat
instructions for use
gas hob
HG61..M/N
HG63/64..M
HG71/74..M
HG76..M
HG80..M
HG96..M/S
HG97..M
Advertisement
Chapters
Table of Contents

Subscribe to Our Youtube Channel
Related Manuals for Atag HG97 MB Series


Summary of Contents for Atag HG97 MB Series
- Page 1 gebruiksaanwijzing gaskookplaat instructions for use gas hob Het toestel-identifi catieplaatje bevindt zich aan de onderkant van het toestel. The appliance identifi cation card is located on the bottom of the appliance. Plak hier het toestel-identifi catieplaatje. Stick the appliance identifi cation card here. Houd, wanneer u contact opneemt met de serviceafdeling, het complete typenummer bij de hand.
- Page 2 handleiding ........NL 3 – NL 29 manual .
-
Page 3: Table Of Contents
UW GASKOOKPLAAT inhoud uw gaskookplaat beschrijving ......... . . NL 4 inleiding . -
Page 4: Beschrijving
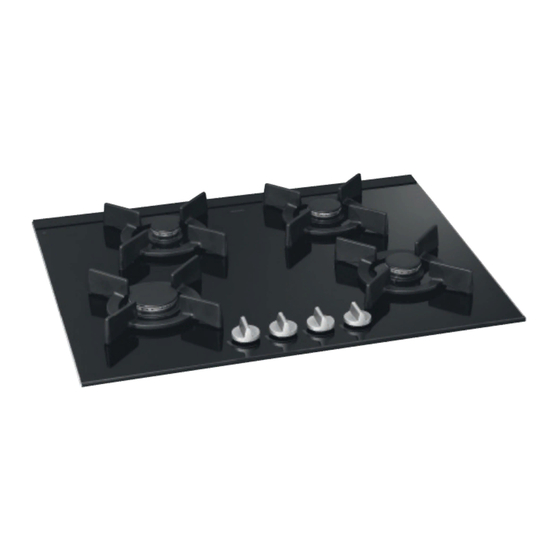
UW GASKOOKPLAAT beschrijving HG97..MB HG96..SB / HG96..MB HG76..MB / HG80..MB HG71..MB / HG74..MB 6 / 7 6 / 7 HG63..MB HG61..MB / HG64..MB 6 / 7 HG61..NB 1. sterkbrander 2. normaalbrander 3. sudderbrander 4. wokbrander 5. pandrager 6. glasplaat 7. RVS-plaat NL 4... -
Page 5: Inleiding
UW GASKOOKPLAAT inleiding Deze gaskookplaat is ontworpen voor de echte kookliefhebber. De verschillen in brandercapaciteit zorgen ervoor dat u ieder gerecht kunt bereiden. Dankzij de in de knoppen geïntegreerde vonkontsteking ontsteekt èn bedient u de branders met één hand. Dit toestel voldoet aan alle eisen die gelden voor het Kookkeurmerk. Dit betekent dat de gaskookplaat hoog rendement koppelt aan een minimum aan onvolledige verbrandingsgassen. -
Page 6: Waar U Op Moet Letten
VEILIGHEID waar u op moet letten Zorg voor voldoende ventilatie tijdens het gebruik – Houd natuurlijke ventilatieopeningen open. – Bij langdurig gebruik van de kookplaat is extra ventilatie noodzakelijk. Zet bijvoorbeeld een raam open of installeer een mechanische ventilator. Gebruik de kookplaat alleen voor het bereiden van gerechten –... -
Page 7: Ontsteken En Instellen
BEDIENING ontsteken en instellen Elke brander kan traploos worden geregeld tussen vol- en kleinstand. bediening 0-stand branderaanduiding volstand kleinstand Wok HG63..MB, HG74..MB, HG80..MB, HG96..MB, HG97..MB Druk de bedieningsknop in en draai hem linksom. De brander ontsteekt. 0-stand branderaanduiding kleinstand wok volstand wok kleinstand buitenring wok Voor de toestellen met vlambeveiliging moet u de bedieningsknop... -
Page 8: De Kookplaat Optimaal Gebruiken
COMFORTABEL KOKEN de kookplaat optimaal gebruiken – Zorg er altijd voor dat de vlammen onder de pan blijven. Als vlammen om de pan heen spelen gaat veel energie verloren. Bovendien kunnen de handgrepen dan te heet worden. Gebruik geen pannen met een kleinere bodemdiameter dan 12 cm. Kleinere pannen staan niet stabiel. - Page 9 COMFORTABEL KOKEN de kookplaat optimaal gebruiken wokbrander Met de wokbrander kunt u gerechten op een zeer hoge temperatuur bereiden. Het is hierbij van belang dat u: – van te voren de ingrediënten in reepjes, plakjes of stukjes snijdt; – bij het roerbakken olie van goede kwaliteit gebruikt, zoals olijf-, maïs-, zonnebloem- of arachide olie.
-
Page 10: Algemeen
ONDERHOUD algemeen Uw toestel is vervaardigd uit hoogwaardige materialen, die u eenvoudig reinigt. – Branderdelen mogen niet in de vaatwasser gereinigd worden. De onderdelen kunnen door het vaatwasmiddel aangetast worden! Gebruik niet te veel vocht, aangezien dit de bran der of ven ti la tie o pe- nin gen kan bin nendrin gen. - Page 11 ONDERHOUD algemeen Wok HG61/71/76MB Branderdeksel buiten en HG96..SB Branderkop Branderkop binnen Gaskelk Branderkelk Bougie Thermokoppel Branderdeksel Wok HG63/74/80/96/97..MB Branderdeksel Positioneringsnok Luchtring Branderkop Thermokoppel Bougie NL 11...
- Page 12 ONDERHOUD algemeen algemeen – Regelmatig onder houd direct na gebruik voor komt dat over ge kookt voed sel lange tijd kan inwer ken en hard nek ki ge, moei lijk te ver wij de ren vlekken ver oor zaakt. Gebruik hiervoor een mild reinigingsmiddel. –...
- Page 13 ONDERHOUD algemeen reinigen verwijderbare branderdelen De verwijderbare branderdelen (inclusief wok) kunt u het beste reinigen met een mild schoonmaakmiddel en een zachte doek. Bij hardnekkige vlekken kunt u de delen laten weken in een sopje. Gebruik nooit schuurpoeders, pads, scherpe voorwerpen of agressieve reinigingsmiddelen.
-
Page 14: Tabel
STORINGEN tabel Wanneer u twijfelt over de goede werking van uw kookplaat betekent dit niet automatisch dat er een defect is. Controleer in elk geval de volgende punten: storing oorzaak oplossing Het ruikt naar gas in de omgeving – Er is een brander ingeschakeld, –... -
Page 15: Verpakking En Toestel Afvoeren
MILIEUASPECTEN verpakking en toestel afvoeren Bij de vervaardiging van dit toestel is gebruik gemaakt van duurzame materialen. De verpakking van het toestel is recyclebaar. Gebruikt kunnen zijn: • karton; • papier; • polyethyleenfolie (PE); • CFK-vrij polystyreen (PS-hardschuim); • polypropyleenband (PP). Deze materialen op verantwoorde wijze en conform de overheidsbepalingen afvoeren. -
Page 16: Algemeen
INSTALLATIEVOORSCHRIFT algemeen Dit toestel mag alleen door een erkend installateur worden aangesloten. let op De gassoort en het land waarvoor het toestel is ingericht staan vermeld op het gegevensplaatje. Dit is een klasse 3 toestel. gasaansluiting De gasaansluiting moet voldoen aan de nationale en lokale voorschriften. Wij adviseren de kookplaat aan te sluiten met een vaste leiding. - Page 17 INSTALLATIEVOORSCHRIFT algemeen elektrische aansluiting 230 V - 50 Hz - 0,6 VA De elektrische aansluiting moet voldoen aan de nationale en lokale voorschriften. Wandcontactdoos en stekker moeten te allen tijde bereikbaar blijven. Als u een vaste aansluiting wilt maken, moet u er voor zorgen dat er een omnipolaire schakelaar met een contactafstand van minimaal 3 mm in de toevoerleiding wordt aangebracht.
-
Page 18: Inbouwen
INSTALLATIEVOORSCHRIFT inbouwen uitsparing in werkblad zagen Zaag de uitsparing in het werkblad. Doe dit zeer nauwkeurig (zie inbouwmaten). Als het werkblad van hout is, behandel dan de kopse kanten van het werkblad met afdichtvernis, om uitzetten van het werkblad door vocht te voorkomen. kookplaat voorbereiden 1/2"... - Page 19 INSTALLATIEVOORSCHRIFT inbouwen Verwijder de beschermfolie van het afdichtband (A) en plak het band in de groef van de aluminium profielen of op de rand van de glasplaat. Plak het afdichtband niet door de hoek, maar knip 4 stukken die goed aansluiten in de hoek.
- Page 20 INSTALLATIEVOORSCHRIFT inbouwen inbouwmaten HG61/63/64..M 1*) bevestigingspunt montagebeugel voorzijde min.50 voorzijde G1/2" NL 20...
- Page 21 INSTALLATIEVOORSCHRIFT inbouwen inbouwmaten HG61..N voorzijde min.50 voorzijde G1/2" NL 21...
- Page 22 INSTALLATIEVOORSCHRIFT inbouwen inbouwmaten HG71/74..M voorzijde min.50 voorzijde G1/2" NL 22...
- Page 23 INSTALLATIEVOORSCHRIFT inbouwen inbouwmaten HG76..M 45 31 voorzijde min.50 voorzijde G1/2" NL 23...
- Page 24 INSTALLATIEVOORSCHRIFT inbouwen inbouwmaten HG96..M/S voorzijde min.50 voorzijde G1/2" NL 24...
- Page 25 inbouwen INSTALLATIEVOORSCHRIFT inbouwmaten HG80..M 45 31 voorzijde min.50 voorzijde G1/2" NL 25...
- Page 26 INSTALLATIEVOORSCHRIFT inbouwen inbouwmaten HG97..M voorzijde min.50 voorzijde G1/2" NL 26...
- Page 27 INSTALLATIEVOORSCHRIFT inbouwen inbouwsituaties HG71/74/76/80/96/97 in 60 cm kast Inbouwmaten HG71/74..M in 60 cm corpus X < 31 mm Y = 31 mm - X X >= 31 mm : Y = 0 mm Inbouwmaten HG76/77/96/97..MB en HG96..SB in 60 cm corpus X <...
- Page 28 INSTALLATIEVOORSCHRIFT inbouwen benodigde vrije ruimte rondom Een gaskookplaat ontwikkelt warmte. Laat voldoende ruimte vrij tot niet hittebestendige materialen. Let ook op bij materialen die kunnen verkleuren (zoals roestvaststaal). min 600 (HG61/63/64) min 750 HG71/74/76/80 min 900 HG96/97 min. 650 mm min.
-
Page 29: Gastechnische Gegevens
INSTALLATIEVOORSCHRIFT gastechnische gegevens G25/25 mbar G20/20 mbar G25/20 mbar G30/29 mbar G31/29 mbar G31/37 mbar G30/50 mbar G31/50 mbar brandertype (kW) (kW) (kW) (kW / g/h) (kW / g/h) (kW / g/h) (kW / g/h) (kW / g/h) sudder 1.00 1.00 0.90 0.90 / 65... - Page 30 NL 30...
- Page 31 YOUR GAS HOB contents your gas hob description ......... . . GB 4 introduction .
-
Page 32: Description
YOUR GAS HOB description HG97..MB HG96..SB / HG96..MB HG76..MB / HG80..MB HG71..MB / HG74..MB 6 / 7 6 / 7 HG63..MB HG61..MB / HG64..MB 6 / 7 HG61..NB 1. rapid burner 2. semi-rapid burner 3. simmer burner 4. wok burner 5. -
Page 33: Introduction
YOUR GAS HOB introduction This ATAG gas hob has been designed for the real lover of cooking. The differences in burner capacity mean that you can cook any type of dish. Thanks to the integration of the spark ignition in the knobs, you can ignite and control the burners with one hand. -
Page 34: What You Should Pay Attention To
SAFETY what you should pay attention to Ensure that there is adequate ventilation during use – Keep natural ventilation openings open. – When using the hob for long periods, extra ventilation is necessary. Open a window for instance or install a mechanical fan. Use the hob only for preparing dishes –... -
Page 35: Igniting And Adjusting
CONTROLS igniting and adjusting Each burner can be adjusted continuously between the full and low positions. controls 0-setting burner indication high setting low setting Wok HG63..MB, HG74..MB, HG80..MB, HG96..MB, HG97..MB 0-setting burner indication low setting wok high setting wok low setting outer ring wok Press the control knob in and turn it anti-clockwise. -
Page 36: Optimal Use Of The Hob
COMFORTABLE COOKING optimal use of the hob – Always ensure that the flames remain below the pan. If flames play around the pan, a lot of energy is lost. In addition, the handles can get too hot. Do not use pans with a base diameter less than 12 cm. Smaller pans will not be stable. - Page 37 COMFORTABLE COOKING optimal use of the hob wok burner With the wok burner you can prepare dishes at a very high temperature. For this purpose it is important: – to cut the ingredients into strips, slices or pieces before cooking; –...
-
Page 38: General
MAINTENANCE general Your appliance has been manufactured from high-grade materials, which are easy for you to clean. – Burner parts should not be cleaned in the dishwasher. The parts may be damaged by the dishwasher detergent! Do not use too much water as this can penetrate into the burner or ventilation openings. - Page 39 MAINTENANCE general burner cap outer ring Wok HG61/71/76MB and HG96..SB burner head burner head inside gas base burner base sparkplug thermocouple Wok HG63/74/80/96/97..MB GB 11...
- Page 40 MAINTENANCE general general – Regular cleaning immediately after use prevents over-cooked food being able to become ingrained and cause stubborn stains that are difficult to remove. Use a mild cleaning agent. – Clean the control knobs, burners and pan supports first and then the glass plate.
- Page 41 MAINTENANCE general cleaning removable burner components The removable burner components (including wok) are best cleaned with a mild cleaning product and a soft cloth. In the case of obstinate stains you can soak the parts in hot suds. Never use scouring powder, scouring pads, sharp objects or aggressive cleansing agents.
-
Page 42: Table
(appliances with for at least 5 seconds. flame failure device). In case of faults phone the service department. See the guarantee certificate or consult the internet site www.atag.nl. This appliance should only be connected up by a registered installer! GB 14... -
Page 43: Disposal Of Packaging And Appliance
ENVIRONMENTAL ASPECTS disposal of packaging and appliance In the manufacturing of this appliance use has been made of durable materials. The appliance packaging is recyclable. The following may have been used: • cardboard; • paper; • polythene film (PE); • CFC-free polystyrene (PS hard foam); •... -
Page 44: General
INSTALLATION INSTRUCTIONS general The fitting of the appliance should only be carried out by a registered Corgi gas fitter. please note The type of gas and the country for which the appliance has been designed are indicated on the ratings plate. This is a category 3 appliance. - Page 45 INSTALLATION INSTRUCTIONS general electrical connection (solely for appliances with a spark switch) 230 V - 50 Hz - 0.6 VA The electrical connection must comply with national and local regulations. Wall socket and plug must be accessible at all times. If you want to make a fixed connection, ensure that a multi-pole switch with a distance between contacts of 3 mm is installed in the supply cable.
-
Page 46: Building In
INSTALLATION INSTRUCTIONS building in cut opening in worktop Saw the opening in the worktop. This should be done very accurately (building in dimensions). If the woodtop is made of treated wood, then coat the sawn surfaces of the top with sealing varnish, to prevent moisture causing the top to swell. preparing the hob 1/2"... - Page 47 INSTALLATION INSTRUCTIONS building in Remove the protective foil of the sealing strip (A) and attach the sealing strip in the groove of the aluminium profiles or the edge of the glass plate. Do not attach the sealing strip through the corner. Instead, cut 4 pieces that fit tightly together in the corners.
- Page 48 INSTALLATION INSTRUCTIONS building in building in dimensions HG61/63/64..M 1*) attachment point for mounting bracket front min.50 front G1/2" GB 20...
- Page 49 INSTALLATION INSTRUCTIONS building in building in dimensions HG61..N front min.50 front G1/2" GB 21...
- Page 50 INSTALLATION INSTRUCTIONS building in building in dimensions HG71/74..M front min.50 front G1/2" GB 22...
- Page 51 INSTALLATION INSTRUCTIONS building in building in dimensions HG76..M 45 31 front min.50 front G1/2" GB 23...
- Page 52 INSTALLATION INSTRUCTIONS building in building in dimensions HG96..M/S front min.50 front G1/2" GB 24...
- Page 53 INSTALLATION INSTRUCTIONS building in building in dimensions HG80..M 45 31 front min.50 front G1/2" NL 25...
- Page 54 INSTALLATION INSTRUCTIONS building in building in dimensions HG97..M front min.50 front G1/2" NL 26...
- Page 55 INSTALLATION INSTRUCTIONS building in fitted-unit situations for HG71/74/76/80/96/97 in 60 cm cabinet fitted-unit dimensions for HG71/74..M in 60 cm corpus X < 31 mm Y = 31 mm - X X >= 31 mm : Y = 0 mm fitted-unit dimensions for HG76/77/96/97..MB and HG96..SB in 60 cm corpus X <...
- Page 56 INSTALLATION INSTRUCTIONS building in space to be left free around the appliance A hob generates heat. Leave a sufficient distance between the appliance and non heat-resistant materials. Take care also with materials that may discolour (such as stainless steel). min 600 (HG61/63/64) min 750 HG71/74/76/80 min 900 HG96/97 min.
-
Page 57: Gas Information
INSTALLATION INSTRUCTIONS gas information G25/25 mbar G20/20 mbar G25/20 mbar G30/29 mbar G31/29 mbar G31/37 mbar G30/50 mbar G31/50 mbar burner type (kW) (kW) (kW) (kW / g/h) (kW / g/h) (kW / g/h) (kW / g/h) (kW / g/h) simmer 1.00 1.00... - Page 58 GB 30...
Need help?
Do you have a question about the HG97 MB Series and is the answer not in the manual?
Questions and answers