Table of Contents
Advertisement
Quick Links
Advertisement
Table of Contents

Related Manuals for Saramonic Vlink2


Summary of Contents for Saramonic Vlink2
- Page 1 2.4 GHz Wireless Microphone System Vlink2 User Manual...
- Page 2 Please retain for future reference. For any issues that cannot be resolved with the user manual, please refer to your retailer for help or contact us at: info@saramonic.com. Cautions 1. Take care not to use the unit underwater or unprotected in rainy conditions.
-
Page 3: General Introduction
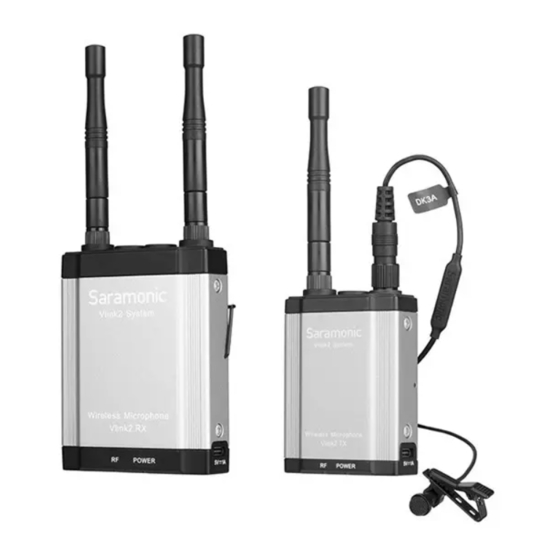
General Introduction The Saramonic Vlink2 wireless microphone system provides a premium 2-person wireless audio solution for vloggers, mobile journalists and content creators . It is an easy-to-use, high-quality and flexible 2.4 GHz system. The external microphone input allows the receiver to be connected to a mic device. -
Page 4: Product Structure
⑤ ① Antennas ② LINE OUT Jack Connect the Vlink2 RX to a DLSR camera, smartphone with a 3.5mm headphone jack, mixer or amplifier with the supplied output cable. ③ 3.5mm Talkback and Headphone Jack Using the talkback function with the supplied headphone, the receiver can monitor the real-time feedback and deliver talkback communication with transmitter. - Page 5 ⑥ SET Button Long press the SET button to enter the displayed menu. Then, short press the SET button to confirm your setting change, or long press again to exit without saving. ⑦ Power / Mute Button Status Operation Power ON Long press for at least three seconds Power OFF Long press until it turns off...
-
Page 6: Attaching Accessories
⑪ +/- button (Pair button) Press the buttons “+” and “-“ for 3 seconds at the same time, entering pairing mode. Attaching Accessories Connect the supplied cable to the output jack. ① Plug the supplied cable into the LINE OUT jack. ②... - Page 7 Attach the shoe mount adapter ③ Please attach the belt clip as shown before attaching the shoe mount adapter. ④ Press the bottom of the belt clip to make some space between the belt clip and the receiver. ⑤ Align the belt clip with the two vertical grooves on the shoe mount adapter and insert the adapter in the direction of the arrow.
- Page 8 OLED Display Operation Guide Home screen: If no operation is performed for 20 seconds on the other screens, the display will automatically return to the home screen. ① Pairing Indicator Paired Successfully Disconnected ② Output Mode Indicator M: Mono S: Stereo ③...
- Page 9 ⑥ Channel A Icon ⑦ RF Level Indicator (Channel A) Indicates the current reception level. ⑧ Audio Input Level Meter (Channel A) Displays the audio input level. ⑨ TX's Battery Level Indicator (Channel A) Displays the TX battery level. Please recharge the device immediately when the indicator starts flashing.
- Page 10 Set Output Volume Set the volume of output audio within the range of 0 to 31. The setting is retained even after the power is turned off. Default volume is 28. Output Mode The output mode can be set to mono or stereo. When the output mode is in mono, the audio from the left and right channel will be mixed.
- Page 11 Set Mute Key Enable or Disable Mute key button function. Default is “Enable”. Language English or (Chinese) are available. Default is English. Restore Default Setting Yes: restores default settings, No: exits restore default settings. Version of the Vlink2 RX's firmware...
- Page 12 Body-pack Transmitter Vlink2 TX Introduction The Saramonic Vlink2 TX is a compact body-pack transmitter. It features an easy-to-read OLED display, a detachable antenna and built-in rechargeable battery. With the 3.5mm headphone and mic input jacks, it can accept audio from the included 3.5mm locking mic, and supports efficient two-way communication with the receiver .
- Page 13 Antennas Connect headphones for monitoring communication from the receiver. MIC IN/LINE IN Jack The transmitter can be connected to a 3.5mm microphone or other line-level devices. USB-C Charging Port (DC 5V) Power / Mute Button Status Operation Power ON Long press for at least three seconds Power OFF Long press until it turns off Mute ON...
- Page 14 OLED display Display menus, please refer to "OLED Display Operation Guide" for more details. POWER indicator Status Indicators Power On / Fully charged Solid blue light Low battery / Charging Solid red light Flashing red light Low battery warning (the unit shutdowns whitin 10 mins) +/- button (Pair button) Press the buttons “+”...
- Page 15 OLED Display Operation Guide Home screen: If no operation is performed for 20 seconds on the other screens, the display will automatically return to the home screen. ① Pairing Indicator Paired Successfully Disconnected ② RF Level Indicator ③ Battery Level Indicator Displays the TX battery level.
- Page 16 MIC GAIN Adjust the external microphone’s gain level (0-9). Default is “06”. Set Output Volume Set the volume of output audio within the range of 0 to 31. The setting is retained even after the power is turned off. Default volume is 28. Input Mic In Input Setting...
- Page 17 Set Mute Key Enable or Disable Mute key button function.Default is “Enable”. Language Setting. English or (Chinese) are available. Default is "English". Restore Default Setting. Yes: restores default settings, No: exits restore default settings. 1.1.3 Version of the Vlink2 TX's firmware.
- Page 18 It can be powered by a rechargeable Li- ion battery or two AA batteries. The Vlink2 HU works with the Vlink2 RX on various audio capturing occasions.
- Page 19 Power Indicator Status Indicators Disconnected Slowly flashing blue light Pairing Quickly flashing blue light Paired Successfully Solid blue light Mute ON (Paired Successfully) Flashing red light Low Battery Solid red light Power/Mute Button Status Operation Power ON Long press for at least three seconds Power OFF Long press until it turns off Mute ON...
-
Page 20: Battery Installation
Battery Installation The transmitter is powered by a rechargeable Li-ion battery or two AA batteries. To install batteries, please follow these steps: 1. Turn the grip anti-clockwise, and pull the grip down until the battery compartment is visible. 2. Open the battery cover as shown. 3.Insert two two AA batteries or the supplied Li-ion battery into the battery compartment, respecting the polarity indicated inside the compartment. - Page 21 Operation Guide How to connect the Vlink2 TX with the Vlink2 RX Before leaving factory, the transmitter and the receiver of a set are pre-paired. Therefore, the connection will be established once they are powered on.
- Page 22 How to connect the Vlink2 HU with the Vlink2 RX 1. Long press the Power button to turn on the Vlink2 RX and the Vlink2 2. Long press the Pair button of the Vlink2 RX (press the buttons “+” and “-” at the same time) to enter pairing mode. The RF indicator will flash rapidly in blue.
-
Page 23: Connection Example
Connection Example TX+RX Compatible with TRS/TRRS headphones (not included) - Page 24 Compatible with TRS/TRRS headphones (not included) Compatible with TRS/TRRS headphones (not included)
-
Page 25: Packing Lists
• 3.5mm TRRS Locking-type Plug Audio Cable for Smartphone (1) • Cold Shoe Mount Adapter (1) • Detachable Antenna (4) • Belt clip (3) • Hard Protective Case (1) Vlink2 HU • Vlink2 HU Handheld Microphone Transmitter (1) • Type-C Charging Cable (1) • Rechargeable Li-ion Battery (1) -
Page 26: Specifications
Specifications Vlink2 RX Oscillator type GFSK Carrier frequencies 2.4GHz (2404-2476MHz) Operating range Up to 328'(100m) 3.5 mm LINE OUT jack Audio connector 3.5mm MIC IN & 3.5mm headphone output jack Built-in battery capacity 3000mAh Continuous use time 19 hrs Power requirements... - Page 27 Vlink2 TX Oscillator type GFSK Carrier frequencies 2.4GHz (2404-2476MHz) Operating range Up to 328'(100m) Audio output connector 3.5mm headphone output Audio input connector 3.5mm MIC IN/LINE IN jack Built-in battery capacity 2000mAh Continuous use time 20 hrs Power requirements Built-In Li-ion Battery or USB-C DC 5V...
- Page 28 Vlink2 HU Oscillator type GFSK Carrier frequencies 2.4GHz (2404-2476MHz) Operating range Up to 164'(50m) Battery capacity 1600mAh Li-ion battery or 2*AA battery With the supplied Li-ion battery: 22 hrs Continuous use time With 2 AA batteries: 20 hrs Li-ion battery or 2*AA batteries or USB-C...
- Page 29 For better recording experience, the application is recommended. Shenzhen Jiayz Photo Industrial., Ltd 40 61 1096...
Need help?
Do you have a question about the Vlink2 and is the answer not in the manual?
Questions and answers