Table of Contents
Advertisement
Quick Links
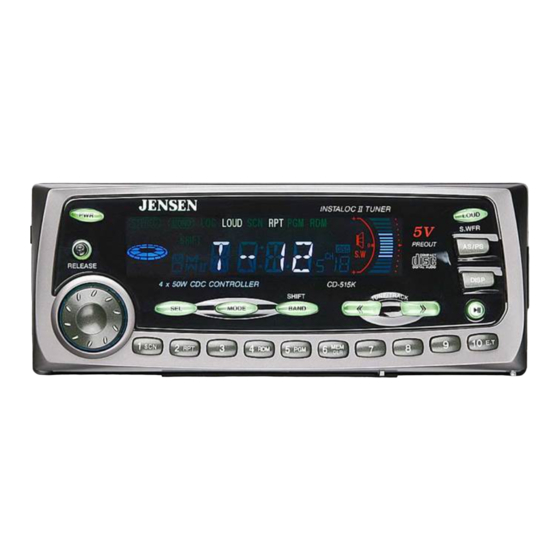
How to Enjoy Your CD515K AM/FM
Stereo Receiver/CD Player with Optional
CD Changer Control and Detachable
Flip-Over Security Panel
STEREO
REL
COMPACT
DIGITAL AUDIO
SEL
Welcome!
What you're holding in your hands is no ordinary owner's
manual. We've tried to make the instructions in this owner's
manual clear and easy to follow. If you take a few minutes to
look through it, you'll learn how to use all of the features on
your new Jensen car stereo for maximum enjoyment.
For your Jensen stereo to work right, it must be installed
correctly. The enclosed installation manual will show you how
to install your new stereo like a pro. It's a good idea to read
all of these instructions before you begin the installation.
Most installations are straightforward and can be handled by
a do-it-yourselfer with the right tools, patience, and the ability
to follow instructions. But, do-it-yourself installation isn't for
everyone. If you still don't feel confident after reading this
book, consider turning the installation job over to someone
better suited to it.
Warranty Service
If your Jensen stereo should ever require service, you will
need to have the original dated receipt. If you ever need to
return the unit for any reason, always include the receipt with
the product.
Technical Assistance
For technical assistance with the operation of the CD515K,
call 1-800-323-0221.
®
MONO
LOC LOUD
SHIFT
MODE
BAND
®
TUNE
Operation
CD515K Features
Basic Operation ......................... 2
On/Off ............................................ 2
Select Function .............................. 2
Volume ........................................... 3
Bass ............................................... 3
Treble ............................................. 3
Balance .......................................... 4
Fader .............................................. 4
Sub (subwoofer) ............................ 5
Loudness ....................................... 5
View/Set the Clock ......................... 5
Mode .............................................. 5
Radio Operation ......................... 6
Radio Mode .................................... 6
Select a Band ................................ 6
Select a Station .............................. 6
Stereo Reception ........................... 6
Preset Stations .............................. 7
Automatically Store Stations .......... 7
(Preset Scan) ................................. 7
CD Player Operation ................. 8
CD Mode ........................................ 8
Insert and Eject CD ........................ 8
Skip Tracks .................................... 8
Pause CD ...................................... 8
Intro (Preview all Tracks) ............... 9
Repeat the Same Track ................. 9
Random (Play all Tracks) ............... 9
Direct Track Access ....................... 9
Program CD Tracks ....................... 9
CD Changer Operation ........... 10
CDC Mode ................................... 10
Direct Disc Access ....................... 10
Direct Track Access ..................... 10
Skip Tracks .................................. 10
Pause CD Changer ...................... 11
Intro (Preview all Tracks) ............. 11
Repeat the Same Track ............... 11
Random (Play all Tracks) ............. 11
and Warranty ............................. 12
Advertisement
Chapters
Table of Contents

Related Manuals for Jensen CD515K


Summary of Contents for Jensen CD515K
-
Page 1: Table Of Contents
Jensen car stereo for maximum enjoyment. Pause CD ........8 Intro (Preview all Tracks) ....9 For your Jensen stereo to work right, it must be installed Repeat the Same Track ....9 correctly. The enclosed installation manual will show you how Random (Play all Tracks) .... -
Page 2: Basic Operation
DIGITAL AUDIO TUNE SHIFT MODE BAND On/Off Select Function 1. Press and hold Press any button to turn the CD515K LOUD (S.WFR) on. Press PWR to turn it off. button for more than one second to >2 sec activate Subwoofer. (Volume) -
Page 3: Volume
® CD515K Volume Treble – 1. Press SEL button three Adjust volume times. TRE appears in by turning the display. volume knob. 0 = minimum volume 46 = maximum volume 2. Adjust treble level by turning volume knob. – Bass 1. -
Page 4: Balance
® CD515K Fader Balance SEL SEL SEL SEL 1. Press SEL button four times. 1. Press SEL button five times. 2. Adjust sound balance left and right by 2. Adjust sound front and rear by turning turning volume knob. volume knob. -
Page 5: Sub (Subwoofer)
CD play (CD) or CD Changer (CDC) mode. MODE MODE MODE The MODE button only selects the CD mode if a CD is inserted, and only selects the CDC mode if a Jensen CD Changer is plugged in and a CD is inserted. -
Page 6: Radio Operation
® CD515K Radio Operation ® STEREO COMPACT DIGITAL AUDIO TUNE SHIFT MODE BAND Radio Mode Select a Station Options for selecting a station MODE MODE Press MODE button one time to select Radio Mode (TUN). TUNE <2 sec Select a Band... -
Page 7: Preset Stations
® CD515K Preset Stations Automatically Store Stations Select ten strong stations and store them in current band. Ten numbered preset buttons store and recall 1. Select a band (if needed). BAND stations for each band. Store a station: 1. Select a band (if needed). -
Page 8: Cd Player Operation
® CD515K CD Player Operation ® COMPACT DIGITAL AUDIO TUNE SHIFT MODE BAND Skip Tracks CD Mode MODE MODE TUNE Press MODE button two times to select CD Player Mode (CD). Press to advance to next track. Track Insert and Eject CD number appears for less than 1 second then the time remaining appears. -
Page 9: Intro (Preview All Tracks)
® CD515K Intro (Preview all Tracks) Program CD Tracks Press and hold the INT button for Use Program function to select up to more than two seconds to play first 24 CD tracks to play in any order. ten seconds of each track on current Program works by allowing you to CD. -
Page 10: Cd Changer Operation
TUNE SHIFT MODE BAND Direct Track Access The CD515K is designed to control an optional Jensen 6-disc CD changer. While a CD is playing or paused, press a preset button for less than two seconds to CDC Mode select the corresponding track number (1–10). -
Page 11: Fast Forward And Fast Reverse
® CD515K Intro (Preview all Tracks) Fast Forward and Fast Reverse Press and hold the INT button for (High speed audible search) more than two seconds to play first TUNE ten seconds of each track on current CD. Press and hold the INT button for >2 sec... -
Page 12: Specifications
Jensen will pay the return shipping charges if the product is What is Covered. Except as otherwise specified below, returned to an address inside the USA or Canada. - Page 13 Attach Wires to Radio ....6 clear and easy to follow. Install Wiring Inside the Car ..6 For your Jensen stereo to work right, it must be installed Wiring Diagram–Advanced correctly. This manual will show you how to install your new Installation ........
-
Page 14: Installation
Speaker Requirements Wiring Harness Adapter For a basic installation, you can purchase a Only connect the CD515K to speakers rated in wiring harness adapter for your car's existing the load impedance range of 4 to 8 ohms. radio connectors. This makes installation easy. -
Page 15: Connections
Stretch electrical sound better, great or INCREDIBLE! tape tightly over splice. Better Sound Install a Jensen tape deck or CD player like you’re doing now. High power units can make your existing speakers sound better and play louder. -
Page 16: Disconnect Battery
® CD515K Disconnect Battery Before you begin, always disconnect the battery negative terminal. Remove Old Radio 1. Remove trim to expose chassis. 2. Remove the frame from the dashboard. 3. Unscrew screws from the sides. 4. Disconnect wiring harness and remove radio. -
Page 17: Wiring
No convenient power wire? Install a fuse Some speakers connect to the original adapter having a spade connector. radio with a single wire. Your Jensen radio requires two wires per speaker. You must locate each speaker and run a second wire Fuse from the speaker (–) terminal to the radio. -
Page 18: Wiring With A Wiring Adapter
Attach Wires to Radio Splice, crimp or solder the wires from the 1. After splicing the wiring adapter to the Jensen connector to the wiring adapter. Match Jensen connector, attach the connector to the wires according to the chart (below) and the back of the radio as shown. -
Page 19: Wiring Diagram-Advanced Installation
Using green/black violet/black an incorrect fuse could damage radio. The CD515K uses one 10 amp (in the green violet filter box) and two 1 amp fast blow AGC fuses as part of rear wiring harness. -
Page 20: Testing
® CD515K Testing Before you finish the installation, you should do the following tests to make sure the wiring is correct and everything is operating properly. Reconnect Battery View/Set the Clock When wiring is complete, To view the time, press CLK button to reconnect the battery temporarily display clock. -
Page 21: Test Antenna Connection
® CD515K Test Antenna Connection Test Memory Wiring 1. With the radio playing, hold button 1 for five TUNE seconds. You just stored the current station in memory. 5 sec 1. Press or . The radio should tune to a nearby station. -
Page 22: Test Speaker Connections
® CD515K Test Speaker Connections These tests make sure the speakers are connected right. If speakers don’t play at all, both wires may not be connected. If the wrong speaker plays (you hear front speakers when you expect rear speakers) make sure you connected the wires right. -
Page 23: Final Installation
® CD515K Final Installation ®... -
Page 24: Troubleshooting
Press Reset button ER-8 appears on display Impossible operation Try a different CD Can’t find cause of problem Call Jensen Technical Assistance (1-800-323-0221) Reset Button Detachable Flip-Over Panel In case of abnormal 1. Press REL button to open flip-over panel. -
Page 25: Warranty
Jensen will pay the return shipping charges if the product is What is Covered. Except as otherwise specified below, returned to an address inside the USA or Canada.
Need help?
Do you have a question about the CD515K and is the answer not in the manual?
Questions and answers