Advertisement
Scan for full manual
Step 1: Check what's in the box
VM-80VN 1:8 Video Distributor
1 Power supply (12V DC)
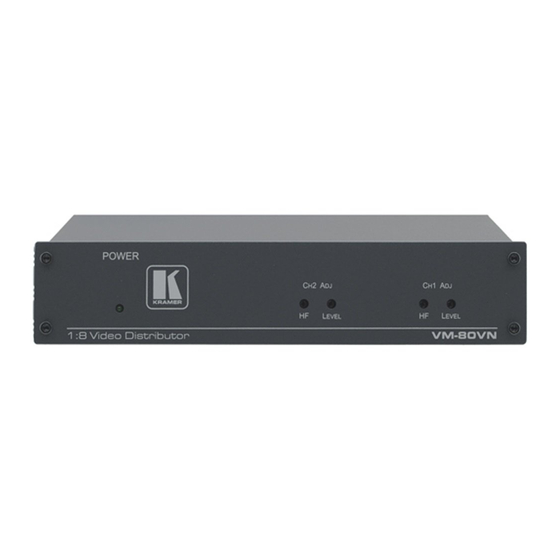
Step 2: Get to know your VM-80VN
This section defines the VM-80VN.
#
Feature
1
POWER LED
2
CH2 ADJ HF Trimmer
3
CH2 ADJ Level Trimmer
4
CH1 ADJ HF Trimmer
5
CH1 ADJ Level Trimmer
6
CH 1 IN BNC Connector
7
CH 1 IN 75
Pushbutton
Ω
8
1:8 Pushbutton
9
CH 2 IN BNC Connector
10
CH 2 IN 75
Ω
Pushbutton
11
CH 1 OUT BNC Connector
12
CH 2 OUT BNC Connector
13
12V DC Connector
VM-80VN Quick Start
VM-80VN Quick Start Guide
This guide helps you install and use your
Go to
www.kramerav.com/downloads/VM-80VN
upgrades are available.
Function
Illuminates when the device is powered on
Adjusts the CH2 cable compensation equalization level
Adjusts the CH2 video gain level
Adjusts the CH1 cable compensation equalization level
Adjusts the CH1 video gain level
Connects to the CH1 video source
Press in for CH1 75Ω termination, release for no termination
Press in for 1:8 operation, release for 1:4 operation
Connects to the CH2 video source
Press in for CH2 75Ω termination, release for no termination
Connects to the CH1 video acceptor(s) (from 1 to 4)
Connects to the CH2 video acceptor(s) (from 1 to 4)
Connector for attaching the 12V DC power supply
VM-80VN
for the first time.
to download the latest user manual and check if firmware
4 Rubber feet
1 Quick start guide
P/N: 2 9 0 0 - 3 0 1 2 6 3 QS
Rev: 3
Advertisement
Table of Contents

Related Manuals for Kramer VM-80VN


Summary of Contents for Kramer VM-80VN
- Page 1 Step 1: Check what’s in the box VM-80VN 1:8 Video Distributor 4 Rubber feet 1 Power supply (12V DC) 1 Quick start guide Step 2: Get to know your VM-80VN This section defines the VM-80VN. Feature Function POWER LED Illuminates when the device is powered on...
- Page 2 • Reliable earthing of rack-mounted equipment should be maintained. Step 4: Connect inputs and outputs Always switch OFF the power on each device before connecting it to your VM-80VN. To achieve specified extension distances, use the recommended Kramer cables available at www.kramerav.com/product/VM-80VN.
Need help?
Do you have a question about the VM-80VN and is the answer not in the manual?
Questions and answers