Table of Contents
Advertisement
Quick Links
Advertisement
Table of Contents

Subscribe to Our Youtube Channel
Related Manuals for CYP MED-AS402

Summary of Contents for CYP MED-AS402
- Page 1 MED-AS402 Medical Video recorder Operation Manual Operation Manual...
- Page 2 INSTRUCTIONS FOR THE USER The document combines text and illustrations, providing a comprehensive overview of the system. The information is presented as a sequential series of actions, allowing the user to learn directly how to use the device. The text provides explanations and instructs the user step-by-step in the practical use of the product, with short, clear instructions in an easy-to-follow sequence.
- Page 3 SAFETY INSTRUCTIONS 1. Strictly follow these Instructions for Use; please read these safety instructions carefully. 2. Please keep this User Manual for later reference; any use of the product requires full understanding and strict observation of all portions of these instructions. Observe all WARNINGS and CAUTIONS as rendered throughout this manual and on labels on the equipment.
- Page 4 6. Put this equipment on a reliable surface during installation. Dropping it or letting it fall may cause damage. For plug-in equipment, the power outlet socket must be located near the equipment and must be easily accessible. Caution! To prevent overheating, do not cover the openings or place the device in direct sunlight or near radiant heaters.
- Page 5 9. Classification: 1). Supply Class I adapter 2). No applied part 3). Continuous Operation 4). Not AP or APG category Warning! This device is not suitable for use in the presence of flammable anesthetic mixture with air, oxygen, nitrous oxide, or for life support systems. 10.
- Page 6 EN 60601-1-2 (IEC 60601-1-2) Medical electrical equipment Part 1-2: General requirements for safety Collateral standard: Electromagnetic compatibility; Requirements and tests 14. Accessory equipment connected to analog and digital interfaces must be in compliance with the respective nationally harmonized IEC standards (i.e. IEC 60950 for data processing equipment, IEC 60065 for video equipment, IEC 61010-1 for laboratory equipment, and IEC 60601-1 for medical equipment.) Furthermore all configurations shall comply with the system...
- Page 7 17. “WARNING - Do not modify this equipment without authorization of the manufacturer.” 18. “WARNING – To avoid risk of electric shock, this equipment must only be connected to a supply mains with protective earth. 19. “CAUTION: This adapter Sinpro Power: Type: HPU101-107 is a forming part of the medical device”.
- Page 8 DISPOSING OF OLD PRODUCTS Within the European Union EU-wide legislation, as implemented in each member state, requires that waste electrical and electronic products carrying the mark shown at left must be disposed of separately from normal household waste. This includes monitors and electrical accessories, such as signal cables or power cords.
- Page 9 LIST OF ACCESSORIES Before installing your Point-of-Care Terminal, ensure that the following materials have been received: MED-AS402 ■ Warning! No user serviceable parts inside; refer servicing to qualified personnel. Only the accessories indicated on the list of accessories above have been tested and approved to be used with the device.
- Page 10 ADDITIONAL INFORMATION AND ASSISTANCE Contact your distributor, sales representative, or Cypress' customer service center for technical support if you need additional assistance. Please have the following information ready before you call: ■ Product name and serial number Description of your peripheral attachments ■...
-
Page 11: Table Of Contents
1.3.2 Cleaning and Disinfecting ....7 1.4 Operating Principle ........8 1.5 Intended User Profile ......... 8 2. System Setup ..........10 2.1 A Quick Tour of the MED-AS402 ..... 10 2.1.1 Front View ........10 2.1.2 Rear View ........11 2.2 Installation Procedures ......12 2.2.1 Connecting the Power Cord .. -
Page 12: General Information
In other chapters, the SDKs and APIs provided will be described in more detail. Intended use – MED-AS402 is intended to serve as a medical video recorder for integration with hospital systems. MED-AS402 is designed for general purpose used in medical image or video related application in the hospital environment, for data collection and for displaying information via connecting a display. -
Page 13: Specifications
1.2 Specifications Intel® Core™ i7-7700 3.6GHz Memory 16GB, Up to 32GB DDR4 2133MHz System 1TB, based on customers’ Storage requirement System input Input 100-240 AC rating Voltage Input Up to 4K Resolution Output Video Up to 4K Resolution Compression MPEG2 H.264, H.265 Format 2 (Mic-in/ Line-out) (Mic-in could be Audio... - Page 14 Input Power Supply 100-240V AC, 47-63Hz, 500W Voltage Certification UL/CB 60601-1, CE &FCC Class B certified 0 ~ 40°C(Operating) Temperature -10 ~50°C (Storage/Transportation) 10%-90% @ 40°C (non-condensing) (Operating) Humidity Environment 5 ~90% (non-condensing) (Storage/ Transportation) 700-1060 hPa (Operation) Pressure 500-1060 hPa (Storage/ Transportation) Dimensions 329.5mmX320mmX145mm...
-
Page 15: Dimensions
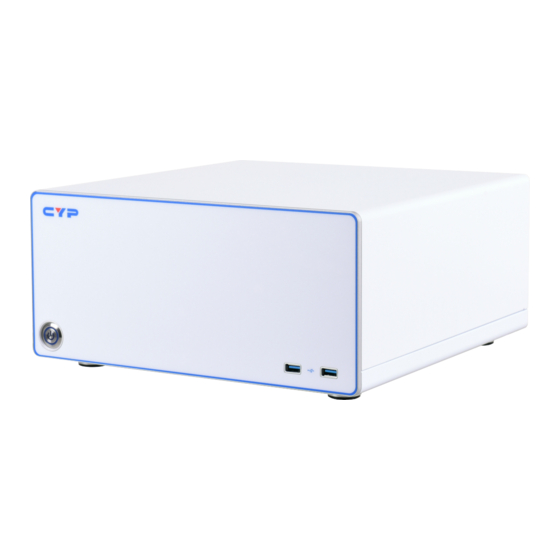
1.3 Dimensions Dimensions: 329.5 x 320 x 145 mm Figure 1.1 Dimensions of the MED-AS402... - Page 16 Figure 1.2 MED-AS402 Front Panel Power button (blue light) USB 3.0...
- Page 17 Figure 1.3 MED-AS402 Rear Panel RS232 DVI-D Display Port HDMI USB 2.0 USB 3.0 RJ-45 Headphone...
-
Page 18: Optional Add-On Cards
During normal use of MED-AS402 the device may become dirty and should be regularly cleaned. Steps: 1. Prepare cleaning detergent 2. Wipe MED-AS402 with a clean cloth that has been moistened in the detergent. 3. Wipe thoroughly with a clean cloth. Suggested cleaning detergent: 1. -
Page 19: Operating Principle
Part of the body or type of tissue applied to or interacted with: hands, expected contact time shall be less than 1 min, and will not touch MED-AS402 so frequently once it is set up. Education level: at least 8 years intensive reading experience (school) - Page 20 Knowledge: Minimum – read and understand “westernized Arabic” numerals when written in Arial font - can distinguish: every parts of body as described in user manual - trained and authorized by manufacturer only. To be considered as trained and authorized, they must complete the training course of the manufacturer;...
-
Page 21: System Setup
2. SYSTEM SETUP 2.1 A Quick Tour of the MED-AS402 Before you start to set up the MED-AS402, take a moment to become familiar with the locations and purposes of the controls, drives, connections and ports, which are illustrated in the figures below. -
Page 22: Rear View
2.1.2 Rear View Figure 2-2: Rear view of MED-AS402 Most of I/O ports of MED-AS402 are located at the rear cover, including Display port, COM port, HDMI port, DVI-D port, Ethernet ports, USB ports and so on. Apart from the I/O ports shown in below fig 2.2, additional I/O ports are also included (not shown here) as add-on... -
Page 23: Installation Procedures
2.2 Installation Procedures 2.2.1 Connecting the Power Cord The MED-AS402 can only be powered by connecting the power cord to its power supply (FSP500M-80PA), and pressing the power button on the front cover. Be sure to always handle the power cords by holding the plug ends only. -
Page 24: Running The Bios Setup Program
The setup program is stored in read-only memory. It can be accessed either when you turn on or reset the MED-AS402, by pressing the “F2 or Del” key on your keyboard immediately after powering on... -
Page 25: Installing System Software
AS402 hard drive. Note: Some distributors and system integrators may have already pre- installed system software prior to shipment of your MED-AS402. If required, insert your operating system's installation or setup diskette into the external diskette drive until the release button pops out. -
Page 26: Installing The Drivers
2. Failure to power off 3. AC power in and all switches ON, but system doesn't power on Contact your distributor, sales representative, or CYP's customer service center for technical support if you need additional assistance. Please have the following information ready before you call: ■... - Page 27 MED-AS402 is intended for use in an electromagnetic environment in which radiated RF disturbances are controlled. The customer or the user of the model MED-AS402 can help prevent electromagnetic interference by maintaining a minimum distance between portable and mobile RF communications equipment (transmitters) and the model AS402 as recommended below, according to the maximum output power of the communications equipment.
- Page 28 Rated Maximum Separation Distance According to Frequency of Transmitter Output Power of Transmitter W 150 kHz to 80 MHz 80 MHz to 800 MHz 800 MHz to 2,5 GHz d = 1,2 √P d = 1,2 √P d = 2,3 √P 0,01 0,12 0,12...
- Page 29 Guidance and Manufacturer’s Declaration – Electromagnetic Immunity MED-AS402 is intended for use in the electromagnetic environment specified below. The customer or the user of the model MED-AS402 should assure that it is used in such an environment. Immunity Test IEC 60601 Test...
- Page 30 NOTE UT is the A.C. main voltage prior to application of the test level. Guidance and Manufacturer’s Declaration – Electromagnetic Immunity The model MED-AS402 is intended for use in the electromagnetic environment specified below. The customer or the user of the model MED-AS402 should assure that it is used in such an environment.
- Page 31 Immunity test IEC 60601 Compliance Electromagnetic Test Level Environmental Guidance Level Conducted RF 3 Vrms 150 Vrms V/m Portable and mobile RF kHz to 80 communi-cations equipment IEC 61000-4-6 MHz 3 V/m should be used no closer to any part of the model MED- 80 MHz to Radiated RF AS402, including cables, than...
- Page 32 RF transmitters, an electromagnetic site survey should be considered. If the measured field strength in the location in which MED-AS402 is used exceeds the applicable RF compliance level above, MED-AS402 should be observed to verify normal operation. If abnormal performance is observed, additional measures may be necessary, such as reorienting or relocating the unit.
-
Page 33: Operation And Safety
■ You want to remove/install any parts 3.2 Thermal The vent hole on the rear cover of MED-AS402 as well as system fans, CPU fan function as a cooling air flow inlet and outlet. These air inlets and outlets transfer heat from inside the computer to the cooler air outside. -
Page 34: Proper Handling
3.5 Proper Handling Handle your MED-AS402 with care. It is made of metal, and has sensitive electronic components inside. Don’t use a damaged MED-AS402. Set MED-AS402 on a stable work surface. - Page 36 CYPRESS TECHNOLOGY CO., LTD. www.cypress.com.tw...
Need help?
Do you have a question about the MED-AS402 and is the answer not in the manual?
Questions and answers