Table of Contents
Advertisement
Quick Links
Manual for Installation, Operation
System Flow Rate
12 Gallons Per Day
24 Gallons Per Day
36 Gallons Per Day
Industry Leader in RO Expertise and Membrane Applications since 1983™
2450 Business Park Dr., Vista, CA 92081
www.appliedmembranes.com
and Maintenance of
Model Number
AAA-125
AAA-245
AAA-365
Systems
(760) 727-3711
sales@appliedmembranes.com
System Flow Rate
50 Gallons Per Day
75 Gallons Per Day
100 Gallons Per Day
Membranes & Chemicals
(760) 727-4427
Model Number
AAA-505
AAA-755
AAA-1005
Filters
Document ID# AAA5-MANUAL
Revision: 06-04-14
Advertisement
Table of Contents

Summary of Contents for Applied Membranes AAA-125
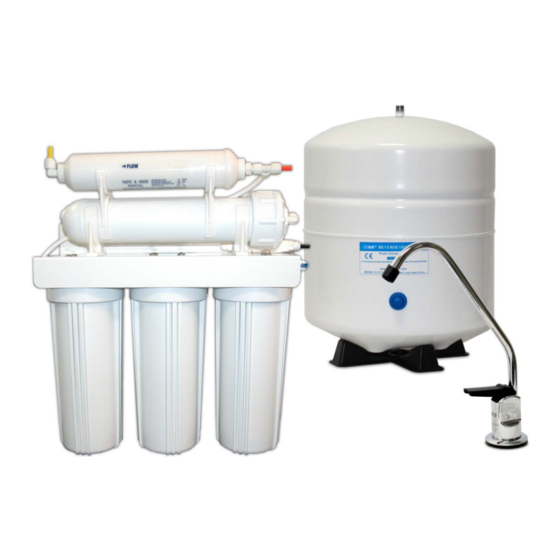
- Page 1 Manual for Installation, Operation and Maintenance of System Flow Rate Model Number System Flow Rate Model Number 12 Gallons Per Day AAA-125 50 Gallons Per Day AAA-505 24 Gallons Per Day AAA-245 75 Gallons Per Day AAA-755 36 Gallons Per Day...
-
Page 2: Conditions For Operation
Introduction Please read this entire service guide prior to beginning installation. The Applied Membranes reverse osmosis drinking water system has been designed for quick and simple installation and maintenance. By carefully reading this instruction manual and following the operational guidelines you will ensure a successful installation and reliable operation. Routine maintenance is essential to the longevity and performance of the system. - Page 3 Black Product Water – Tank From the tee on the post-carbon inlet to the tank inlet/outlet Orange Product Water – Final From the post-carbon outlet to the faucet Yellow Copyright © 2014 Applied Membranes, Inc. Page 3 All Rights Reserved.
-
Page 4: Preparing For Installation
Determine the location for the storage tank. A maximum distance from tank to faucet of 15 feet is possible (additional tubing will be needed). The system will produce a faster flow at the faucet with the shortest tubing run from tank to faucet. Copyright © 2014 Applied Membranes, Inc. Page 4 All Rights Reserved. -
Page 5: System Mounting
Push in the collet against the face of the fitting. With the collet held in this position the tube can be removed. The fitting can then be re-used. Copyright © 2014 Applied Membranes, Inc. Page 5 All Rights Reserved. - Page 6 Installation and Service Manual – Under-the-Counter Point of Use 5 Stage Reverse Osmosis System Copyright © 2014 Applied Membranes, Inc. Page 6 All Rights Reserved.
-
Page 7: Starting Your Installation
Solid Copper Riser Tube: Same procedure as flex tubing except you must cut a piece of the riser tube about ¾” to 1” so the slip joint adapter can fit between faucet and riser tube Copyright © 2014 Applied Membranes, Inc. Page 7 All Rights Reserved. -
Page 8: Drain Saddle Installation
Starting with the ⅛” drill bit, drill a ⅛” hole in the drain pipe. Use the ¼” drill bit to enlarge the hole. Clean the debris from the pipe and the hole before continuing. Copyright © 2014 Applied Membranes, Inc. Page 8... - Page 9 Connect the other end of the black tubing to the ‘out’ side of the flow restrictor on the RO System. NOTE: Some states require the use of an air gap faucet. Check your local plumbing code to assure compliance. Copyright © 2014 Applied Membranes, Inc. Page 9 All Rights Reserved.
-
Page 10: Faucet Installation
Tank Valve in OPEN Position Position Faucet Installation For this, step, you will need: o Wrench Variable speed drill w/ ⅛” and ” drill bits Faucet Assembly Kit Yellow Tubing Copyright © 2014 Applied Membranes, Inc. Page 10 All Rights Reserved. - Page 11 Note: Non-Air Gap Faucet – Comes with the system. (Air Gap may be purchased separately - part number H-T5022.) Some states require the use of an air gap faucet. Check your local plumbing code to assure compliance. Copyright © 2014 Applied Membranes, Inc. Page 11...
-
Page 12: Connect Tubing
Note: Air bubbles may be present in the product water after initial system startup, causing a milky color in the water. This is normal and safe to drink. The air bubbles will disappear within a few days of regular use. Copyright © 2014 Applied Membranes, Inc. Page 12... -
Page 13: System Maintenance
Drain the tank completely, close the faucet to allow tank to fill again, and then drain again. Replace filters and membrane as indicated in the replacement instructions. The post filter should be changed after sanitizing the system. Copyright © 2014 Applied Membranes, Inc. Page 13 All Rights Reserved. -
Page 14: Troubleshooting Chart
Milky colored water Air in the system Air in the system is normal after startup of the RO. Water should lose the milky look within a few days of normal usage. Copyright © 2014 Applied Membranes, Inc. Page 14 All Rights Reserved. -
Page 15: Replacement Parts
H-C9200 For Membrane Housing Housing to Inline Filter Wrench (Membrane Housing) Filter PI480822S H-J2025PW ¼”T x ¼”M Elbow H-B2031W Membrane Fitting, Quick Connect Filter Bracket Housing Clip (Filter In/Out) Copyright © 2014 Applied Membranes, Inc. Page 15 All Rights Reserved. -
Page 16: Product Warranty
Product Warranty SELLER hereby warrants to CUSTOMER that the goods herein described will be free from any liens or encumbrances, that good title to said goods will be conveyed to CUSTOMER by sale of same. SELLER warrants materials of its own manufacture against defects in material and workmanship under normal conditions of usage and service as specified in this manual for one year from whichever of the following events occur first: ...


Need help?
Do you have a question about the AAA-125 and is the answer not in the manual?
Questions and answers