elysia RamperPro Important Before You Start
Camera controller
Hide thumbs
Also See for RamperPro:
- User manual (40 pages) ,
- Tips, tricks and frequently asked questions (4 pages) ,
- Quick start manual (2 pages)
Table of Contents
Advertisement
Quick Links
Important before you start
Published on Elysia Visuals (http://www.elysiavisuals.com)
Important before you start
Properly setup your Canon dSLR
Make sure to set 'External Speedlite control' to "Enable". You also need to make sure that the ISO
and shutterspeed steps are in 1/3 stop increments (and not in 1 stop increments). These are the
default values of your camera, so you are fine if you have never changed them on your camera.
How to power the RamperPro
The RamperPro has no built-in battery. We have done that because we believe that its better to have
options when you want to power the RamperPro. The unit will approximately use 5 Watts. That
means that you will have a very long runtime when you use a LiPo battery like our
battery kit
[1]. There are two ways that you can use to power your RamperPro:
Use a
"USB" battery with a 5V output
RamperPro that you can use to power the unit. This USB port is not a "real" USB port; it is
only there to power the RamperPro from a steady 5V power supply. Some laptops may give
enough power to power the RamperPro, but we don't recommend this because the
RamperPro draws more current than the average USB port of a laptop can deliver.
You can connect any 12V power source to the side of the RamperPro. The RamperPro has a
highly efficient power circuit that can handle input voltages up to 24V. The built-in voltage
meter of the RamperPro will give you feedback about how much juice you have left.
There is a third way that you can use. The RamperPro features two MoCoBus connectors. You can
also provide 12V via these MoCoBus connectors. The use of the MoCoBus is for future use when
more MoCoBus enables motion control hardware will become available on the market. You should
think of MoCoBus enabled stepper motors for example. The RamperPro will then become a fully
featured motion controller.
You can now trigger your camera via USB
Please test if USB triggering works for you. There are cameras that are
not storing their images to their memory card in this mode! This is a new
feature and we love to hear your feedback so that we can improve this
feature where needed.
RamperPro firmware 3068 and higher now support USB triggering of your camera. That means that
you don't always have to connect the remote trigger cable and PC sync cable as described in the
section below. Just connect the USB cable betwen the RameprPro and your camera. Make sure that
USB triggering is configured on your RamperPro! Navigate to the camer1 and camera2 icons in the
system menu (tools icon in the button bar). There you can set the property "Trigger by USB" to true.
We don't recomend to use USB triggering when you want to use two cameras in stereo mode with
your RamperPro. Then its very imporant that both cameras are triggered at the same time; you need
to use the remote trigger cable in that case. We also recommend to use remote trigger cables when
you shoot with 3 or more cameras when you daisy chain multiple RamperPro controllers via the
MoCoBus.
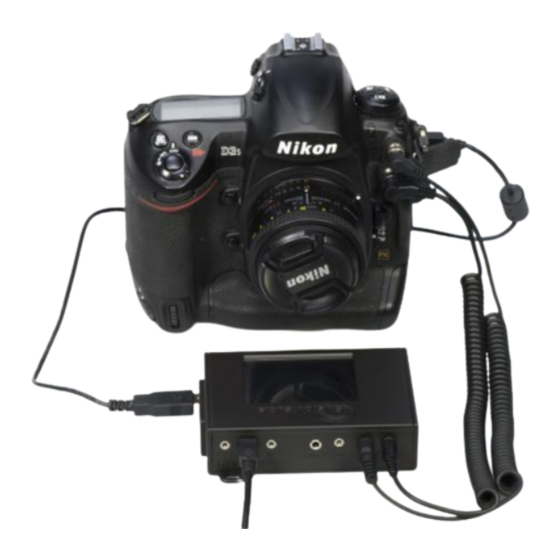
Connect your camera to the RamperPro
You need to connect at least two cables between the RamperPro and your camera if you want to use
the ramping mode of the RamperPro. Note that you only need the trigger cable when you are using
© Elysia Productions. All rights reserved | Telephone +31 6 3473 9959 | email:
[1]. There is a mini USB connection at the back of the
Euro's, including VAT and excluding shipping costs
About us
-
Contact us
RamperPro
visuals@elysia.nl
All shown prices are in
Page 1 of 4
Advertisement
Table of Contents

Related Manuals for elysia RamperPro


Summary of Contents for elysia RamperPro
- Page 1 [1]. There is a mini USB connection at the back of the RamperPro that you can use to power the unit. This USB port is not a "real" USB port; it is only there to power the RamperPro from a steady 5V power supply. Some laptops may give enough power to power the RamperPro, but we don't recommend this because the RamperPro draws more current than the average USB port of a laptop can deliver.
- Page 2 (manual), flash mode (long exposure) etc. on your camera. Here you see the back of the RamperPro. The connections for camera one are at the side of the unit. The connectors for camera two are in the middle of the unit. It doesn't matter which USB port you are using per camera.
- Page 3 That's it! The RamperPro can both be used to make a movie of a sunset or a sunrise. We will only mention sunsets in examples when we are explaining the generic usage of the RamperPro to keep the manual as simple as possible.
- Page 4 Important before you start Published on Elysia Visuals (http://www.elysiavisuals.com) © Elysia Productions. All rights reserved | Telephone +31 6 3473 9959 | email: visuals@elysia.nl All shown prices are in Page 4 of 4 Euro's, including VAT and excluding shipping costs...
Need help?
Do you have a question about the RamperPro and is the answer not in the manual?
Questions and answers