
Related Manuals for Origin Acoustics PROFESSIONAL PC50


Summary of Contents for Origin Acoustics PROFESSIONAL PC50
- Page 1 PROFESSIONAL COLLECTION In-Ceiling Speakers PC50 PC60 PC80 PCSUB8 Installation Manual PC50, PC60, PC80, PCSUB8...
-
Page 2: Table Of Contents
Professional Collection Manual Table of Contents Introduction Certifications & Safety Agency What’s Included Specifications Product Features 70v/100v System Speaker Placement Speaker Wire Wire Routing Painting The Grille Installation Drop Ceiling Installation Troubleshooting Technical Assistance Warranty Return Process... -
Page 3: Introduction
Professional Collection Manual Introduction Thank you for purchasing the Professional Collection speaker. All of Origin Acoustics’ speakers are designed to have excellent sound quality, longevity, and a simple installation process. This instruction booklet covers the necessary information for a smooth installation, including: the tools you will need, step-by-step instructions for installation, troubleshooting tips for any errors that may occur, and all warranty information. -
Page 4: What's Included
Professional Collection Manual What’s Included • Speaker • Grille • Cut-out Template • Tile Bridge (Optional) • Installation Manual SPECIFICATIONS MODEL* PC80 PC60 PC50 PART SPC80000B, SPC80000W SPC60000B, SPC60000B SPC50000B, SPC50000W Woofer 8” IMPP 6 1/ 2 ” IMPP 5 1/ 4 ” IMPP Tweeter 1”... -
Page 5: Product Features
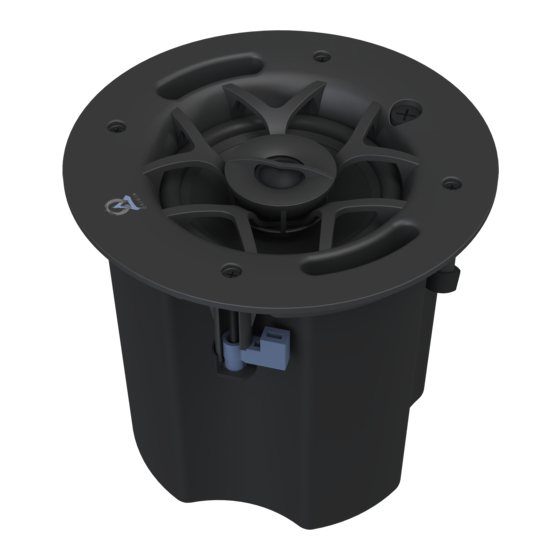
Professional Collection Manual Product Features Enclosure Transformer Tap and Bypass Switch Multi-Motion High Excursion Pivoting™ Tweeter Woofer Magnetic Grille 2 0 1 . 2 m m 7 . 9 2 i n Safety Bracket 4-Pin Terminal Conduit Clamp Connector 2 5 4 . 6 m m 1 0 . -
Page 6: 70V/100V System
70/100-Volt systems are advantageous when the design calls for multiple speakers from the same amplifier and/or long-distance wire runs. The Origin Acoustics 70V/100V loudspeakers feature multiple taps off the transformer adjusted by a rotary switch at the front side of the speaker.. The higher the wattage selected the more output will be generated by the speaker. -
Page 7: Speaker Placement
Professional Collection Manual Wiring Diagram Speaker Placement Speaker placement is determined by several factors like desired SPL, coverage requirements, variance in SPL by location, etc. When the object is to fill a large area with very little variance (+/- 2dB), then a larger number of speakers is required. Typically, once the number of speakers has been determined, placing them equidistant from the walls and from each other will deliver the best result. -
Page 8: Speaker Wire
Professional Collection Manual Speaker Wire The gauge of wire used can have an impact on the performance of your speakers. Generally, speaker wire is determined by the length of the run and wattage utilized. The longer your run is, the smaller the wire gauge must be. On commercial 70 volt systems, 18 gauge, 2 conductor, stranded and jacketed without shield wire is commonly used. -
Page 9: Painting The Grille
Professional Collection Manual Painting the Grille In some situations the speakers may look better if the color matched the walls, ceiling, or trim in the room. This can be accomplished by painting the grille. The grille must be painted with spray paint, and most hardware stores will mix a can of paint to match whatever color you need. -
Page 10: Installation
Professional Collection Manual Installation 1. Cut a hole in the drywall using the supplied cutout template (See figure A) Figure A 2. Connect the wires from your amplifier to the male terminal connector at the rear of speaker. Strip approximately 3/ 1 6” (5mm) of the insulation off each wire. Insert the wire into the correct square` opening on the connector. - Page 11 Professional Collection Manual 4. Make sure all the dog leg (L-shaped) clamps on the speaker are in the upright position and facing to the side, not outwards. Insert the speaker into the hole. Turn the four screws so that the dog legs face outwards and continue turning until they clamp down on the ceiling.
-
Page 12: Drop Ceiling Installation
Professional Collection Manual Drop Ceiling Installation The Tile Bridge, consisting of C-bracket and rails, should be used in suspended ceiling installations involving acoustic ceiling tile 2’ x 2’ or 2’ x 4’ . The Tile Bridge can also be used in installations when the speakers are mounted into material that will not support their weight. - Page 13 Professional Collection Manual NOTES...
-
Page 14: Troubleshooting
If you are considering returning the product, it’s required that you contact Origin Acoustics prior to any return attempts. This way we can determine if the issue can be resolved without returning... -
Page 15: Warranty
Before making any return attempts, it is required that you first contact Origin Acoustics. Return product to Origin Acoustics or your dealer, either in person or by mail. It’s preferable if the product is returned in the original packaging. If this isn’t possible, the customer is responsible for insuring the shipment for the full value of the product. - Page 16 6975 S Decatur Blvd, Las Vegas, NV 89118 • www.originacoustics.com • 844-674-4461 ©2019 Origin Acoustics. All copyrighted, trademarked and patented elements mentioned herein are the sole property of Origin Acoustics.
Need help?
Do you have a question about the PROFESSIONAL PC50 and is the answer not in the manual?
Questions and answers