Table of Contents
Advertisement
Available languages
Available languages
Advertisement
Table of Contents

Related Manuals for Bushnell ImageView 11-8313


Summary of Contents for Bushnell ImageView 11-8313
- Page 1 Model: 11-8313 LIT. #: 98-0393/02-04 11-8313 IMAGEVIEW MANUAL 3/11/04, 2:58 PM...
- Page 2 CONTENTS ENGLISH ...1 FRANÇAIS...11 ESPAÑOL ...23 DEUTSCH...33 ITALIANO ...43 PORTUGUÊS ...53 11-8313 IMAGEVIEW MANUAL 3/11/04, 2:58 PM...
-
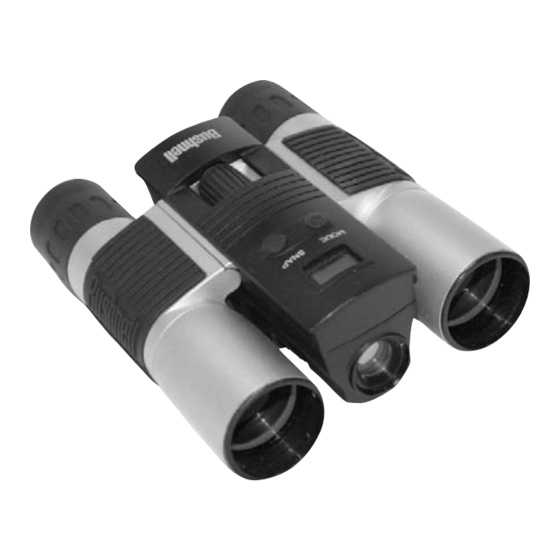
Page 3: Button Descriptions
Congratulations on your purchase of a Bushnell ImageView binocular. Before using the product, please read the instructions contained in this manual and take time to familiarize yourelf with the different parts and features of the product. CAMERA OPERATION INSTRUCTIONS BUTTON DESCRIPTIONS The MODE button has three functions: 1. - Page 4 Press MODE-> press SNAP to capture. 11-8313 IMAGEVIEW MANUAL 10. Low Resolution mode, will cause your pictures to be of a lower resolution, but will allow you to store many more pictures in the camera’s memory. The default setting is Hi. To change the resolution, press the MODE button until you see the “mode”...
- Page 5 Select the STO (Mass Storage) or PCC (PC CAM) mode by pressing the SNAP button. Then press MODE button to confirm and enter next setting. 11-8313 IMAGEVIEW MANUAL c. Select 50 Hz or 60 Hz settings for the camera output by pressing the SNAP button. Then press MODE button to confirm and enter next setting.
-
Page 6: Connecting To The Computer
For OS Windows Me/2000/XP, no need to install software, just plug in and use. Load software prior to connecting your camera to your computer if your OS is Windows 98. 11-8313 IMAGEVIEW MANUAL 10-11 To load software insert CD into your CD-ROW drive and it will self-start. The CD contains the Roxio Photo Suite software as well as the drivers that will allow your computer to recognize your camera. -
Page 7: Warranty Repair
TWO-YEAR LIMITED WARRANTY Your Bushnell® product is warranted to be free of defects in materials and workmanship for two years after the date of purchase. In the event of a defect under this warranty, we will, at our option, repair or replace the product, provided that you return the product postage prepaid. -
Page 8: Description Des Boutons
Merci d’avoir choisi les jumelles Imageview de Bushnell. Avant d’utiliser cet instrument, veuillez lire attentivement ces instructions. INSTRUCTIONS D’UTIILISATION DE L’APPAREIL PHOTO DESCRIPTION DES BOUTONS Le bouton MODE (MODE) a trois fonctions : 1. Mise sous tension : Maintenez le bouton enfoncé jusqu’à ce que l’appareil photo se mette sous tension. - Page 9 LCD au même moment. Appuyez sur MODE-> Appuyez sur SNAP pour prendre la photo. 11-8313 IMAGEVIEW MANUAL 16-17 10. Le mode «Low Resolution» (basse résolution) donne des photos d’une résolution inférieure mais permet d’enregistrer beaucoup plus de photos dans la mémoire de l’appareil. Le réglage par défaut est “Hi”...
- Page 10 SNAP . Appuyez ensuite sur le bouton MODE pour confirmer et entrer le réglage suivant. 11-8313 IMAGEVIEW MANUAL 18-19 c. Sélectionnez 50 ou 60 Hz pour la fréquence de sortie de l’appareil en appuyant sur le bouton SNAP.
-
Page 11: Connexion À L'ordinateur
Pour les systèmes Windows Me/2000/XP , il n’est pas nécessaire d’installer le logiciel ; il suffit de brancher et d’utiliser. 11-8313 IMAGEVIEW MANUAL 20-21 Pour charger le logiciel, introduisez le CD dans le lecteur de CD-ROM et le logiciel se lance de lui-même. -
Page 12: Garantie Limitée De Deux Ans
GARANTIE LIMITÉE DE DEUX ANS Votre produit Bushnell® est garanti exempt de défauts de matériaux et de fabrication pendant deux ans après la date d’achat. Au cas où un défaut apparaîtrait sous cette garantie, nous nous réservons l’option de réparer ou de remplacer le produit, à... -
Page 13: Descripción De Los Botones
Gracias por haber elegido un Imageview de Bushnell. Lea detenidamente las instrucciones antes de usar este producto. INSTRUCCIONES DE FUNCIONAMIENTO DE LA CÁMARA DESCRIPCIÓN DE LOS BOTONES El botón MODE (MODALIDAD) tiene tres funciones: 1. Encendido: Pulse y mantenga pulsado el botón hasta que se encienda la cámara. - Page 14 Pulse MODE-> pulse SNAP para captar. 11-8313 IMAGEVIEW MANUAL 26-27 10. La modalidad de ” Baja Resolución”, hará que sus fotografías tengan una resolución más baja pero le permitirá almacenar muchas más fotografías en la memoria de la cámara. La configuración predeterminada es Hi (Alta).
- Page 15 Seleccione las modalidades STO (Almacenamiento Masivo) o PCC (PC CAM) pulsando el botón SNAP . Luego pulse el botón MODE para confirmarlo e introducir la siguiente configuración. 11-8313 IMAGEVIEW MANUAL 28-29 c. Seleccione la configuración de 50 Hz o 60 Hz para la cámara pulsando el botón SNAP. Luego pulse el botón MODE para confirmarlo e introducir la siguiente configuración.
-
Page 16: Conexión Al Ordenador
Si su Sistema Operativo es Windows 98, cargue el software antes de conectar su cámara al ordenador. Para un SO Windows Me/2000/XP , no necesita instalar ningún software, sólo conéctela antes de usarla. 11-8313 IMAGEVIEW MANUAL 30-31 Para cargar el software, inserte el CD en la unidad de disco CD-ROM y arrancará automáticamente. El CD contiene software Roxio Photo Suite, así... -
Page 17: Garantía Limitada De Dos Años
GARANTÍA LIMITADA DE DOS AÑOS Su producto Bushnell® está garantizado contra defectos de material y fabricación durante dos años a partir de la fecha de compra. En caso de defectos bajo esta garantía, nosotros, a nuestra opción, repararemos o sustituiremos el producto siempre que lo devuelva con portes pagados. -
Page 18: Lcd-Anzeige
Danke, dass Sie sich für eine Bushnell Imageview entschieden haben! Bevor Sie das Produkt zum ersten Mal in Betrieb nehmen, lesen Sie bitte die Anleitung aufmerksam durch. GEBRAUCHSANWEISUNG FÜR DIE KAMERA BESCHREIBUNG DER KNÖPFE Der MODE-Knopf hat drei Funktionen: 1. Power on: Halten Sie den Knopf so lange gedrückt, bis die Kamera sich einschaltet. - Page 19 LCD-Anzeige. MODE drücken-> SNAP drücken, um ein Bild zu machen. 11-8313 IMAGEVIEW MANUAL 36-37 10. Der Modus „Niedrige Auflösung” ergibt Bilder mit geringerer Auflösung, dafür können Sie aber mehr Bilder im Kameraspeicher speichern. Die Kamera-Voreinstellung ist „Hi“. Zum Ändern der Auflösung drücken Sie den MODE-Knopf, bis das „Mode”-Symbol erscheint.
- Page 20 Sie den SNAP-Knopf betätigen. Drücken Sie anschließend den MODE-Knopf zur Bestätigung und zum Übergang auf die nächste Einstellung. 11-8313 IMAGEVIEW MANUAL 38-39 c. Wählen Sie 50 Hz oder 60 Hz Kamera-Output, indem Sie den SNAP-Knopf betätigen. Drücken Sie anschließend den MODE-Knopf zur Bestätigung und zum Übergang auf die nächste Einstellung. Die Kamera ist auf „60“...
- Page 21 Wenn Sie die Betriebssysteme Windows Me/2000/XP , benutzen, ist keine eigene Installation notwendig, schließen Sie einfach die Kamera an - Plug and Use! 11-8313 IMAGEVIEW MANUAL 40-41 Zum Installieren der Softwaren legen Sie die CD in das CD-ROM-Laufwerk, der Installationsvorgang startet von selbst.
- Page 22 ZWEIJÄHRIGE BESCHRÄNKTE GARANTIE Sie erhalten für Ihr Bushnell®-Produkt eine Garantie für einen Zeitraum von zwei Jahren ab dem Kaufdatum. Die Garantie erstreckt sich auf Material- und Herstellungsfehler. Für den Fall, dass ein Mangel im Rahmen dieser Garantie auftritt, werden wir das Produkt nach unserer Wahl reparieren oder austauschen, vorausgesetzt, dass Sie das Produkt freigemacht zurückschicken.
-
Page 23: Descrizione Dei Pulsanti
Grazie per aver scelto il binocolo Bushnell Imageview. Prima di usare il binocolo, leggere attentamente le istruzioni. ISTRUZIONI PER L’USO DELLA FOTOCAMERA DESCRIZIONE DEI PULSANTI Il pulsante MODE ha tre funzioni: 1. Accensione: Premere e tenere premuto il pulsante fino all’accensione della fotocamera. - Page 24 LCD. Premere MODE-> premere SNAP per scattare la foto. 11-8313 IMAGEVIEW MANUAL 46-47 10. In modo “bassa risoluzione” le foto avranno una risoluzione più bassa, ma sarà possibile salvarne di più...
- Page 25 Selezionare il modo STO (memoria di massa) o PCC (PC CAM) premendo il pulsante SNAP . Premere quindi il pulsante MODE per confermare e accedere all’impostazione successiva. 11-8313 IMAGEVIEW MANUAL 48-49 c. Selezionare 50 Hz o 60 Hz per l’uscita della fotocamera premendo il pulsante SNAP. Premere quindi il pulsante MODE per confermare e accedere all’impostazione successiva..
-
Page 26: Collegamento Al Computer
Per i sistemi operativi Windows Me/2000/XP , l’installazione del software non è necessaria; collegare la fotocamera al computer e procedere all’uso. 11-8313 IMAGEVIEW MANUAL 50-51 Per caricare il software, inserire il CD nel lettore CD-ROM; l’operazione si avvierà automaticamente. Il CD contiene il software Roxio Photo Suite e i driver che permettono al computer di riconoscere la fotocamera. - Page 27 GARANZIA LIMITATA PER DUE ANNI Si garantisce che questo prodotto Bushnell® sarà esente da difetti di materiale e fabbricazione per due anni a decorrere dalla data di acquisto. In caso di difetto durante il periodo di garanzia, a nostra discrezione ripareremo o sostituiremo il prodotto purché...
-
Page 28: Display De Lcd
Muito obrigado por selecionar Bushnell Imageview. Leia atentamente as instruções antes de usar este produto. INSTRUÇÕES DE OPERAÇÃO DA CÂMERA DESCRIÇÕES DOS BOTÕES O botão MODE possui três funções: 1. Ligar: pressione e mantenha este bot o pressionado at que a c mera ligue. - Page 29 LCD. Pressionar MODE-> pressionar SNAP para capturar. 11-8313 IMAGEVIEW MANUAL 56-57 10. O modo de “Baixa resolução” fará com que as fotografias sejam de uma menor resolução, mas permitirá armazenar um maior número de fotografias na memória da câmera. O ajuste padrão é Hi (alta resolução).
- Page 30 Selecione o modo STO (Armazenamento de massa) ou PCC (PC CAM) pressionando o bot o. Em seguida pressione o boto MODE para confirmar e passar para a pr xima configura o. 11-8313 IMAGEVIEW MANUAL 58-59 c. Selecione os ajustes de 50 Hz ou 60 Hz para a sa da da c mera pressionando o bot o SNAP. Em seguida pressione o boto MODE para confirmar e passar para a pr xima configura o.
-
Page 31: Conexão Ao Computador
Para carregar o software, insira o CD no leitor de CD-ROM e ele iniciar automaticamente. O CD contm o software Roxio Photo Suite e os drivers que permitir o que o computador reconheça a camera. 11-8313 IMAGEVIEW MANUAL 60-61 Siga as instru es que aparecerem na tela. Caso seu computador não possua a função de AutoReprodução e no rodar os CDs automaticamente, abra o CD na janela “Meu computador”... - Page 32 GARANTIA LIMITADA DE DOIS ANOS Garantimos que seu produto Bushnell® estará isento de defeitos materiais e de fabricação. por dois anos após a data de aquisição. Caso tenha algum um defeito sob esta garantia, iremos a nossa opção, consertar ou trocar este produto desde que o produto seja devolvido com porte pago.
- Page 33 ©2004 Bushnell Performance Optics 11-8313 IMAGEVIEW MANUAL 3/11/04, 3:00 PM...