Table of Contents
Advertisement
Quick Links
Advertisement
Table of Contents

Subscribe to Our Youtube Channel
Related Manuals for Touch Dynamic Quest VIII


Summary of Contents for Touch Dynamic Quest VIII
- Page 1 USER MANUAL Version 1.0 June 2020 Quest VIII...
- Page 2 Copyright Copyright 2020 All Rights Reserved Manual Version 1.0 The information contained in this document is subject to change without notice. We make no warranty of any kind with regard to this material, including, but not limited to, the implied warranties of merchantability and fitness for a particular purpose. We shall not be liable for errors contained herein or for incidental or consequential damages in connection with the furnishing, performance, or use of this material.
- Page 3 Safety Regulatory Information Caution: Only use approved and UL Listed accessories, battery packs and battery chargers. Do NOT attempt to charge damp/wet mobile computers or batteries. All components must be dry before connecting to an external power source. Power Supply Use only the approved power supply output rated 12 VDC and minimum 3 A.
- Page 4 Hearing Aids The wireless device may interfere with some hearing aids. In the event of interference you may want to consult your hearing aid supplier to discuss solutions. Other Medical Devices Please consult your physician or the manufacturer of the medical device, to determine if the operation of your wireless product may interfere with the medical device.
- Page 5 CE Marking and European Economic Area The use of 2.4 GHz WLAN's, for use through the EEA, have the following restrictions: Maximum radiated transmit power of 100 mW EIRP in the frequency range 2.400 -2.4835 GHz France, outside usage is restricted to 2.4 - 2.454 GHz. ...
- Page 6 Battery Caution Risk of explosion if battery is replaced by an incorrectly type. Dispose of used battery according to the local disposal instructions. Waste Electrical and Electronic Equipment (WEEE) English: For EU Customers: All products at the end of their life must be returned to the reseller for recycling.
- Page 7 Revision History Version Date Description Jun 2020 Initial release...
-
Page 8: Table Of Contents
Table of Contents 1 Item Checklist ..........9 Standard Items ................... 9 Optional Items ..................9 2 System View ..........11 Front View ..................11 Rear View ..................12 Specification ..................13 3 Getting Started ......... 15 Power On/Off the System ..............15 Charging the Battery ................ -
Page 9: Item Checklist
Item Checklist Standard Items a. System b. 36W power adapter c. Battery Optional Items VP3300... - Page 10 Augusta Ingenico e. Mini Smart Card II f. Charging cradle g. Battery x 4 h. Hand strap...
-
Page 11: System View
System View Front View Description 2D scanner button 2MP front camera (optional) Programmable capacitive function key Touch screen Ambient light sensor Power On/Off Battery status indicator Speaker... -
Page 12: Rear View
Rear View Description 2D scanner (optional) Battery cover 5MP AF camera (optional) LED flash Location of internal NFC antenna Access cover for audio jack and USB port Docking connector DC-in Dummy cover of peripheral kits... -
Page 13: Specification
Specification System Quest VIII Motherboard Qualcomm 450 Octa-Core 1.8GHz (64bits) System memory 3GB LPDDR3 Flash memory 32G eMMC LCD Touch Panel LCD size 8” IPS LCD Brightness 500 nits Resolution 1200 x 1920 Touch screen P-CAP 5 points Multi-touch Wireless Networking Wireless LAN 802.11 a/b/g/n/ac... - Page 14 System Quest VIII Motherboard Battery & Power Battery 1S2P, 3.85V, 28.69W, 7454 mAh Hot swap battery 300mAh, 3C discharge for swappable Power adapter 12V/36W for tablet charging only Peripherals MSR/ Augusta combo reader/ MSR & Smart card combo reader/ Payment device...
-
Page 15: Getting Started
Getting Started Power On/Off the System Push the power button for 1 second to turn on the system and push it for 4 seconds to turn off the system. Note: For best touch performance, remove the protective plastic overlay from the LCD screen by peeling it away from one of the corners. -
Page 16: Replacing The Battery
Replacing the Battery Power off the tablet. Unplug the AC cable if connected directly to the DC-in port on the tablet. Place the tablet face down on a flat surface. Next, slide the latches up as shown to unlock and release the battery cover. -
Page 17: Installing Peripheral Kits
Installing Peripheral Kits Remove the screws (x4) to release the dummy cover first. Connect the cable to the connector on the system side. Insert the peripheral module in place and fasten the screws (x4) on the back to secure the module. Note: The variety of peripheral kits (MSR/ Augusta combo reader/ MSR &... -
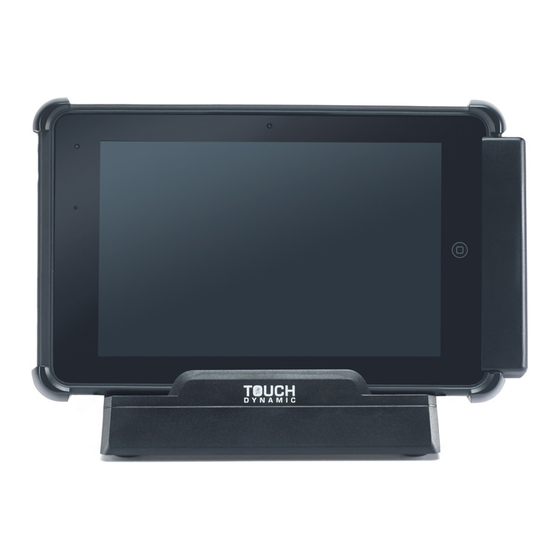
Page 18: Using The Tablet Charger
Using the Tablet Charger Insert the tablet into the slot, then connect the AC adapter to the DC-in input and connect the other end to the power outlet. Attaching the Hand Strap Align and attach the hand strap to the back side of the tablet and fasten the screws (x2) to secure it.
Need help?
Do you have a question about the Quest VIII and is the answer not in the manual?
Questions and answers