Table of Contents
Advertisement
Quick Links
JOBE E-DUNA SUP
OWNERS MANUAL
(UK)
THIS MANUAL MUST BE READ BEFORE USING THIS PRODUCT
SAVE THIS OWNER'S MANUAL! KEEP FOR FUTURE REFERENCE
(FR)
CE MANUEL DOIT ETRE LU AVANT D'UTILISER CE PRODUIT
GARDER LE EN REFERENCE
(ES)
ESTE MANUAL DEBE LEERSE ANTES DE USAR EL PRODUCTO
GUARDAR ESTE MANUAL! TENERLO PARA FUTURAS CONSULTAS.
(NL)
LEES DEZE HANDLEIDING ZORGVULDIG VOORDAT U HET PRODUCT IN GEBRUIK NEEMT
BEWAAR DEZE HANDLEIDING VOOR TOEKOMSTIG GEBRUIK
(PT)
LEIA ESTE MANUAL ANTES DE USAR ESTE PRODUTO
GUARDE ESTE MANUAL DE UTILIZADOR PARA REFERÊNCIA FUTURA
(DE)
DIESE BEDIENUNGSANLEITUNG MUSS VOR DER VERWENDUNG DIESES PRODUKTS
DURCHGELESEN WERDEN
HEBEN SIE DIESE BEDIENUNGSANLEITUNG FÜR ZUKÜNFTIGE FRAGEN AUF
MANUFACTURED BY:
Jobe Sports International
Heerewaardensestraat 30,
6624 KK Heerewaarden
The Netherlands
tel. +31 (0) 487 573090
e-mail: info@jobesports.com
url: www.jobesports.com
MADE IN CHINA - FABRICADO EN CHINA - FABRIQUÉ EN CHINE
Advertisement
Table of Contents

Subscribe to Our Youtube Channel
Related Manuals for JOBE JOBE E-DUNA


Summary of Contents for JOBE JOBE E-DUNA
- Page 1 JOBE E-DUNA SUP OWNERS MANUAL (UK) THIS MANUAL MUST BE READ BEFORE USING THIS PRODUCT SAVE THIS OWNER’S MANUAL! KEEP FOR FUTURE REFERENCE (FR) CE MANUEL DOIT ETRE LU AVANT D’UTILISER CE PRODUIT GARDER LE EN REFERENCE (ES) ESTE MANUAL DEBE LEERSE ANTES DE USAR EL PRODUCTO GUARDAR ESTE MANUAL! TENERLO PARA FUTURAS CONSULTAS.
-
Page 2: Table Of Contents
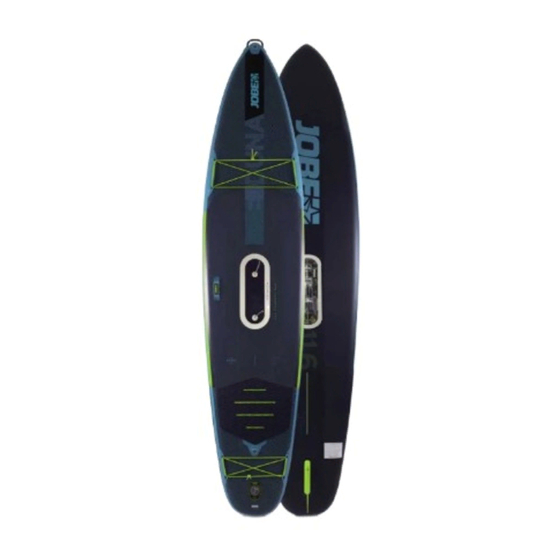
Table of contents Safety warning A word of caution Unpacking & Assembly Drive Batteries & Charging Preparation & Inflation Step by Step preparation guide Compressor Fin assembly Paddle & Remote control Drive operation Packing up Battery charge indicators Troubleshooting Repair kit & Repairs Warranty &... - Page 3 Congratulations on being the proud owner of the new Jobe E-duna SUP Board and welcome to our family. First, a word of appreciation: clearly you have great taste in design and functionality and are an avid watersports fan, so we would like to thank you for purchasing a Board.
-
Page 4: Safety Warning
SAFETY WARNINGS and PRECAUTIONS Please read this Owner’s Instruction Manual in its entirety before using this product and pay special attention to items that include any of the following terms: CAUTION, WARNING, DANGER, IMPORTANT, NOTICE, ONLY, MUST, ALWAYS, DO NOT, and NEVER. SAFETY WARNING PADDLEBoardING CAN BE VERY DANGEROUS AND REQUIRES INTENSE PHYSICAL EFFORT. -
Page 5: A Word Of Caution
WARNING By using this product you agree to accept the risks involved with paddleboarding activity and agree to follow all instructions, cautions, and warnings carefully at all times while using Jobe Sports’ products. WARNING It is the owner’s responsibility to read and understand the this Instruction Manual and to instruct all other users in the safe operation of this product. -
Page 6: Unpacking & Assembly
UNPACKING AND ASSEMBLY Open the board packaging carefully (DO NOT use sharp objects so as not to puncture the SUP) and ensure all the components are included. Immediately upon opening the box your board comes in, verify that it includes all the parts/components: Board inflatable SUP Inflation hose... -
Page 7: Drive
DRIVE The Drive is what sets the board apart from any competitor. It is an integrated combination of compressor with inflation hose and motor with propeller. This is located in a plastic housing with an affixing cover and a protective mesh on the bottom. - Page 8 BATTERIES The battery will arrive with half a charge, so before use it MUST be charged using the included charger according to the directions included. SEE: CHARGING BATTERY. The battery can be transported in the Drive housing, as long as the battery is not connected to the Drive. WARNING During transport and storage the battery MUST NEVER be exposed to temperatures above 120 °F (50 °C ), as this will reduce the battery’s lifespan and it may damage it permanently.
- Page 9 CHARGING THE REMOTE CONTROL’S BATTERY Also charge the remote control’s battery with the included charger in a completely dry environment. Use the included USB charger to charge the remote control’s battery. Make sure the remote control is completely dry. The charger comes with a 5V USB adapter, into which you plug the included charging cable. The charging cable’s other end has a magnetic connector, which you plug into the remote control.
- Page 10 READYING THE SUP Take the bag down to the water’s edge Open the bag and remove the paddle, and assemble the paddle (see step by step guide). Unfold the SUP on a soft, flat surface. Place the Drive next to the SUP on a clean and flat surface (right on the board bag is best).
-
Page 11: Step By Step Preparation Guide
STEP BY STEP PREPARATION GUIDE Open Board valve Pin Down = valve open Pin up = valve closed Make sure safety valve is closed! - Page 12 1-3 unfold the bag and remove 8 connect battery the 3 piece paddle 4 remove fin and inflation hose 9-12 attach inflation hose to drive and board correctly 5 open the board valve 13 assemble the paddle 6 make sure valve pin is in closed 14 attach safety &...
-
Page 13: Compressor
COMPRESSOR The compressor is activated by holding the on/off switch for 3 seconds. Activate the first inflation phase by hol- ding the on/off button for 3 seconds. The first phase lasts about a minute and a half and will automatically shut itself off at the right pressure, but briefly pressing the on/off button will also deactivate the compressor. - Page 14 WARNING Make sure the Drive is inserted in the correct direction, otherwise the motor will propel you BACKWARD instead of forward. Make absolute sure that the dedicated hole for the Drive is clean, with no foreign objects, sand, or dirt. WARNING The inflation hose may become HOT during the operation of the compressor.
-
Page 15: Fin Assembly
FIN ASSEMBLY Attach the fin to your board following the instructions in the pictures. Make sure the fin is pointing in the right direction! Check the water’s depth and make sure the fin is not obstructed. Check the weather and conditions. Mounting the fin The fin can be mounted before or after inflating the board. -
Page 16: Paddle & Remote Control
PADDLE AND REMOTE CONTROL The paddle is collapsible and comes in 3 parts. Put the three parts together and fasten the tightening clips. Many theories exist about the optimal paddle length, so contact a local expert for more information. Now assemble the already charged remote control as indicated in the picture. Attach it to the paddle. (see picture) Front side Back side Insert and tighten screws... -
Page 17: Drive Operation
WARNING: DO NOT submerge the board remote control (which is normally attached onto the top of the paddle) more than necessary. There is no problem if the remote control gets wet or floats on top of the water, but it is not intended to be submerged under the water surface, especially at any significant depth. -
Page 18: Battery Charge Indicators
Put everything in the board bag and fold it up BATTERY CHARGE INDICATORS CAUTION! Clean everything EXCEPT THE INSIDE OF THE Drive. If you’ve been paddling in salt water make sure to rinse the board and the outside of the Drive with fresh water and dry them before transport. Clean the propeller, propeller channel, and protective mesh after every session. -
Page 19: Troubleshooting
TEST THE REMOTE CONTROL’S BATTERY With the Drive off, hold button 2 and click the on/off button Charge level is encoded in a combo of green and red LED, LED: - 4x green = full - 3x green then 1x red = 75% - 2x green then 2x red = 50% - 1x green then 3x red = 25% - 4x red = empty... -
Page 20: Repair Kit & Repairs
Depending on the size of the puncture, it might still be repairable. If you are unsure as to whether a puncture is repairable, contact Jobe and we will advise you about the appropriate steps. - Page 21 PADDLE POSITION FRONT SUP DIRECTION...
- Page 22 ADJUST YOUR PADDLE TO THE RIGHT HEIGHT Correct height Use clip with lever to adjust size Use with logo facing forward...
- Page 23 THREE YEARS WARRANTY. REALLY. THREE YEARS WARRANTY. REALLY. We believe in our brand. For this reason, Jobe inflatables come with 3 years warranty. All you have to do is register your board within 2 weeks online at We believe in our brand. For this reason, Jobe inflatables come with 3 years jobesports.com/happycustomers...
Need help?
Do you have a question about the JOBE E-DUNA and is the answer not in the manual?
Questions and answers