
Subscribe to Our Youtube Channel
Related Manuals for FarmTek 820PC

Summary of Contents for FarmTek 820PC
- Page 1 WEATHERSHIELD CANOPIES Portable Canopies Photo may show a different but similar model. STK# DIMENSIONS ©2008 FarmTek® All Rights Reserved. Reproduction 820PC 8’ W x 20’ L is prohibited without permission. Revision date: 10.10.08...
-
Page 2: Safety Precautions
BEGIN TO ASSEMBLE THE SHELTER. • Never erect the structure under power lines. Thank you for purchasing this FarmTek® shelter. When • Identify whether underground cables and pipes are properly assembled and maintained, this product will present before preparing the site or anchoring the provide years of reliable service. -
Page 3: Assembly Procedure
These words and phrases are common to most joints and to fasten brackets to rafters. FarmTek® shelters and identify the different parts of the shelter. (Some are used in this document. Others may not apply to this particular shelter.) These terms describe the shipped parts and can also be found on the materials list/spec sheets included with the shipment. -
Page 4: Required Tools
WEATHERSHIELD CANOPIES REQUIRED TOOLS ALTERNATIVE ASSEMBLY INFORMATION The following list identifies the main tools needed to These instructions describe assembling the entire roof assemble the shelter. Additional tools and supports may be section of the shelter first. The frame is then lifted and the needed depending on the structure, location, and legs added. - Page 5 WEATHERSHIELD CANOPIES The following graphics and photos will help you identify the different parts. (Some parts are not shown.) CC4595 102191 102192 4-Way Coupler Tie Down 8'' Snugger Ball 3-Way Coupler ADDITIONAL PARTS IDENTIFICATION NOTES In some instances, there can be differences between the parts that are shown and referenced in the instructions and the parts that are shipped with the shelter.
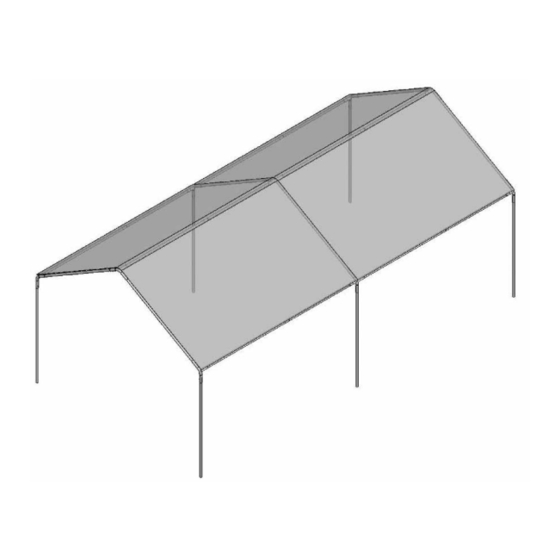
- Page 6 WEATHERSHIELD CANOPIES WeatherShield Canopies Main Cover Installation Note: If the conditions are calm, the main cover can be installed ASSEMBLE THE MAIN ROOF FRAME after the main roof frame is assembled as shown below. This section is an overview of the process for assembling Do not install the main cover during windy or stormy your roof frame.
- Page 7 WEATHERSHIELD CANOPIES INSTALL LEGS This section describes attaching the legs to the roof frame. See illustration below to identify main parts of the frame. 1. Using the leg pipes, insert the legs into the 3-way and 4-way couplers of the main frame. Do not install the 5.
- Page 8 WEATHERSHIELD CANOPIES INSTALL THE MAIN FRAME COVER After the frame is properly squared and anchored, install the main cover. Gather the parts: • Snugger ball tie downs (#CC4595) • Main cover NOTE: Assistance is required to install the main cover. WARNING: To prevent property damage and personal injury, do not install the cover on a windy or stormy day.
-
Page 9: Care And Maintenance
For replacement or missing parts, call 1-800-245-9881 for assistance. NOTE: With the exception of Truss Arch buildings, FarmTek® shelters and greenhouses do not have any tested loading criteria. Outside view 5. After all panels are installed, read the shelter care and maintenance information that follows. - Page 10 WEATHERSHIELD CANOPIES QUICK START GUIDE 8' Wide Portable Canopies Revision date: 10.10.08...
- Page 11 WEATHERSHIELD CANOPIES Revision date: 10.10.08...
- Page 12 WEATHERSHIELD CANOPIES Revision date: 10.10.08...
- Page 13 WEATHERSHIELD CANOPIES Revision date: 10.10.08...
Need help?
Do you have a question about the 820PC and is the answer not in the manual?
Questions and answers