Bosworth Guzzler G2-0501N Operator's Manual
115 vac sappuller double diaphragm pump
Hide thumbs
Also See for Guzzler G2-0501N:
- Operator's manual (12 pages) ,
- Operator's manual (12 pages) ,
- Operator's manual (20 pages)

Related Manuals for Bosworth Guzzler G2-0501N


Summary of Contents for Bosworth Guzzler G2-0501N
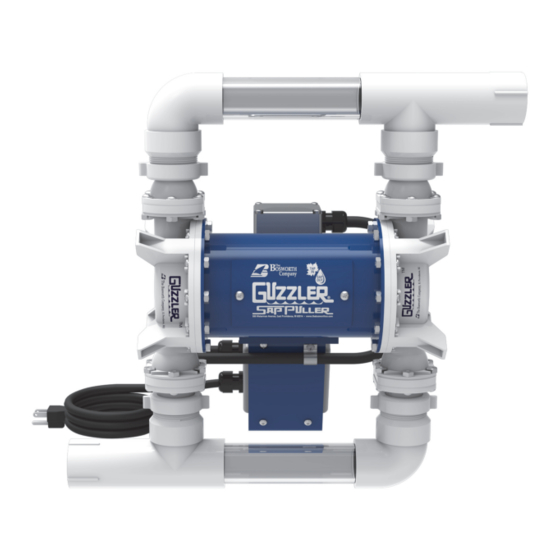
- Page 1 ® G2‐0501N 115 VAC S P ’ M © Copyright 2016 The Bosworth Company Doc M-PR-09-31.111516...
- Page 2 Guzzler G2-0501N SapPuller Pump Exploded 2M 10 10 21 22 6B 6B 7D 7E 7F 10 10 1M Doc M-09-31-111516...
- Page 3 Guzzler G2-0501N SapPuller Pump - Exploded View 1G Pump Inlet Flange: 1‐1/2 in smooth 1M Pump Inlet Manifold 2G Pump Outlet Flange: 1‐1/2 in smooth 2M Pump Outlet Manifold 3B Bu on & Stainless Steel Washer 4 Clevis 4B Connec ng Rod...
- Page 4 Guzzler G2-0501N SapPuller Pump Assembly & Safety Information Assembling your Guzzler G2-0501N SapPuller Pump Your Guzzler G2 SapPuller pump ships with the outlet manifold dis- connected from and packed sepa- rately in the box with the pump. To assemble your pump, simply at-...
-
Page 5: Installation And Operating Information
The Guzzler G2-0501N SapPuller requires 115 VAC power. If power is not readily available, it can be provided from a generator that supports a minimum 200 running wa output. (The motor is rated for 1.44 amps at full load.) Be sure that the generator is actually delivering 115 VAC, as devia ons from this voltage –... - Page 6 Installation and Operating Information The motor on your Guzzler G2‐0501N SapPuller Pump has a built‐in cooling fan to keep the motor from overheat‐ ing. Ensure that the motor has adequate airflow during operation or it will overheat. Even with adequate venti‐ lation, you may notice that the motor becomes uncomfortably hot to touch during pump operation.
- Page 7 Changing the Diaphragm and Valves (Optional) When replacing the diaphragm it is best to remove and repair only one pump body before a emp ng to remove the other body. Close a en on should be paid to the orienta on of various parts. The use of witness marks may be helpful during the reassembly.
-
Page 8: Changing The Diaphragm
Changing the Diaphragm Installing a new Diaphragm 10. Place the new diaphragm onto the clevis and secure it with the bu on (rounded edge side toward diaphragm), washer & screw. Note: Be sure to place the diaphragm on the clevis so that the ridge running along the diaphragm’s circumference is facing toward you. (Figure 11) (The other side of the diaphragm’s outer edge is flat.) Be sure the screw is ght. We recom- mend using blue Loc te on the screw to help ensure it does not come loose during pump opera on. Install the new diaphragm on the clevis. Figure 11 11. Place the pump body up against the dia- phragm and align it with the holes in the housing. (Figure 12) Be sure that the dia- phragm’s outer lip sits in the groove running around the circumference of the pump body. (Figure 13) (Note: Ensure the pump body is installed in the correct orienta on, with the outlet facing up.) ... -
Page 9: Removing The Valve
Changing Pump Valves Each pump body in the Guzzler G2 SapPuller pump features a pair of valves (a total of 4 for the pump). A valve is fastened between the pump body and each of its inlet and outlet ports. (Figure 14) Valves are typically replaced in pairs;... -
Page 10: Installing The Valve
flat side of the valve faces away from the pump body and toward the outlet flange. NOTE: IF THE UMBRELLA VALVES ARE NOT ORIENTED COR- RECTLY IN THE PUMP FLANGES, THE PUMP WILL NOT FUNCTION PROPERLY AND COULD BE DAMAGED UPON OPERATION. Replacement Parts Your Guzzler G2 SapPuller pump comes with a pair of replacement diaphragms. Addi onally, The Bosworth Com‐ pany sells a full line of replacement parts for your pump, including replacement diaphragms and valves. You can order replacement parts directly through your distributor or by going on our website at www.thebosworthco.com Doc M-09-31-111516...
Need help?
Do you have a question about the Guzzler G2-0501N and is the answer not in the manual?
Questions and answers