
Related Manuals for Tennant EZ Rider


Summary of Contents for Tennant EZ Rider
- Page 1 New & Reconditioned Equipment & Parts - www.southeasternequipment.net EZ Ridert t t t Operator Manual 330730 Rev. 03 *330730*...
- Page 2 New & Reconditioned Equipment & Parts - www.southeasternequipment.net This manual is furnished with each new TENNANT Model EZ Ridert. It provides necessary operating and preventive maintenance instructions. Read this manual completely and understand the machine before operating or servicing it.
-
Page 3: Table Of Contents
... TIRES ......EZ Rider 330730 (9- -00) - Page 4 ........EZ Rider 330730 (9- -00)
-
Page 5: Safety Precautions
- - Report machine damage or faulty operation immediately. This machine is designed solely for scrubbing dirt - - Follow mixing and handling and dust in an indoor environment. Tennant does instructions on chemical containers. not recommend using this machine in any other environment. - Page 6 AND ON THE LEFT SIDE OF THE OPERATOR AND UNDERNEATH THE SEAT SUPPORT. COMPARTMENT. FLAMMABLE SPILLS LABEL - - LOCATED ON THE SEAT SUPPORT. FOR SAFETY LABEL - - LOCATED ON THE SEAT SUPPORT. 353451 EZ Rider 330730 (9- -00)
-
Page 7: Operation
We recommend taking advantage 07324 of a regularly scheduled service contract from your TENNANT representative. - Order parts and supplies directly from your authorized TENNANT representative. Use the parts manual provided when ordering parts. EZ Rider 330730 (9- -00) -
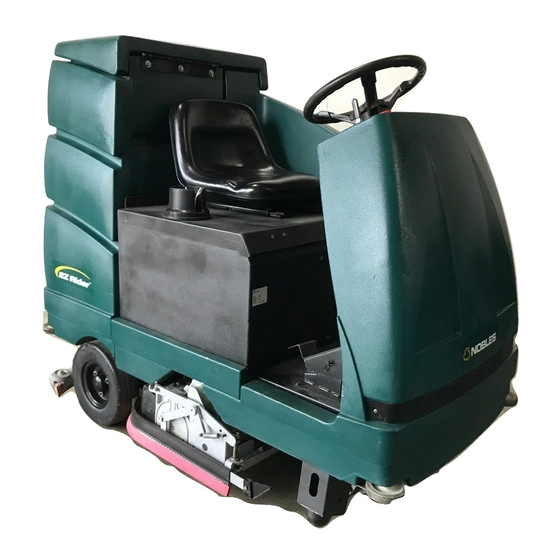
Page 8: Machine Components
A. Solution tank B. Tank Cover C. Vacuum fan inlet screen D. Steering wheel E. Recovery tank F. Operator seat G. Batteries H. Scrub head Side squeegee J. Rear wheel K. Rear squeegee L. Front wheel EZ Rider 330730 (9- -00) -
Page 9: Control Panel Symbols
Battery charge Circuit breaker #2 Scrubbing Circuit breaker #3 Squeegee Circuit breaker #4 Brush pressure Circuit breaker #5 Recovery tank full Circuit breaker #6 Solution flow Circuit breaker #7 Circuit breaker #8 Circuit breaker #9 EZ Rider 330730 (9- -00) -
Page 10: Controls And Instruments
G. Horn button H. Solution flow lever Directional pedal J. Brake pedal K. Parking brake pedal L. Operator seat M. Recovery tank full indicator N. Circuit breaker panel O. Battery discharge indicator P. Scrub switch EZ Rider 330730 (9- -00) -
Page 11: Operation Of Controls
When the machine is moving forward and the directional pedal is reversed, the machine will coast for a short distance before changing direction. Use the brake pedal to stop the machine. EZ Rider 330730 (9- -00) -
Page 12: Steering Wheel
STEERING WHEEL The steering wheel controls the machine’s direction of travel. Left: Turn the steering wheel to the left. Right: Turn the steering wheel to the right. EZ Rider 330730 (9- -00) -
Page 13: On--Off Key Switch
The hourmeter records the number of hours the machine has been operated. Check the hourmeter regularly; this information is used to determine when to perform routine machine maintenance. HORN BUTTON The horn button operates the horn. Sound: Press the button. EZ Rider 330730 (9- -00) -
Page 14: Scrub Switch
The pressure will then return to the minimum setting. Release the scrub switch when the desired setting is indicated on the display. NOTE: When the machine power is turned off, the brush pressure will remain in the last setting used. EZ Rider 330730 (12- -00) -
Page 15: Rear Squeegee Switch
RECOVERY TANK FULL INDICATOR The recovery tank full indicator light will illuminate when the recovery tank is full. NOTE: When the indicator illuminates, all scrubbing functions will shut off automatically. EZ Rider 330730 (9- -00) -
Page 16: Battery Discharge Indicator
Decrease solution flow: Pull the lever backward. NOTE: The machine is equipped with a solenoid valve that automatically stops the solution flow when the directional pedal is in the neutral position or when the scrub head is raised. EZ Rider 330730 (9- -00) -
Page 17: Circuit Breakers
NOTE: Always replace the fuse with a fuse of the same amperage. The fuse is located behind the operator console. Access the fuse by lowering the operator console. Fuse Rating Circuit Protected FU-1 40 A Propelling EZ Rider 330730 (9- -00) -
Page 18: Operator Seat
The squeegee wheel cams adjust the squeegee deflection along the entire length of the squeegee. There are wheel cams at either end of the squeegee. Increase deflection: Turn the cams counter-clockwise. Decrease deflection: Turn the cams clockwise. EZ Rider 330730 (9- -00) -
Page 19: Squeegee Leveling Knob
NOTE: The amount and type of soilage play an important role in determining the type of brushes to be used. For specific recommendations, contact your Tennant representative. When finished scrubbing, clean the recovery tank. EZ Rider 330730 (9- -00) -
Page 20: Pre-Operation Checklist
OPERATION PRE-OPERATION CHECKLIST Perform the following steps before operating the machine: - Check under the machine for leaks. - Check the brakes and steering for proper operation. - Check the squeegees for wear and damage. EZ Rider 330730 (9- -00) -
Page 21: Starting The Machine
2. Turn the machine power on. 3. Release the machine parking brake. 4. Drive the machine to the area to be cleaned. NOTE: The machine will not travel unless the operator is sitting in the operator’s seat. EZ Rider 330730 (9- -00) -
Page 22: Filling The Tanks
3. Turn the machine power off. See the STOP THE MACHINE section of the manual. 4. Set the machine parking brake. FOR SAFETY: Before leaving or servicing machine, stop on level surface, set parking brake, turn off machine, and remove key. EZ Rider 330730 (9- -00) - Page 23 WARNING: Flammable materials can cause an explosion or fire. Do not use flammable materials in tank(s). FOR SAFETY: When using machine, follow mixing and handling instructions on chemical containers. 6. Lower the tank cover. EZ Rider 330730 (9- -00)
-
Page 24: Scrubbing And Brush Information
Cleans without scuffing. Super abrasive bristle scrub brush -- Nylon fiber impregnated with abrasive grit to remove stains and soilage. Strong action on any surface, performing well on buildup, grease, or tire marks. 05939 EZ Rider 330730 (9- -00) - Page 25 Strong action on any surface, performing well on buildup, grease, or tire marks. NOTE: Cylindrical scrub brushes must be installed with the herringbone patterns on the brushes pointing towards each other for best debris pick up. EZ Rider 330730 (9- -00)
-
Page 26: Scrubbing
Use this flow rate for rough floors and heavy or compacted dirt. Decrease flow: Pull the solution flow lever back. Use this flow rate for smooth floors and light dirt. Stop flow: Pull the lever all the way back. EZ Rider 330730 (9- -00) - Page 27 5. Adjust brush pressure for cleaning application. See the SCRUB SWITCH section of the manual. 6. Drive the machine forward and scrub as required. WARNING: Flammable materials or reactive metals can cause explosion or fire. Do not pick up. EZ Rider 330730 (9- -00)
-
Page 28: Double Scrubbing
FOR SAFETY: When using machine, go slow on inclines and slippery surfaces. The maximum rated climb and descent incline with empty tanks is 11_, with full tanks is 4_. FOR SAFETY: Before leaving or servicing machine, stop on level surface. EZ Rider 330730 (12- -00) -
Page 29: Stop Scrubbing
Continue driving the machine forward until the rear squeegee raises, and the vacuum fan shuts off. 2. When the vacuum fan stops, take your foot off the directional pedal. 3. Press the brake pedal to stop the machine. EZ Rider 330730 (9- -00) -
Page 30: Draining And Cleaning The Tanks
4. Set the machine parking brake. FOR SAFETY: Before leaving or servicing machine, stop on level surface, set parking brake, turn off machine, and remove key. 5. Lift the recovery tank draining hose off the retaining hook. EZ Rider 330730 (9- -00) - Page 31 Do not use flammable materials in tank(s). Check the vacuum fan inlet filter daily. Clean inlet filter with a damp cloth or hose when dirty. Allow filter to dry completely before replacing it into machine. EZ Rider 330730 (9- -00)
- Page 32 11. Cylindrical scrub head: Remove and clean the debris trough. Place the trough back in the scrub head when clean. NOTE: The scrub head must be lowered approximately 25 mm (1 in) to remove debris trough. EZ Rider 330730 (9- -00)
-
Page 33: Stop The Machine
3. Turn the machine power off. 4. Set the machine parking brake. FOR SAFETY: Before leaving or servicing machine, stop on level surface, set parking brake, turn off machine, and remove key. EZ Rider 330730 (9- -00) -
Page 34: Post-Operation Checklist
- Check the squeegee suction hose for obstructions. - Cylindrical brushes: Empty and clean the debris tray. - Drain and clean the recovery tank. - Check under the machine for leaks. - Check the service records to determine maintenance requirements. EZ Rider 330730 (9- -00) -
Page 35: Options
3. Connect the QuickMopt attachment to the mounting bracket on the front of the machine. 4. Fasten the latches on the front of the mountng bracket. Release the parking brake and drive to the designated area to be swept. EZ Rider 330730 (9- -00) - Page 36 6. Turn the vacuum and brushes on, lower brushes and begin scrubbing. 7. Remove and refasten the QuickMopt head covers with the easy to remove snaps. Remove the head covers to rotate, shake and clean at regular intervals. EZ Rider 330730 (9- -00)
-
Page 37: Machine Troubleshooting
Reduce scrub brush down pressure Uneven brush pressure, level scrub head Broken brush drive belts on cylindrical scrub head, replace belt Check with TENNANT representative for advice Low battery charge Charge batteries until the charger automatically turns off EZ Rider 330730 (9- -00) -
Page 38: Maintenance
New & Reconditioned Equipment & Parts - www.southeasternequipment.net MAINTENANCE MAINTENANCE EZ Rider 330730 (9- -00) -
Page 39: Maintenance Chart
..Distilled water . . . Special lubricant, Lubriplate EMB grease (TENNANT part no. 01433--1) ..SAE 90 weight gear lubricant NOTE: Also check procedures indicated (H) after the first 50 hours of operation. -
Page 40: Lubrication
STEERING CASTER PIVOT BEARING The steering caster bearing is located on the floorplate. Lubricate with Lubriplate EMB grease (TENNANT part no. 01433--1) every 100 hours. REAR SQUEEGEE CASTERS The rear squeegee casters are located on the back side of the rear squeegee. Lubricate the... -
Page 41: Batteries
If needed, add just enough distilled water to cover the plates. Never add acid to the batteries. Do not overfill. Always keep the battery caps on, except when adding water or taking hydrometer readings. EZ Rider 330730 (9- -00) - Page 42 27_ C (80_ F), the reading must be temperature corrected. Add or subtract to the specific gravity reading 0.004, 4 points, for each 6_ C(10_ F) above or below 27_C(80_ F). EZ Rider 330730 (12- -01)
-
Page 43: Charging The Batteries
DO NOT OVERFILL. The batteries can overflow during charging due to expansion. NOTE: Make sure the battery caps are in place while charging. FOR SAFETY: When maintaining or servicing machine, avoid contact with battery acid. EZ Rider 330730 (9- -00) - Page 44 6. Plug the battery charger into the wall outlet. NOTE: If the red “ABNORMAL CYCLE” lamp lights when the TENNANT charger is plugged into a wall outlet, the charger cannot charge the battery and there is something wrong with the battery.
-
Page 45: Self--Diagnostic Test
Be sure to record which pressure indicators illuminate or blink when each switch is held down. Contact service personnel with the error code data. 5. Turn off the self--diagnostic test by turning off the machine power. EZ Rider 330730 (12- -01) -
Page 46: Electric Motors
Hang pads, or lie pads flat to dry. NOTE: Be sure to replace brushes and pads in sets. Otherwise one brush or pad will be more aggressive than the other. EZ Rider 330730 (12- -00) -
Page 47: Replacing The Disk Brushes Or Pads
3. Remove the cotter pin and washer holding the side squeege in the closed position. 4. Open the side squeege. 5. Turn the scrub brush/pad driver, until you can see the brush/driver spring clip. EZ Rider 330730 (9- -00) - Page 48 9. Flip or replace the scrub pad, center the scrub pad on the pad driver. 10.Replace the center disk to secure the pad in place on the driver. EZ Rider 330730 (9- -00)
- Page 49 14.Check to make sure the brush is securely mounted on the brush drive hub. 15.Close the side squeege, and secure in place with the washer and cotter key. 16.Repeat for the other brush. EZ Rider 330730 (9- -00)
-
Page 50: Cylindrical Brushes
A polish mark will remain on the floor. 4. Raise the scrub head and move the machine away from the chalked area. Turn the machine power off. EZ Rider 330730 (9- -00) - Page 51 B. While holding the flat end of the idler shaft with a wrench, loosen the mounting screw on the outside of the idler door. EZ Rider 330730 (9- -00)
- Page 52 350630 Level the scrub head by turning the scrub head links. Both scrub head links should be adjusted equally. Check the brush patterns again and readjust as necessary until both patterns are the same. EZ Rider 330730 (9- -00)
-
Page 53: Replacing The Cylindrical Brushes
Pull the bottom of the door outward, then pull the idler door and idler plug off the brush. 5. Pull the old brush out of the scrub head. EZ Rider 330730 (9- -00) - Page 54 The idler door of that side of the scrub head is stamped with the same letter. Make sure the letter on the door matches the letter on the scrub head when replacing the doors. EZ Rider 330730 (9- -00)
-
Page 55: Solution System
If the filter becomes dirty, the solution flow will be reduced. Check and clean this filter regularly. NOTE: DO NOT use steam to clean the tanks. Excessive heat can damage the tanks and components. EZ Rider 330730 (9- -00) -
Page 56: Rear Squeegee Assembly
25 mm (1 in) from the floor. 2. Turn the machine power off and set the parking brake. 3. Remove the squeegee suction hose from the squeegee. 4. Remove both squeegee mounting knobs. 5. Pull the squeegee off the machine. EZ Rider 330730 (9- -00) -
Page 57: Replacing The Rear Squeegee Assembly
Turn the squeegee leveling knob clockwise to decrease the deflection at the ends of the squeegee blade. 6. Drive the machine forward with the squeegee down to check the squeegee blade deflection. 7. Readjust the squeegee blade deflection if necessary. EZ Rider 330730 (9- -00) -
Page 58: Adjusting Rear Squeegee Blade Deflection
Turn the squeegee deflection cams counter--clockwise to increase blade deflection. 6. Drive the machine forward again to check the squeegee blade deflection. 7. Readjust the squeegee blade deflection if necessary. EZ Rider 330730 (9- -00) -
Page 59: Adjusting The Squeegee Guide Roller
FOR SAFETY: Before leaving or servicing machine, stop on level surface, set parking brake, turn off machine, and remove key. 3. Loosen the two retainer knobs, one at each end of the squeegee. EZ Rider 330730 (9- -00) - Page 60 5. Pull off the rear squeegee blade. 6. Insert the rotated or new squeegee blade and then insert the retainer band. 7. Tighten the two retainer knobs until the ends of the front and rear squeegee blades touch. Do not over--tighten. EZ Rider 330730 (9- -00)
-
Page 61: Replacing Or Rotating The Front Squeegee Blade
10. Install the squeegee assembly on the squeegee pivot. See REPLACING THE SQUEEGEE ASSEMBLY. 11. Adjust the squeegee blade leveling and deflection as stated in LEVELING THE REAR SQUEEGEE and ADJUSTING REAR SQUEEGEE BLADE DEFLECTION. EZ Rider 330730 (9- -00) -
Page 62: Side Squeegee Blades
4. Slide a new squeegee blade into the frame. 5. Replace the retainer bracket, deflector, clevis pin, and cotter pin. 6. Repeat for the side squeegee on the other side of the scrub head. EZ Rider 330730 (9- -00) -
Page 63: Belts And Chains
500 hours thereafter. The proper deflection should be 3 to 6 mm (0.1 to 0.3 in) between the steering sprocket and the idler sprocket when the steering wheel is turned as far as it will go in either direction. EZ Rider 330730 (12- -01) -
Page 64: Skirts And Seals
VACUUM FAN SEAL The vacuum fan seal is located on top of the vacuum fan under the tank cover. Check the seal for damage and wear after every 100 hours of operation. EZ Rider 330730 (9- -00) -
Page 65: Solution Tank Seal
Check the seal for damage and wear after every 100 hours of operation. RECOVERY TANK SEAL The recovery tank seal is located around the filter, under the tank cover. Check the seal for damage and wear after every 100 hours of operation. EZ Rider 330730 (9- -00) -
Page 66: Brakes And Tires
Remove the cotter key from the brake extension arm, and position the extension arm in the next adjustment hole in the brake link. Insert the cotter key back into the brake extension arm, and check the brake for proper operation. EZ Rider 330730 (12- -01) -
Page 67: Tires
The machine has three tires: one in front, and two in the rear of the machine. All three tires are solid rubber. Check the tires for damage and wear after every 100 hours of operation. EZ Rider 330730 (10- -00) -
Page 68: Pushing, Towing, And Transporting The Machine
FOR SAFETY: When loading machine onto truck or trailer, use winch. Do not drive the machine onto the truck or trailer unless the loading surface is horizontal AND is 380 mm (15 in) or less from the ground. EZ Rider 330730 (9- -00) - Page 69 FOR SAFETY: When unloading machine off truck or trailer, use winch. Do not drive the machine off the truck or trailer unless the loading surface is horizontal AND 380 mm (15 in) or less from the ground. EZ Rider 330730 (9- -00)
-
Page 70: Machine Jacking
FOR SAFETY: When servicing machine, block machine tires before jacking machine up. FOR SAFETY: When servicing machine, jack machine up at designated locations only. Block machine up with jack stands. EZ Rider 330730 (12- -00) -
Page 71: Storage Information
3. Turn the machine power on. 4. Start the solution flow system to circulate the washer solution through the components. 5. The washer solution does not need to be drained from the solution tank. EZ Rider 330730 (9- -00) -
Page 72: Specifications
GENERAL MACHINE PERFORMANCE Item Measure Aisle turnaround width 1840 mm (72.5 in) Travel Speed 9.6 Km (6 mph) Maximum rated climb and descent angle with full tanks Maximum rated climb and descent angle with empty tanks EZ Rider 330730 (9- -00) -
Page 73: Power Type
Size Front (1) Solid 90 mm wide x 250 mm OD (3.5 in wide x 9.8 in OD) Rear (2) Solid 90 mm wide x 310 mm OD (3.5 in wide x 12.3 in OD) EZ Rider 330730 (9- -00) -
Page 74: Machine Dimensions
New & Reconditioned Equipment & Parts - www.southeasternequipment.net SPECIFICATIONS 28 in scrub 820 mm 850 mm (32.25 in) (33.5 in) 1370 mm (54 in) 820 mm 1690 mm (32.25 in) (66.5 in) 353501 MACHINE DIMENSIONS EZ Rider 330730 (9- -00) -
Page 75: Index
Charging the batteries, 41 Steering gear, 61 Circuit breakers, 15 Circuit breakers, 15 Fuse, 15 Control panel, 12 Electrolyte level, Checking, 41 Self--diagnostic test, 43 Symbols, 7 Filling the tanks, 20 Freeze protection, Storage, 69 Fuse, 15 EZ Rider 330730 (9- -00) - Page 76 Pre--operation checklist, 18 Starting the machine, 19 Stop scrubbing, 27 Stopping the machine, 31 Troubleshooting, 35 Machine performance Aisle turnaround width, 70 Climb and descent angles, 70 Machine specifications, 70–73 Machine tie down locations, 67 EZ Rider 330730 (9- -00)
- Page 77 Solution system, 53 Solution tank, 53 Filling the tank, 20 Solution tank seal, 63 Specifications, 70–73 Battery chargers, 71 Electric motors, 71 Machine capacities, 70 Machine dimensions, 70 Machine performance, 70 Power type, 71 Tires, 71 EZ Rider 330730 (9- -00)
- Page 78 Draining and cleaning, 28–31 Filling the tanks, 20 Recovery tank, 53 Solution tank, 53 Tie down location, 67 Tires, 64, 65 Specifications, 71 Towing machine, 66 Transporting machine, 66 Troubleshooting, 35 Vacuum fan, 44 Seal, 62 EZ Rider 330730 (9- -00)
Need help?
Do you have a question about the EZ Rider and is the answer not in the manual?
Questions and answers