Table of Contents
Advertisement
Available languages
Available languages
Quick Links
Anleitung_RB_ID_1050_SPK7__ 19.06.12 15:24 Seite 1
Manual de instrucciones original
m
Taladro Percutor
Original operating instructions
t
Hammer Drill
Manual de instruções original
O
Berbequim com percussão
Originalbetriebsanleitung
k
Schlagbohrmaschine
Art.-Nr.: 42.598.17
Art.-Nr.: 42.598.18
Modelo
I.-Nr.: 11012
1050
I.-Nr.: 11012
RB-ID
Advertisement
Table of Contents

Related Manuals for Robust RB-ID 1050


Summary of Contents for Robust RB-ID 1050
- Page 1 Anleitung_RB_ID_1050_SPK7__ 19.06.12 15:24 Seite 1 Manual de instrucciones original Taladro Percutor Original operating instructions Hammer Drill Manual de instruções original Berbequim com percussão Originalbetriebsanleitung Schlagbohrmaschine Modelo Art.-Nr.: 42.598.17 I.-Nr.: 11012 1050 Art.-Nr.: 42.598.18 I.-Nr.: 11012 RB-ID...
- Page 2 Anleitung_RB_ID_1050_SPK7__ 19.06.12 15:24 Seite 2 Con el fin de evitar que se dañe el engranaje, el conmutador taladro/taladro percutor sólo se deberá cambiar cuando la herramienta se haya detenido por completo To avoid damaging the gearbox, the drill / hammer drill selector switch should only be moved when the machine is at a standstill Para evitar danos na engrenagem, o comutador furar/furar com percussão só...
- Page 3 Anleitung_RB_ID_1050_SPK7__ 19.06.12 15:24 Seite 3...
- Page 4 Anleitung_RB_ID_1050_SPK7__ 19.06.12 15:24 Seite 4...
- Page 5 Anleitung_RB_ID_1050_SPK7__ 19.06.12 15:24 Seite 5...
- Page 6 Anleitung_RB_ID_1050_SPK7__ 19.06.12 15:24 Seite 6 “Aviso - Leer el manual de instrucciones para reducir cualquier riesgo de sufrir daños” Usar protección para los oídos. La exposición al ruido puede ser perjudicial para el oído. Es preciso ponerse una mascarilla de protección. Puede generarse polvo dañino para la salud cuando se realicen trabajos en madera o en otros materiales.
-
Page 7: Instrucciones De Seguridad
Anleitung_RB_ID_1050_SPK7__ 19.06.12 15:24 Seite 7 con toma de tierra como tubos, ¡Atención! calefacciones, fogones y frigoríficos. Existe Al usar aparatos es preciso tener en cuenta una un gran riesgo de descarga eléctrica si su cuerpo serie de medidas de seguridad para evitar lesiones o se halla puesto a tierra. - Page 8 Anleitung_RB_ID_1050_SPK7__ 19.06.12 15:24 Seite 8 partes giratorias del aparato puede producir menor frecuencia y pueden manejarse de forma lesiones. más sencilla. e) Evitar trabajar en una posición corporal g) Respetar estas instrucciones cuando se inadecuada. Adoptar una posición segura y desee utilizar la herramienta eléctrica, los mantener en todo momento el equilibrio.
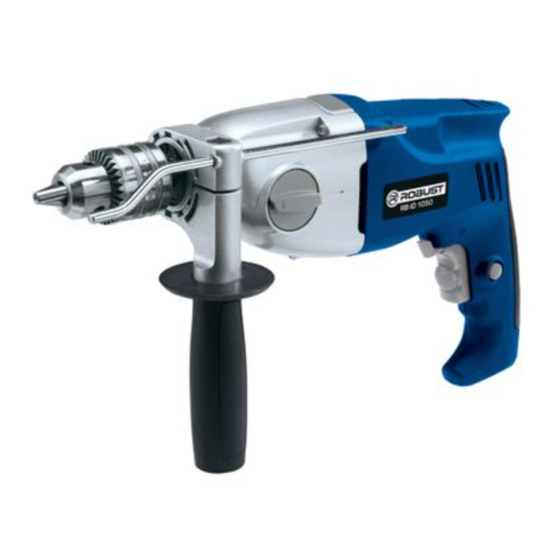
- Page 9 Anleitung_RB_ID_1050_SPK7__ 19.06.12 15:24 Seite 9 2. Descripción del aparato (fig. 1) Tener en consideración que nuestro aparato no está indicado para un uso comercial, industrial o en taller. No asumiremos ningún tipo de garantía cuando se 1. Portabrocas de corona dentada utilice el aparato en zonas industriales, comerciales 2.
-
Page 10: Antes De La Puesta En Marcha
Anleitung_RB_ID_1050_SPK7__ 19.06.12 15:24 Seite 10 excepcionales, variar o superar el valor indicado Primero se debe montar la empuñadura dependiendo de las circunstancias en las que se adicional (8). Para ello, girar la empuñadura para utilice la herramienta eléctrica. abrir bien sujeción de forma que se pueda El valor de emisión de vibraciones indicado puede introducir la empuñadura adicional a través del utilizarse para comparar la herramienta con otras. - Page 11 Anleitung_RB_ID_1050_SPK7__ 19.06.12 15:24 Seite 11 7. Manejo 7.4 Conmutador izquierda/derecha (fig. 8/pos. 7) ¡Conmutar sólo con el aparato parado! Con el conmutador derecha/izquierda (7) se 7.1 Interruptor ON/OFF (fig. 8/pos. 5) cambia la dirección de giro del taladro percutor: En primer lugar, introducir una broca adecuada en el aparato (véase 6.3).
-
Page 12: Cambio Del Cable De Conexión A La Red Eléctrica
Anleitung_RB_ID_1050_SPK7__ 19.06.12 15:24 Seite 12 Para evitar que la broca se desgaste, se 9.2 Escobillas de carbón recomienda lubricar la perforación con un En caso de formación excesiva de chispas, refrigerante adecuado. ponerse en contacto con un electricista especializado para que compruebe las escobillas 7.7.3 Atornillar/soltar tornillos de carbón. - Page 13 Anleitung_RB_ID_1050_SPK7__ 19.06.12 15:24 Seite 13 “Caution - Read the operating instructions to reduce the risk of inquiry” Wear ear-muffs. The impact of noise can cause damage to hearing. Wear a breathing mask. Dust which is injurious to health can be generated when working on wood and other materials. Never use the device to work on any materials containing asbestos! Wear safety goggles.
-
Page 14: Safety Regulations
Anleitung_RB_ID_1050_SPK7__ 19.06.12 15:24 Seite 14 d) Do not use the cable to carry the electric Important! tool, to hang it up or to pull it out of the When using equipment, a few safety precautions socket. Keep the cable away from heat, oil, must be observed to avoid injuries and damage. -
Page 15: Items Supplied
Anleitung_RB_ID_1050_SPK7__ 19.06.12 15:24 Seite 15 4. Usage and treatment of the electric tool its own mains lead. Contact with a live cable will a) Do not overload the appliance. Use the also make the metal parts of the tool live and will correct tool for your work. -
Page 16: Proper Use
Anleitung_RB_ID_1050_SPK7__ 19.06.12 15:24 Seite 16 4. Proper use Drilling in metal Vibration emission value a ≤ 2,5 m/s K uncertainty = 1.5 m/s The drill is designed for drilling holes into wood, iron, non-ferrous metals and rock using the appropriate Additional information for electric power tools bits. -
Page 17: Operation
Anleitung_RB_ID_1050_SPK7__ 19.06.12 15:24 Seite 17 6.1. Fitting the additional handle (Fig. 2-3/Item 8) 7. Operation The additional handle (8) enables you to achieve better stability whilst using the hammer drill. Do not 7.1 ON/OFF switch (Fig. 8/Item 5) use the tool without the additional handle. First fit a suitable drill bit into the tool (see 6.3). -
Page 18: Replacing The Power Cable
Anleitung_RB_ID_1050_SPK7__ 19.06.12 15:24 Seite 18 7.4 Clockwise/Counter-clockwise switch 7.7.3 Inserting/Removing screws (Fig. 8/Item 7) Switch the Drill/Hammer drill selector switch (3) Change switch position only when the drill is to position A (drill). at a standstill! Use a low speed setting Switch the direction of the hammer drill using the clockwise/counter-clockwise switch (7): 7.7.4 Starting holes... -
Page 19: Disposal And Recycling
Anleitung_RB_ID_1050_SPK7__ 19.06.12 15:24 Seite 19 10. Disposal and recycling The unit is supplied in packaging to prevent its being damaged in transit. This packaging is raw material and can therefore be reused or can be returned to the raw material system. The unit and its accessories are made of various types of material, such as metal and plastic. - Page 20 Anleitung_RB_ID_1050_SPK7__ 19.06.12 15:24 Seite 20 “Aviso – Leia o manual de instruções para reduzir o risco de ferimentos” Use uma protecção auditiva. O ruído pode provocar perda auditiva. Use uma máscara de protecção contra o pó. Durante os trabalhos em madeira e outros materiais pode formar-se pó prejudicial à saúde. Os materiais que contenham amianto não podem ser trabalhados! Use óculos de protecção.
-
Page 21: Instruções De Segurança
Anleitung_RB_ID_1050_SPK7__ 19.06.12 15:24 Seite 21 ligadas à terra, como tubos, aquecimentos, Atenção! fogões, frigoríficos. Existe um maior risco de Ao utilizar ferramentas, devem ser respeitadas choque eléctrico, se o seu corpo estiver em algumas medidas de segurança para prevenir contacto com a terra. ferimentos e danos. - Page 22 Anleitung_RB_ID_1050_SPK7__ 19.06.12 15:24 Seite 22 parafusos. Se se encontrar uma ferramenta ou Mantenha os acessórios de corte afiados e chave, numa peça em rotação do aparelho, pode limpos. Os acessórios de corte cuidados e com provocar ferimentos. as arestas de corte afiados encravam-se menos e) Evite posições inadequadas.
- Page 23 Anleitung_RB_ID_1050_SPK7__ 19.06.12 15:24 Seite 23 2. Descrição do aparelho (figura 1) Chamamos a atenção para o facto de os nossos aparelhos não terem sido concebidos para uso comercial, artesanal ou industrial. Não assumimos 1. Bucha de coroa dentada qualquer responsabilidade se o aparelho for utilizado 2.
-
Page 24: Antes Da Colocação Em Funcionamento
Anleitung_RB_ID_1050_SPK7__ 19.06.12 15:24 Seite 24 ferramenta eléctrica, sofrer alterações e em casos percussão através da fixação. Ao rodar a pega para excepcionais ultrapassar o valor indicado. a direita, aperta a fixação. Ao rodar o punho para a esquerda, desaperta a fixação. O valor de emissão de vibração indicado pode ser Primeiro tem de ser montado o punho adicional comparado com o de uma outra ferramenta eléctrica. - Page 25 Anleitung_RB_ID_1050_SPK7__ 19.06.12 15:24 Seite 25 7. Operação Não efectue este ajuste durante a perfuração. 7.4 Comutador para rotação reversível 7.1 Interruptor para ligar/desligar direita/esquerda (figura 8/pos. 7) (figura 8/pos. 5) Comutar apenas com a ferramenta parada! Coloque primeiro uma broca adequada no Ajuste o sentido de rotação do berbequim com aparelho (ver 6.3).
-
Page 26: Eliminação E Reciclagem
Anleitung_RB_ID_1050_SPK7__ 19.06.12 15:24 Seite 26 7.7.2 Furar aço húmido e um pouco de sabão. Não utilize Coloque o comutador furar/furar com percussão detergentes ou solventes; estes podem corroer (3) na posição A (furar). as peças de plástico do aparelho. Certifique-se Para trabalhos em aço, utilize sempre brocas de que não entra água para o interior do aparel HSS (HSS = aço rápido de alta liga) e um ajuste... - Page 27 Anleitung_RB_ID_1050_SPK7__ 19.06.12 15:24 Seite 27 “WARNUNG - Zur Verringerung des Verletzungsrisikos Bedienungsanleitung lesen” Tragen Sie einen Gehörschutz. Die Einwirkung von Lärm kann Gehörverlust bewirken. Tragen Sie eine Staubschutzmaske. Beim Bearbeiten von Holz und anderer Materialien kann gesundheitsschädlicher Staub entstehen. Asbesthaltiges Material darf nicht bearbeitet werden! Tragen Sie eine Schutzbrille.
- Page 28 Anleitung_RB_ID_1050_SPK7__ 19.06.12 15:24 Seite 28 Schlages. Achtung! b) Vermeiden Sie Körperkontakt mit geerdeten Beim Benutzen von Geräten müssen einige Oberflächen, wie von Rohren, Heizungen, Sicherheitsvorkehrungen eingehalten werden, um Herden und Kühlschränken. Es besteht ein Verletzungen und Schäden zu verhindern. Lesen Sie erhöhtes Risiko durch elektrischen Schlag, wenn diese Bedienungsanleitung / Sicherheitshinweise Ihr Körper geerdet ist.
-
Page 29: Sicherheitshinweise Für Bohr- Maschinen
Anleitung_RB_ID_1050_SPK7__ 19.06.12 15:24 Seite 29 haben oder das Gerät eingeschaltet an die Elektrowerkzeuges beeinträchtigt ist. Lassen Stromversorgung anschließen, kann dies zu Sie beschädigte Teile vor dem Einsatz des Unfällen führen. Gerätes reparieren. Viele Unfälle haben ihre d) Entfernen Sie Einstellwerkzeuge oder Ursache in schlecht gewarteten Schraubenschlüssel, bevor Sie das Elektrowerkzeugen. - Page 30 Anleitung_RB_ID_1050_SPK7__ 19.06.12 15:24 Seite 30 Bitte beachten Sie, dass unsere Geräte 2. Gerätebeschreibung (Bild 1) bestimmungsgemäß nicht für den gewerblichen, handwerklichen oder industriellen Einsatz konstruiert wurden. Wir übernehmen keine Gewährleistung, 1. Zahnkranzbohrfutter wenn das Gerät in Gewerbe-, Handwerks- oder 2. Bohrtiefenanschlag Industriebetrieben sowie bei gleichzusetzenden 3.
-
Page 31: Vor Inbetriebnahme
Anleitung_RB_ID_1050_SPK7__ 19.06.12 15:24 Seite 31 Zusätzliche Informationen für Elektrowerkzeuge 6.1. Zusatzhandgriff montieren (Bild 2-3/Pos. 8) Der Zusatzhandgriff (8) bietet Ihnen während der Warnung! Benutzung der Schlagbohrmaschine zusätzlichen Der angegebene Schwingungsemissionswert ist nach Halt. Benutzen Sie das Gerät daher nicht ohne den einem genormten Prüfverfahren gemessen worden Zusatzhandgriff. -
Page 32: Bedienung
Anleitung_RB_ID_1050_SPK7__ 19.06.12 15:24 Seite 32 Einsetzen des Bohrers bzw. Werkzeuges das 7.3 Vorwählen der Drehzahl (Bild 8/Pos. 6) Bohrfutter (1) im Uhrzeigersinn mit dem Der Drehzahl-Regler (6) ermöglicht es Ihnen, die Spannschlüssel (10) fest, bis der Bohrer bzw. maximale Drehzahl zu definieren. Der Ein- das Werkzeug eingespannt ist. -
Page 33: Austausch Der Netzanschlussleitung
Anleitung_RB_ID_1050_SPK7__ 19.06.12 15:24 Seite 33 7.7 Tipps für das Arbeiten mit Ihrer 9. Reinigung, Wartung und Schlagbohrmaschine Ersatzteilbestellung 7.7.1 Bohren von Beton und Mauerwerk Ziehen Sie vor allen Reinigungsarbeiten den Stellen Sie den Bohren/Schlagbohren Netzstecker. Umschalter (3) auf die Position B (Schlagbohren). - Page 34 Anleitung_RB_ID_1050_SPK7__ 19.06.12 15:24 Seite 34 La reimpresión o cualquier otra reproducción de documentos e información adjunta a productos, incluida cualquier copia, sólo se permite con la autorización expresa de ISC GmbH. The reprinting or reproduction by any other means, in whole or in part, of documentation and papers accompanying products is permitted only with the express consent of ISC GmbH.
- Page 35 Anleitung_RB_ID_1050_SPK7__ 19.06.12 15:24 Seite 35 m1 CERTIFICADO DE GARANTIA De las Herramientas Elétricas ROBUST que Comercializa CENCOSUD S.A El producto amparado por esta garantia há sido fabricado de acuerdo a las mas altas normas de calidad. De todos modos en caso de defecto fehacientemente comprobado de alguna parte o mecanismo, la reparación se efectuara sin cargo según las...
- Page 36 Anleitung_RB_ID_1050_SPK7__ 19.06.12 15:24 Seite 36 m1 CERTIFICADO DE GARANTÍA Robust; garantiza toda la línea de productos por un periodo de 3 años contra cualquier defecto de fabricación o funcionamiento. Si el producto ha sido operado en condiciones normales de trabajo, nos comprometemos a remplazar sin costo la o las partes encontradas defectuosas, en cualquiera de nuestros servicios técnicos autorizados,...
-
Page 37: Guarantee Certificate
Anleitung_RB_ID_1050_SPK7__ 19.06.12 15:24 Seite 37 t GUARANTEE CERTIFICATE Dear Customer, In the unlikely event that your device develops a fault, we are truly sorry for this, and suggest that you please contact our service department at the address shown on this guarantee card, or contact the nearest authorised DIY store. - Page 38 Anleitung_RB_ID_1050_SPK7__ 19.06.12 15:24 Seite 38 O CERTIFICADO DE GARANTIA Estimado(a) cliente, Os nossos produtos são submetidos a um rigoroso controlo de qualidade. Se, ainda assim, o aparelho não funcionar nas devidas condições, lamentamos esse facto e pedimos-lhe que se dirija ao nosso serviço de assistência técnica na morada indicada no presente certificado de garantia ou à...
- Page 39 Anleitung_RB_ID_1050_SPK7__ 19.06.12 15:24 Seite 39 k GARANTIEURKUNDE Sehr geehrte Kundin, sehr geehrter Kunde, unsere Produkte unterliegen einer strengen Qualitätskontrolle. Sollte dieses Gerät dennoch einmal nicht ein- wandfrei funktionieren, bedauern wir dies sehr und bitten Sie, sich an unseren Servicedienst unter der auf die- ser Garantiekarte angegebenen Adresse, oder an den nächstgelegenen zuständigen Baumarkt zu wenden.
- Page 40 Anleitung_RB_ID_1050_SPK7__ 19.06.12 15:24 Seite 40 EH 06/2012 (01)
Need help?
Do you have a question about the RB-ID 1050 and is the answer not in the manual?
Questions and answers