Advertisement
Table of Contents
Scan for full manual
Step 1: Check what's in the box
KT-107-INWL enclosure
1 Cardboard cut-out template
1 Quick start guide
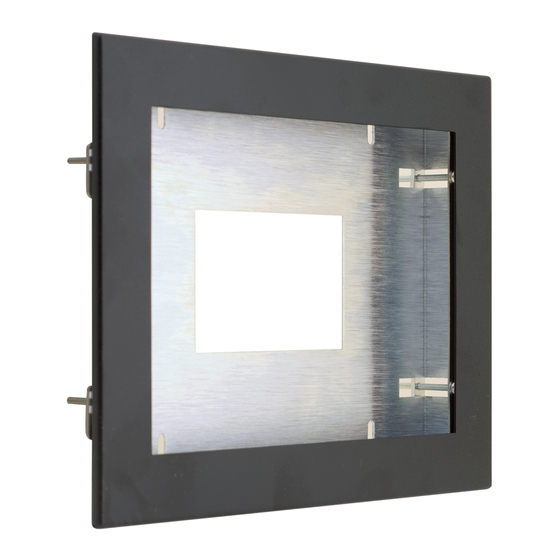
Step 2: Get to know your KT-107-INWL
The KT-107-INWL In-Wall Kit secures KT-107, KT-107RB and KT-107S Touch Panels safely into a wall (drywall, wood, or
concrete).
Step 3: Prepare the surface for installation
For drywall and wooden surfaces:
1. Place the cut-out template (included, use
for drywall and wood installations) over the
surface exactly where you want to install
KT-107-INWL.
2. Mark the inside edge
(W, H: 19.5cm x 15cm) of the template and
cut an opening in the surface according to
the given dimensions.
Kramer is not responsible for any
damage caused to the surface.
For concrete or block wall surfaces:
Use the Kramer KT-107-INWB in-wall box
(purchased separately) for concrete
installations.
1. Make sure that the prepared opening in
the concrete fits the dimensions of the in-
wall junction box.
2. Insert the KT-107-INWB into the opening.
Make sure to place the KT-107-INWB flush
with the plaster surface.
KT-107-INWL Quick Start
KT-107-INWL Quick Start Guide
This guide helps you install and use your KT-107-INWL for the first time.
Go to
www.kramerav.com/downloads/KT-107-INWL
4 4x1/2" screws for wood (packed separately)
4 Inner frame M3x8 screws (packed separately
to download the latest manual and check for updates.
P/N: 2 9 0 0 - 3 0 1 1 5 1 QS
Outer frame
Inner frame
Rev: 2
Advertisement
Table of Contents

Subscribe to Our Youtube Channel
Related Manuals for Kramer KT-107-INWL


Summary of Contents for Kramer KT-107-INWL
- Page 1 Inner frame 1 Quick start guide Step 2: Get to know your KT-107-INWL The KT-107-INWL In-Wall Kit secures KT-107, KT-107RB and KT-107S Touch Panels safely into a wall (drywall, wood, or concrete). Step 3: Prepare the surface for installation For drywall and wooden surfaces: 1.
- Page 2 Step 4: Mount the KT-107-INWL enclosure For each surface type you need to use different screws to mount the KT-107-INWL enclosure. For drywall surfaces: 1. Insert the KT-107-INWL enclosure into the opening. Rear view of drywall screw anchor in the vertical position and tightened, 2.
- Page 3 Step 5: Prepare the Touch Panel for installation Before attaching the touch panel to the KT-107-INWL enclosure, you need to attach the panel-mount plate to the rear side of the Touch Panel and then to the on-wall mount. The panel-mount plate and the on-wall mount are supplied with the Touch Panel.
- Page 4 5. Slide the Touch Panel panel-mount tabs over the grooves on the on-wall mount unit. Step 6: Assemble the Touch Panel Once the KT-107-INWL enclosure is mounted and the Touch Panel prepared, you can mount it onto the KT-107-INWL enclosure. To assemble the Touch Panel: To prevent any damage to the Touch Panel, use the M3x8 screws for attaching the inner frame to the KT-107-INWL enclosure.
Need help?
Do you have a question about the KT-107-INWL and is the answer not in the manual?
Questions and answers