Advertisement
Quick Links
SonicWall 1TB SSD Storage Module
Installation Instructions
This document provides instructions for removing and installing the
SonicWall 1TB SSD storage module in your NSa or NSsp appliance. The
SSD must be installed in the M1 slot on the back of your NSa or NSsp
appliance. There is no need to power down the appliance.
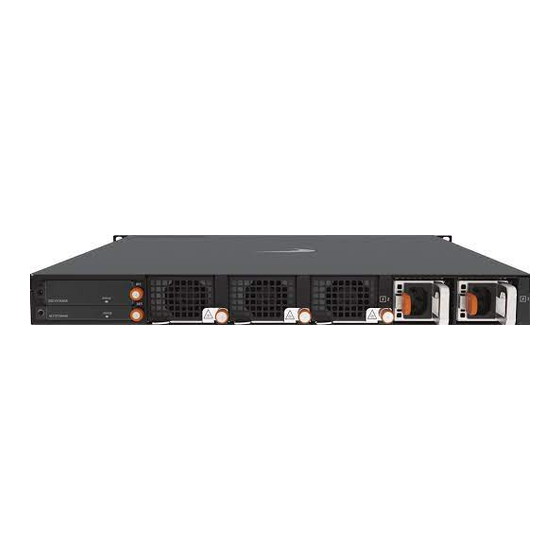
Rear View of the NSa 4700/6700 and NSsp 13700
M1: SSD STORAGE MODULE
CAUTION:
The SSD storage module contains parts and
assemblies susceptible to damage by electrostatic discharge
(ESD). To prevent damage, handle the module using standard
ESD procedures such as storing in an electrostatic bag and
handling while grounded.
For more information on safety and regulatory requirements, refer to
the Safety, Regulatory and Legal Information Guide for the product in
which the SSD storage module is being installed.
Removing the Cover Plate or Defective SSD
To remove the cover plate or defective SSD from the appliance:
1
If there is a cover plate on the M1 slot, but no SSD storage module
inside, loosen the thumb screws on the cover plate.
2
Grip the thumb screws to remove the cover plate, and set it aside.
3
If there is a defective SSD storage module in the slot, use a
screwdriver to loosen and remove the screw on the left side. Then
loosen the thumb screw on the right side and pull it to slide the
SSD storage module out of the appliance.
NOTE:
The cover plate has two thumbscrews to loosen. The new
SSD storage module only has a thumbscrew on the right side. A
screw fits into the hole on the left side.
Installing the SSD
CAUTION:
Do NOT insert anything except the SSD storage
module into the slot labeled for the module (M1). The module
is not designed to fit in the M0 slot.
To install the new SSD storage module in the appliance:
1
Remove the new SSD storage module from the shipping package.
2
Remove the M1 cover plate or the defective SSD storage module
from the appliance. (See previous section.)
3
Insert the new SSD storage module into the empty M1 slot, label
side up.
4
Press the SSD storage module firmly into place to seat the
connectors.
5
Tighten the thumb screw by pushing in and turning to the right.
6
Insert the screw on the left side of the module and tighten with a
screwdriver.
7
Apply the new seal (provided with the SSD) so that it covers the
screw on the left side of the SSD storage module in the M1 slot.
NOTE:
Be sure to apply the FIPS sticker properly over the screw
to ensure warranty protection for the new SSD storage module.
Advertisement

Subscribe to Our Youtube Channel
Related Manuals for SonicWALL 02-SSC-8894

Summary of Contents for SonicWALL 02-SSC-8894
- Page 1 M0 slot. SonicWall 1TB SSD storage module in your NSa or NSsp appliance. The SSD must be installed in the M1 slot on the back of your NSa or NSsp Grip the thumb screws to remove the cover plate, and set it aside.
- Page 2 This SSD storage module is for use only with the SonicWall appliances indicated below. Use of this SSD with a SonicWall appliance that is not approved voids the warranty for that appliance. Contact SonicWall Support for details at https://www.sonicwall.com/support/contact-support. This module, 02-SSC-8894 SONICWALL SSD STORAGE 1TB FOR GEN7 NSA FIREWALLS, is...
Need help?
Do you have a question about the 02-SSC-8894 and is the answer not in the manual?
Questions and answers