Table of Contents
Advertisement
Quick Links
Advertisement
Table of Contents

Subscribe to Our Youtube Channel
Related Manuals for Tesla Smart TRV


Summary of Contents for Tesla Smart TRV
- Page 1 Tesla Smart TRV Thermostat Radiator Valve User guide Set-up and control...
-
Page 2: Table Of Contents
TABLE OF CONTENTS 1. Information about this manual 2. Product Description 3. Device Overview 4. Start-up 4.1 Before we get started. 4.2 Inserting(replacing) batteries 4.3 Set date and time 5. Installation of the radiator thermostat 6. Interface screen 7. Software Installation 8. -
Page 3: Information About This Manual
5-30 °C, and save more than 15% of energy. The device is part of the Tesla Smart system and works with the ZigBee 3.0 protocol. All devices on the system can be configured comfortably and individually with the Tesla smartphone app. -
Page 4: Device Overview
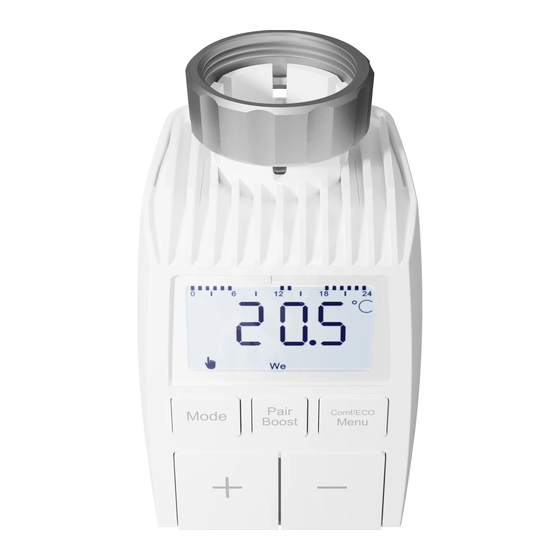
3. Device Overview... -
Page 6: Start-Up
4. Start-up 4.1 Before we get started. • 2 x AA batteries are required for TRV to work, please get prepared. • A smart gateway hub is required for the TRV to work. • Temperature is shown in degrees Celsius. 4.2 Inserting(replacing) batteries •... -
Page 7: Set Date And Time
4.3 Set date and time If batteries are inserted or replaced, the date and time is automatically requested after a brief display of the firmware version number. • Set the year,month,day,hour and minute with the +/- button, and confirm with Menu button. You can press the Boost button to return to the previous menu during the setting of date and time. - Page 8 with a thread size of M30 x 1.5 from the most popular manufacturers such as • Danfoss • Heimeier • MNG • Junkers • Landis&Gyr (Duodyr) • Honeywell-Braukmann • Oventrop • Schlösser • Comap • Valf Sanayii • Mertik Maxitrol •...
- Page 9 5.2 M30 x 1.5 5.2.1 Screw the TRV smart radiator thermostat di- rectly onto the radiator if the connector type is M30 x 1.5(picture shown as below). You can adjust the angle to make the screen facing the viewer properly. 5.2.2 Rotate the thermostat dial to the maximum value, the max value may be 6 or 8.
- Page 10 adapter are lined up with the notches on the valve. 5.3.3 Install the adapter,Plane A is aligned with Plane B. 5.3.4 Install the round tube into the device 5.3.5 Install the device 5.4 Danfoss RAV Valve 5.4.1 Rotate the thermostat dial to the maximum value, the max value may be 6 or 8 5.4.2 Check the is active.
- Page 11 Plane B. 5.4.5 Union nut 5.4.6 Install the device 5.5 Danfoss RA Valve 5.5.1 Rotate the thermostat dial to the maximum value, „N“ Align Dial. 5.5.2 Check the is active. 5.5.3 The valve bodied have elongated notches...
-
Page 12: Interface Screen
around their circumference, which ensure that the adapter is properly seated when it snaps on: snap on the adapter completely,so that the pins inside the adapter are lined up with the notches on the valve. 5.5.4 Install the adapter,Plane A is aligned with Plane B. -
Page 13: Software Installation
7. Software Installation 7.1 Download the Tesla Smart App for your mobile device from App Store or Google Play. 7.2 Search for Tesla Smart 7.3 Download the Tesla Smart app 7.4 Open Tesla Smart App, use your phone number or email address to register and login. If you don’t have Gateway(Hub) installed, tap + on the top right, choose Gateways ->... -
Page 14: Voice Control
8. Voice Control 8.1 Amazon Alexa Amazon Alexa is an intelligent personal assistant developed by Amazon, and is capable of voice inte- raction. Smart radiator thermostat works with Alexa to allow you to regulate the temperature of each room in your system by using a wake-word and an instruction. -
Page 15: Google Home
set-point will change to 18°C but the heating will not start because the room temperature is already higher than 18°C. Common commands for Alexa Listed below are common commands used with Alexa: • Discover Devices: “Alexa, discover devices” • Reduce Temperature: “Alexa, decrease the DEVICE NAME by 4 degrees”... -
Page 16: Product Features
to perform an action such as play music, video playback, report news, access home automation. All of this can all be controlled from a Google Home device. Common commands for Google Home Listed below are common commands used with Google Home: •... -
Page 17: Manual Mode
matic mode, please proceed as follows: • Press the mode button to select ( ) icon • Default temperature: 17°C and 21°C • Temperature range: 5-30°C, step: 0.5°C • App operation: Click the mode icon to select. 9.2 Manual Mode In manual mode, the temperature is controlled in accordance with the current temperature set via ‘+/-’... -
Page 18: Open Window Detection
• Use the ‘+/-’ button to select the temperature for the holiday mode and confirm with the menu button. If you want to end your holiday earlier, press the mode button to cancel the holiday mode. App operation: If you want to end your holiday earlier, click the mode option of the mobile app, and then switch to any mode. -
Page 19: Eco And Comfortable Temperature
temperature of 0.0°C is set in the settings. To adjust the offset temperature, please proceed as follows. • Long press the menu button for 5 seconds, it will enter the setting interface • Select “Offset” option via ‘+/-’ button, and press menu button to enter the offset temperature interface •... -
Page 20: Anti-Freezing Mode
proceed as follows: • Long press the mode button for 5 seconds, it will show LOC symbol on the screen and the device button cannot be used. • Long press the mode button for 5 seconds to unlock child lock App operation: Click the child lock icon in settings. -
Page 21: Anti-Calcification (Descaling) Protection
start the heating stop function, and the device will no longer be able to adjust the temperature. • Press any button to cancel the heating stop functi- on and return to automatic mode. App operation: • Click the Heating stop icon ( ) to turn on/off the function in settings. -
Page 22: Setting
App operation: Click the icon( ) in app to cancel the boost function. 10. Setting Press the menu button for 5 seconds ,enter Setting/ Date/Week programming stage/Open window/ Comfortable temp/ECO temp/Offset/Holiday setting App operation: Click the settings icon( ) in mobile app. -
Page 23: Open Window
with the menu button. • In the menu item “dAy”, use the“+/-” button to select single days of the week, all weekdays, the weekend or the entire week for your heating profile and confirm with the menu button. • Confirm the start time 00:00 pm with the menu button. -
Page 24: Comfortable Temperature
• Temperature range: 5-30 °C, step: 0.5 °C •Use the boost button to return. 10.4 Comfortable Temperature Press the menu button for 5 seconds to open the configuration menu • (Select comfortable temperature icon( ) via the “+/-” button in the menu. •... -
Page 25: Holiday Setting
• Confirm with the menu button. • Select the desired temperature using the “+/-” bu- tton and confirm with the menu button. To confirm, the temperature flashes three times. • Temperature range: -5-5 °C, step: 0.1 °C •Use the boost button to return. 10.7 Holiday Setting Press the menu button for 5 seconds to open the configuration menu. -
Page 26: Reset
12. Reset The device operation: Press the „+“ and „-“ buttons for 5 seconds to enter the reset mode, and the screen will display “FAC”. • Press the menu button to confirm. • Press the boost button to exit. After the device runs reset, the data will not be saved,the device will automatically connect to the gateway 13. -
Page 27: Technical Data
14. TECHNICAL DATA Batteries: 2x 1.5 V LR6/mignon/AA Battery life: 1.5 years Temperature range: 5-30 °C Degree of protection: Ip20 Display: LCD with LED RF: ZigBee Frequency: 2.4GHz Maximum radiated power: 20dBm Dimensions(W x H x D): 55.3 x 54 x 98.3 mm Weight: 190 g (incl. - Page 28 around. Plastic films/bags, pieces of polystyrene, etc. can be dangerous in the hands of a child. Used batteries should not be disposed of with regular domestic waste! Instead, take them to your local battery disposal point. INFORMATION ABOUT DISPOSAL AND RECYCLING This product is marked with the symbol for separate collection.
- Page 29 EU DECLARATION OF CONFORMITY Hereby, Witty Trade s.r.o. declares that the radio equipment type TSL-TRV-TV01 is in compliance with EU directives. The full text of the EU declaration of conformity is available at the following internet address: teslasmart.com/declaration Connectivity: Wi-Fi 2,4 GHz IEEE 802.11b/g/n ZigBee IEEE 802.15.4 Frequency band: 2.400 - 2.4835 GHz (Wi-Fi), 2.400 - 2.480 GHz ZigBee...
- Page 30 Tesla Smart TRV Thermostat Radiator Valve Manufacturer Witty Trade s.r.o. Průmyslová 1472/11, 102 00 Praha, Česká republika www.teslasmart.com...
Need help?
Do you have a question about the Smart TRV and is the answer not in the manual?
Questions and answers