Sena 3S PLUS User Manual
Motorcycle bluetooth
Hide thumbs
Also See for 3S PLUS:
- Quick start manual (17 pages) ,
- Quick start manual ,
- Quick start manual (16 pages)
Table of Contents
Advertisement
Quick Links
Advertisement
Table of Contents

Subscribe to Our Youtube Channel
Related Manuals for Sena 3S PLUS


Summary of Contents for Sena 3S PLUS
- Page 1 3S PLUS Motorcycle Bluetooth ® Communication System User's Guide www.sena.com...
- Page 2 Sena Technologies, Inc. reserves the right to make any changes and improvements to its product without providing prior notice. Sena™ is a trademark of Sena Technologies, Inc. or its subsidiaries in the USA and other countries. SF1™, SF2™, SF4™, SFR™, SRL™, Momentum™, Momentum INC™, Momentum Lite™, Momentum Pro™, Momentum INC Pro™, Momentum EVO™, Cavalry™, Latitude SR™, Latitude SX™, Latitude...
-
Page 3: Table Of Contents
2.2 Universal Microphone Type ......................7 UNIVERSAL INTERCOM ....................15 GETTING STARTED .......................9 3.1 Button Operation ..........................9 FUNCTION PRIORITY ....................16 3.2 Sena Softwares ..........................10 3.2.1 Sena Utility App ....................... 10 10 CONFIGURATION SETTING ..................16 3.2.2 Sena Device Manager ....................10 10.1 Headset Configuration Setting ..................... -
Page 4: Package Contents
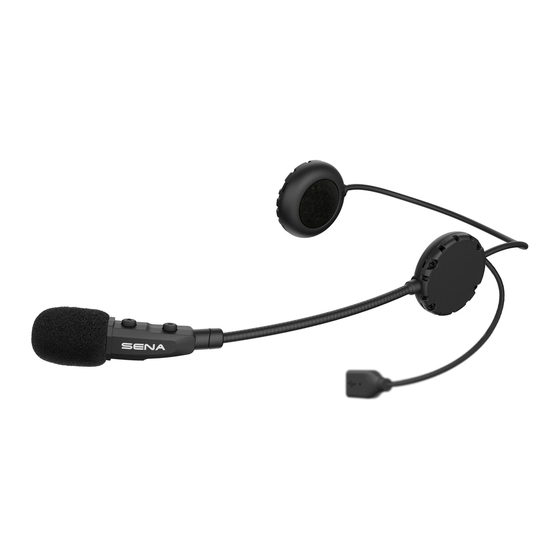
3S PLUS • Microphone Sponges 1 PACKAGE CONTENTS • Hook and Loop Fasteners for Speakers Status LED Pin-hole (–) Button Reset Button • USB Power & Data Cable (USB-C) Speakers (+) Button Microphone DC Power Charging & Firmware Upgrade Port... - Page 5 3S PLUS • Wired Boom Microphone Status LED Pin-hole Reset Button • Hook and Loop Fasteners for Wired Boom Microphone (+) Button • Wired Boom Microphone Sponges Speakers • Wired Boom Microphone Holder • Hook and Loop Fastener for Wired Boom Microphone Holder •...
-
Page 6: Installing The Headset On Your Helmet
3S PLUS 3. Hide the wire under the helmet padding after the installation. 2 INSTALLING THE HEADSET ON YOUR HELMET Boom Microphone Type 1. Peel off the hook fasteners for the speakers and attach them on the back sides of the speakers. -
Page 7: Universal Microphone Type
3S PLUS Universal Microphone Type 3. Locate a suitable surface on the left side of your helmet to attach the unit, clean the location with a moistened towel, and allow to 1. Peel off the hook fasteners for the speakers and attach them on dry thoroughly. - Page 8 3S PLUS 4-1. Attach the hook and loop fastener for the wired boom microphone Note: You can use the wired boom microphone holder after attaching the hook between the internal helmet cheek pad and the internal wall of the and loop fastener for wired boom microphone holder on it to ensure secure helmet shell.
-
Page 9: Getting Started
3S PLUS 4-2. Attach the hook and loop fastener for the wired microphone to the 3 GETTING STARTED inside of the chin guard for full face helmets. Place the wired microphone on the hook and loop fastener. Button Operation (+) Button (–) Button... -
Page 10: Sena Softwares
• Please make sure to take off your headset while charging. The headset automatically turns off during charging. • Any 3rd party USB charger can be used with Sena products if the charger is approved by either the FCC, CE, IC or other locally approved agencies that Sena accepts. -
Page 11: Checking The Battery Level
Bluetooth devices such as a mobile You can raise or lower the volume by tapping the (+) Button or the phone, GPS, MP3 player or Sena SR10 Two-Way Radio Adapter via (-) Button. Volume is set and maintained independently at different Mobile Phone Pairing, Second Mobile Phone Pairing and GPS levels for each audio source, even when the headset is rebooted. -
Page 12: Pairing When The Headset Is Turned Off
3S PLUS Second Mobile Phone Pairing - Second Mobile 3. Search for Bluetooth devices on your mobile phone. Select Sena Phone and SR10 3S PLUS in the list of devices detected. 4. If your mobile phone asks for a PIN, enter 0000. -
Page 13: Mobile Phone Usage
3S PLUS 5. There are several ways to make a phone call: 5 MOBILE PHONE USAGE • Enter numbers on your mobile phone’s keypad and make a call. Then the call is automatically transferred to the headset. • In stand-by mode, press the (+) Button for 3 seconds, to activate Mobile Phone Call Making and Answering the voice dialing of your mobile phone. -
Page 14: Bluetooth Intercom
3S PLUS 6 STEREO MUSIC 7 BLUETOOTH INTERCOM Bluetooth Stereo Music Intercom Pairing 1. To play or pause music, press and hold the (+) Button for 7.1.1 Pairing with Other Headsets for Intercom Conversation 1 second. The headset can be paired with another headset for Bluetooth intercom 2. -
Page 15: Two-Way Intercom
Bluetooth headsets. Non-Sena Bluetooth To terminate an intercom conversation, press and hold the (-) Button headset can be connected to the Sena Bluetooth headset if they for 1 second again. support the Bluetooth Hands-Free Profile (HFP). You can pair the headset with only one non-Sena headset at a time. -
Page 16: Function Priority
3S PLUS 9 FUNCTION PRIORITY 10 CONFIGURATION SETTING The headset operates in the following order of priority: 10.1 Headset Configuration Setting (Highest) Mobile phone 1. To enter configuration menu, press and hold the (+) Button for Intercom 10 seconds until you hear a voice prompt, “Configuration... -
Page 17: Delete All Pairings
Note: The intercom distance of HD Intercom is relatively shorter than that of 10.2 Software Configuration Setting normal intercom. You can change the settings of the headset through the Sena Device Manager or the Sena Utility App. 10.2.4 HD Voice (Default: Enable) 10.2.1 Unit Language... -
Page 18: Voice Prompts (Default: Enable)
The headset supports firmware upgrades. You can update firmware 10.2.6 Advanced Noise Control™ (Default: Enable) using the Sena Device Manager. Please visit Sena Bluetooth website at www.sena.com to check the latest software downloads. When Advanced Noise Control is enabled, the background noise is reduced during an intercom conversation. -
Page 19: Troubleshooting
3S PLUS 12.2 Factory Reset 12 TROUBLESHOOTING If you want to restore the headset to factory default settings, use the Factory Reset in the configuration menu. The headset automatically restores the default settings and turns off. 12.1 Fault Reset When the headset is not working properly, you can easily reset the unit. - Page 20 1.0.0 www.sena.com...
Need help?
Do you have a question about the 3S PLUS and is the answer not in the manual?
Questions and answers