
Subscribe to Our Youtube Channel
Related Manuals for Plockmatic Morgana PowerSquare 160


Summary of Contents for Plockmatic Morgana PowerSquare 160
- Page 1 Morgana PowerSquare™ 160 User Manual Hand Feed English, Issue 1a, July 2019 Doc No. x04123...
- Page 2 © Watkiss Automation Limited 2019 All Rights Reserved. Reproduction, adaptation, or translation without prior written permission is prohibited, except as allowed under the copyright laws. Warranty The information contained in this document is subject to change without notice. Watkiss Automa- tion Limited makes no warranty of any kind with regard to this material, including, but not limited to, the implied warranties of merchantability and fitness for a particular purpose.
-
Page 3: Table Of Contents
Contents 1. Introduction to the PowerSquare 160 ....1 Description of the PowerSquare 160 ..... . .4 2. - Page 4 Empty the Side-Trim Bin .......33 Move the Side-Trimmer ....... .33 Remove and Fit the Side-Trimmer Book Supports .
-
Page 5: Introduction To The Powersquare 160
Introduction to the CHAPTER 1 PowerSquare 160 Thank you for choosing the Morgana PowerSquare™ 160. Your Manual This manual is intended for operators who have been trained on the use of the Morgana PowerSquare™ 160. Operator training is given when the PowerSquare 160 is installed. To make sure you use your PowerSquare 160 correctly, read your manual. - Page 6 1 - Introduction to the PowerSquare 160 - The following operator safety warning labels are on the machine. Label Information Shows danger of crush or cut injuries if fingers or other body parts are inserted into this part of the machine.
- Page 7 1 - Introduction to the PowerSquare 160 - Installation Your PowerSquare 160 must be installed by a Morgana service engineer. Special knowledge is needed to install the machine. CAUTION: Only connect the machine to a mains power supply of the correct voltage with a good earth-connection, as advised by your service engineer at the time of installation.
-
Page 8: Description Of The Powersquare 160
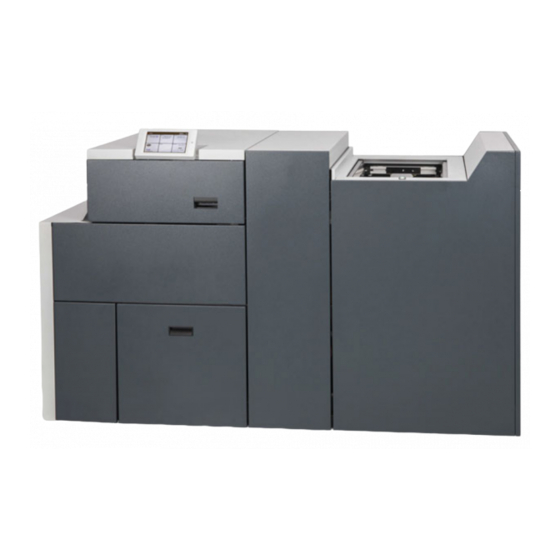
1 - Introduction to the PowerSquare 160 - Description of the PowerSquare 160 Description of the PowerSquare 160 Introduction The PowerSquare processes sets of printed pages into stapled books. The main parts are shown below. An optional Side-Trimmer can be attached. User Interface PowerSquare 160 Trim bin... - Page 9 1 - Introduction to the PowerSquare 160 - Description of the PowerSquare 160 Component - Function Table Component Function The user interface (GUI) The user interface is a colour touch screen where machine settings are entered and where information is displayed. The PowerSquare 160 PowerSquare 160 staples, folds, spine-forms and face-trims the sheets to make a finished book.
- Page 10 1 - Introduction to the PowerSquare 160 - Description of the PowerSquare 160 Component Function Mains power input The mains power input connector is used to connector connect the PowerSquare 160 to mains electrical power. Earth advisory label The label advises that the machine must be connected to an earthing point.
- Page 11 1 - Introduction to the PowerSquare 160 - Description of the PowerSquare 160 The Side-Trimmer FIGURE 4. Side-Trimmer Components Component - Function Table No. Component Function The Top Cover The top cover opens to allow error recovery. The Stacker The stacker collects the finished books. The Trim Bin The trim bin collects the paper that is trimmed from the top and bottom of the book.
- Page 12 1 - Introduction to the PowerSquare 160 - Description of the PowerSquare 160 No. Component Function Fuses The fuses make sure the operator and the machine are protected if there is an electrical problem or short circuit. Rating and serial label The rating label displays the type of machine, serial number, power use and fuse information.
-
Page 13: How To Run The Powersquare 160
How to Run the PowerSquare CHAPTER 2 Introduction This chapter gives information on how to run a job on the PowerSquare 160. Information about the user interface for the PSQ160 is included in “The Touch Screen of the PowerSquare 160” on page 13. This chapter gives information on how to run a job on the PowerSquare 160. -
Page 14: Enter The Job Settings In The Psq160
2 - How to Run the PowerSquare 160 - Enter the Job Settings in the PSQ160 Enter the Job Settings in the PSQ160 CAUTION: Do not operate the touch screen with a sharp object or with too much force. These actions can damage the touch screen. Procedure for a New Job Step Action Information... -
Page 15: Adjust The Stacker
2 - How to Run the PowerSquare 160 - Adjust the Stacker Adjust the Stacker Stacker Adjust the stacker according to the size of the finished book. See “Adjust the Stacker” on page 31. Run the Job Set in the gathering area Green button FIGURE 5. - Page 16 2 - How to Run the PowerSquare 160 - Run the Job Morgana PowerSquare™ 160 User Manual...
-
Page 17: The User Interface
The User Interface CHAPTER 3 The Touch Screen of the PowerSquare 160 Introduction Operate the touch screen with a fingertip. Do not use too much force. A light touch is all that is needed. CAUTION: Do not operate the touch screen with a sharp object or with too much force. -
Page 18: Window Controls
3 - The User Interface - Window Controls Component - Function Table Component Function Job Information The name of the current job is displayed. Touch the job icon to save or load a job. See “Load and Save the Job Settings” on page 25. Status Indicator The status indicator shows the machine condition when the machine is switched on. -
Page 19: The Paper Size Window
3 - The User Interface - The Paper Size Window Icon Function Touch to start the machine. The start button is only shown on screen when it is needed. Use to adjust a value. Touch for small changes. – Touch the value in the middle to open the keypad. Use the keypad to enter values. -
Page 20: The Book Size Window
3 - The User Interface - The Book Size Window Component - Function Table Component Function Standard paper Touch to select a standard paper size. sizes ISO <> IMP Touch to select metric or imperial standard paper sizes. Job mimic Shows the paper orientation for booklet making. - Page 21 3 - The User Interface - The Book Size Window Component - Function Table Component Function Book Width Shows the size of the book after face-trimming. (Face Trim) Auto Book Width Depending on the size of the paper, the PowerSquare 160 will calculate an automatic book width.
-
Page 22: The Book Size Window With Optional P2T Side-Trimmer
3 - The User Interface - The Book Size Window with optional P2T side-trimmer The Book Size Window with optional P2T side-trimmer Component - Function Table Component Function Book Width Shows the size of the book after face-trimming. (Face Trim) Auto Book Width Depending on the size of the paper, the PSQ160 will... -
Page 23: The Advanced Window
3 - The User Interface - The Advanced Window The Advanced Window Component - Function Table Component Function Staple Pitch Use to adjust the staple pitch if needed. The staple pitch is the space between the staples. The machine automatically calculates the staple pitch according to the size of the paper. -
Page 24: The Messages Tile
3 - The User Interface - The Messages Tile Component Function Book Skew Use for adjustment if the finished book is not square. Use the ‘-’ Use the ‘+’ Set Defaults Touch to return the settings in this window Set Defaults to the default values. -
Page 25: The Message Window
3 - The User Interface - The Message Window The Message Window The message window shows 1. an error code 2. the area of the machine 3. the message text. See “Message List” on page 55 for more details. If you need to request technical support, make sure you know the error code(s). -
Page 26: Key Operator Tiles And Windows
3 - The User Interface - Key Operator Tiles and Windows Component Function Current Setup Touch to display the current machine setup. Job List The list of saved jobs. Job Information Displays information about the job. Key Operator Tiles and Windows Touch and hold the Advanced tile to access additional tiles and windows. - Page 27 3 - The User Interface - Key Operator Tiles and Windows Counters This tile has 2 screens. Touch to move between the two screens. The counters display the number of sheets processed and the number of booklet making actions. COUNTS shows the count since last reset. Touch and hold to clear the machine counts.
- Page 28 3 - The User Interface - Key Operator Tiles and Windows Morgana PowerSquare™ 160 User Manual...
-
Page 29: Jobs
Jobs CHAPTER 4 Introduction This chapter describes the standard tasks that are needed in the day-to-day operation of the PowerSquare 160. Load and Save the Job Settings Introduction The current job settings can be saved to the memory and reloaded for use again at a later date. -
Page 30: Adjust The Staple Pitch
4 - Jobs - Adjust the Staple Pitch Adjust the Staple Pitch Introduction The staple pitch is the space between the staples. The machine automatically calculates the staple pitch according to the size of the paper. The staples are inserted symmetrically on the spine of the book. If a non-standard staple pitch is needed, touch the tile to make the Advanced... -
Page 31: Open And Close The Folder Cover
4 - Jobs - Open and Close the Folder Cover Open and Close the Folder Cover When to do If a machine error occurs, or for maintenance. • To access the staple area • To access the folder area. Note The folder cover has an interlock switch. -
Page 32: Lift And Lower The Powersquare 160 Deck
4 - Jobs - Lift and lower the PowerSquare 160 Deck Lift and lower the PowerSquare 160 Deck When to do If a machine error occurs, or for maintenance. • To access the staple head • To access the former area •... -
Page 33: Empty The Trim Bin
4 - Jobs - Empty the Trim Bin Empty the Trim Bin When to do • A message is displayed on the touch screen when the trim bin is full. You can empty the trim bin when you choose. For example, before you start a new job. - Page 34 4 - Jobs - Remove the Trim Bin Drawer Procedure 1. Pull the handle to open the trim bin drawer. 2. Hold the side handles to lift and remove the trim bin. 3. Press in on the tabs on each of the drawer-runners and slide the drawer out. To install the drawer, position the drawer on the runners and push the bin closed.
-
Page 35: Adjust The Stacker
4 - Jobs - Adjust the Stacker Adjust the Stacker The stacker must be adjusted according to the book size. When to do When you start a new job. Catch tray Collection table FIGURE 11. The stacker Book size in window Collection table Orange plastic hand-screw Catch tray... -
Page 36: Raise And Lower The Stacker
4 - Jobs - Raise and Lower the Stacker Raise and Lower the Stacker When to do The stacker can be raised to allow access to other parts of the machine. WARNING: Take care to keep your hands clear of the folding part of the stacker. -
Page 37: Empty The Side-Trim Bin
4 - Jobs - Empty the Side-Trim Bin Empty the Side-Trim Bin When to do • An error message is displayed on the touch screen when the side-trim bin is full. • You can empty the side-trim bin when you choose. For example, before you start a new job. - Page 38 4 - Jobs - Move the Side-Trimmer FIGURE 16. The Side-Trimmer docking latch Procedure Step Action Information Remove the trim bin. See “The Side-Trimmer” on page 7 Raise the Side-Trimmer stacker. See “Raise and Lower the Stacker” on page 32. Use your foot to release the See Figure 16 on page 34.
-
Page 39: Remove And Fit The Side-Trimmer Book Supports
4 - Jobs - Remove and Fit the Side-Trimmer Book Supports Remove and Fit the Side-Trimmer Book Supports There are five removable metal book supports in the side-trimmer. They must be removed when small books are made and fitted for normal applications. When to do •... - Page 40 4 - Jobs - Remove and Fit the Side-Trimmer Book Supports 1. Outer book support, left (marked LH OUT) 2. Inner book support, left (marked LH IN) 3. Centre book support 4. Inner book support, right (marked RH IN) 5. Outer book support, right (marked RH OUT) ...
- Page 41 4 - Jobs - Remove and Fit the Side-Trimmer Book Supports Step 2 - remove the centre book support The centre book support is secured with spring clips. Hold the centre book support with two hands and pull in the direction shown by the arrow until it unclips from the fixings.
- Page 42 4 - Jobs - Remove and Fit the Side-Trimmer Book Supports Step 4 - remove the outer book supports There are two outer book supports. Remove one at a time. Hold each end of the outer book support and lift upwards. Remove the outer book support through the top of the machine.
- Page 43 4 - Jobs - Remove and Fit the Side-Trimmer Book Supports Step 3 - fit the centre book support Hold the outfeed guard open with one hand and slide the centre book support in though the opening. Keep the book support central. See Figure 20 on page 36 The centre book support is secured with spring clips.
-
Page 44: Send A Support File
4 - Jobs - Send a support file Send a support file The PowerSquare 160 can produce a support file to assist with technical support. When to do When instructed by your service engineer. Before you begin If needed enter key operator mode. See “Key Operator Tiles and Windows” on page 22. -
Page 45: Clearing Jams
Clearing Jams CHAPTER 5 This chapter describes how to clear paper jams that can occur in your PowerSquare 160. If a problem continues, contact your Morgana service engi- neer. Morgana PowerSquare™ 160 User Manual... -
Page 46: Paper Jams In The Psq160
5 - Clearing Jams - Paper Jams in the PSQ160 Paper Jams in the PSQ160 Fold and form areas Staple area Trim area Outfeed FIGURE 21. Paper Jam Locations Jam in the Staple Area 1. Open the folder cover. 2. Carefully remove any jammed paper. Do not damage the flights or sensors. 3. - Page 47 5 - Clearing Jams - Paper Jams in the PSQ160 Jam in the Folder or Former Area 1. Open the folder cover. 2. Carefully remove any jammed paper. Do not damage the flights or sensors. If you cannot see the paper in the former area, see “Jam before the Trimmer” on page 43.
- Page 48 5 - Clearing Jams - Paper Jams in the PSQ160 Step Action Information Loosen the trimmer infeed Stand at the trim-bin side of the machine. conveyor. Access to the parts is through the former clamp mechanism. See Figure 22. Hold the shaft and push to the right, against spring pressure to disengage the shaft from the drive pin.
- Page 49 5 - Clearing Jams - Paper Jams in the PSQ160 Jam in the Trim Area Orange Plastic Hand Screw Locking Plate Trim Stop Guard FIGURE 24. Trim Stop Guard Check under here for paper trimmings FIGURE 25. Location of the sensor Step Action Information...
- Page 50 5 - Clearing Jams - Paper Jams in the PSQ160 Step Action Information Close the trim stop Push the trim stop guard into position. guard. Hold the locking plates in position and tighten the orange hand screws. Fit the trim bin drawer. Miscellaneous paper jams If a range of different paper jam problems occur, it can help to clean inside the connecting bridge and the optional two-knife trimmer.
-
Page 51: Troubleshooting
Troubleshooting CHAPTER 6 This chapter describes how to correct problems that can occur on your PowerSquare 160. If a problem continues, contact your Morgana service engineer. PowerSquare 160 Error If a paper jam or other error occurs in the PowerSquare 160, the PowerSquare 160 stops. -
Page 52: General Problems
6 - Troubleshooting - General Problems General Problems The PowerSquare 160 does not start Is the touch screen illuminated? Are error messages displayed on the touch screen? See “Message List” on page 55 Turn OFF and turn ON the PSQ160. If the problem continues, then call your service engineer. -
Page 53: Book Quality Problems
6 - Troubleshooting - Book Quality Problems Book Quality Problems Untidy book problem • The finished book is not tidy • The sheets are not aligned • The book is not folded squarely. Are the covers of the books and the insides of the books made from the same paper-weight and paper-type? Are the different types of paper the same size? You must use paper that is the same size. - Page 54 6 - Troubleshooting - Book Quality Problems Spine form problems Correct spine-form Incorrect spine-form. Incorrect spine-form. The square spine is part The spine is over-formed formed or not formed. and the book is damaged. Is the spine-form different at each end of the spine? Yes No The spine is incorrect along the full length.
- Page 55 6 - Troubleshooting - Book Quality Problems If the problem continues, then call your service engineer. Stapling problems - the book is badly stapled A correctly formed staple: • has equal leg length • has straight legs Is the staple formed correctly? Yes No Call your service engineer The staples should be aligned centrally on the spine.
- Page 56 6 - Troubleshooting - Book Quality Problems Trimming problem - the book is not trimmed Is the option turned off? Face Trim Turn on the Face Trim option. See “Face Trim ON/OFF” on page 17. In the Book Size window, is Book Width turned off? Auto Set the Book Width to...
- Page 57 6 - Troubleshooting - Book Quality Problems Dirty marks on book Are there dirty marks on the spine? Marks on the spine Clean the former roller. See “Clean the Former Roller” on page 65. Are there dirty marks on Marks beside the the cover of the book spine near to the spine?
- Page 58 6 - Troubleshooting - Book Quality Problems Damaged book Normal witness mark left by the form clamp during spine forming. Are there damage marks on the cover of the book near to the spine, from the form clamp, that are worse than the normal witness mark? Run a standard job using 80gsm/20# bond paper.
-
Page 59: Message List
6 - Troubleshooting - Message List Message List About error messages Information and error messages are shown in the Messages tile. The error messages are shown in order of priority. Follow the action needed for the messages, starting with the message at the top of the list. To display more information about a message, touch the Messages tile to open the Message window. - Page 60 6 - Troubleshooting - Message List Node Information Inverter Use the mains ON/OFF switch. Turn the machine OFF, then turn the machine ON. There is a problem with the optional Side Trimmer. Open the top cover of the side trimmer and check for paper trimmings or obstructions.
- Page 61 6 - Troubleshooting - Message List Error Operator Message Text Information Code E41.128.x Jam at Side Trim Infeed Open and then close the top cover of the side- trimmer. E41.129.x Jam at Side Trim Outfeed Then, if necessary, open the top cover of the E41.130.x Jam in Side Trim side-trimmer and check for paper trimmings or...
- Page 62 6 - Troubleshooting - Message List Error Operator Message Text Information Code E5.10C.x P2T Offline Check that the Side Trimmer mains power (see p.7) input cable and the communications cable are connected. Use the side-trimmer mains ON/OFF switch. Turn the side-trimmer OFF, wait at least 5 seconds and then turn the side-trimmer ON.
- Page 63 6 - Troubleshooting - Message List Error Operator Message Text Information Code E64.30E.x Jam in Trim Area There is a book jammed in the trim area. (see p.45) Open the trim bin and the trim stop guard to remove the book. E64.40D.x Jam before Trimmer There is a book jammed before the trimmer.
-
Page 64: Change The Fuses - Powersquare 160
6 - Troubleshooting - Change the Fuses - PowerSquare 160 Change the Fuses - PowerSquare 160 Introduction The PowerSquare 160 has two fuses at the mains power input. See Figure 3 on page 5. If either fuse is broken, the PowerSquare 160 will not operate. WARNING: Turn OFF the machine and remove the mains power supply cable before you change the fuses. -
Page 65: Change The Fuses - Side-Trimmer
6 - Troubleshooting - Change the Fuses - Side-Trimmer Change the Fuses - Side-Trimmer Introduction The Side-Trimmer has two fuses at the power input connector. See Figure 3 on page 5. If either fuse is broken, the Side-Trimmer will not operate. WARNING: Turn OFF the machine and remove the mains power supply cable before you change the fuses. - Page 66 6 - Troubleshooting - Change the Fuses - Side-Trimmer Morgana PowerSquare™ 160 User Manual...
-
Page 67: Maintenance
Maintenance CHAPTER 7 Service Interval The PowerSquare 160 must be serviced every twelve months. Only a Morgana service engineer can service the PowerSquare 160 or optional Side-trimmer. Contact your supplier for further information. Operator Maintenance - PowerSquare 160 and Side-Trimmer Correct maintenance by the operator makes sure that •... -
Page 68: Clean The Powersquare 160
7 - Maintenance - Clean the PowerSquare 160 Operator Maintenance Plan Interval Task Reference • Every week Clean the machine. See page 64. Clean the optional side-trimmer See page 72. • When needed Clean the former roller. See page 65. Clean the polyurethane strips in See page 67. -
Page 69: Clean The Former Roller
7 - Maintenance - Clean the Former Roller Clean the Former Roller When to do Clean the former roller if the spines of the books are dirty. Ink and toner can collect on the former roller. FIGURE 26. Dirty marks on the spine Materials needed •... - Page 70 7 - Maintenance - Clean the Former Roller Step Action Information Clean the roller. Use one hand to hold the fold rollers open. With the other hand, hold the cloth against the roller and push the roller along until it is clean all the way round.
-
Page 71: Clean The Polyurethane Strips In The Form Clamp
7 - Maintenance - Clean the Polyurethane Strips in the Form Clamp Clean the Polyurethane Strips in the Form Clamp When to do Clean the polyurethane strips in the form clamp if there are dirty marks near the spine on the front and back cover of the book. Ink and toner can collect on these parts, especially when you make thin books. -
Page 72: Clean The Trimmings-Removal Fingers
7 - Maintenance - Clean the Trimmings-removal Fingers Clean the Trimmings-removal Fingers When to do Clean the trimmings-removal fingers if there are small, dirty marks on the book. Ink and toner can collect on the trimmings-removal fingers and cause marks on the book. - Page 73 7 - Maintenance - Clean the Trimmings-removal Fingers Procedure Step Action Information Lift the PowerSquare 160 main See “Lift and lower the PowerSquare deck. 160 Deck” on page 28. Remove the trim bin drawer. See “Remove the Trim Bin Drawer” on page 29.
-
Page 74: Install New Staple Cartridges
7 - Maintenance - Install new Staple Cartridges Install new Staple Cartridges When to do • When the staple cartridge is empty. Materials needed • Part Number 810-027 staple cartridge. Procedure Step Action Information Open the folder cover. See “Open and Close the Folder Cover” on page 27. -
Page 75: Clear Paper From The Trim Stop
7 - Maintenance - Clear paper from the trim stop Clear paper from the trim stop When to do • Clear paper from the trim stop if the books are not trimmed square. If paper trimmings collect on the trim stop, the books are not trimmed square. Orange Plastic Hand Screw Locking Plate Trim Stop Guard... -
Page 76: Clean The Side-Trimmer
7 - Maintenance - Clean the Side-Trimmer Clean the Side-Trimmer We recommend that you clean the Side-Trimmer every week to remove surface dust. CAUTION: Only clean the machine with materials that are recommended in this manual. Do not use other chemicals or abrasive material. Use a moist cloth to clean the outside of the Side-Trimmer. -
Page 77: Clean The Outfeed Lower Guide
7 - Maintenance - Clean the Outfeed Lower Guide Clean the Outfeed Lower Guide When to do There are repeated book jams in the booklet-making system. Materials needed • Cleaning cloth. • Household spray polish that contains silicone. Procedure Top Cover Outfeed Guard FIGURE 35. - Page 78 7 - Maintenance - Clean the Outfeed Lower Guide Morgana PowerSquare™ 160 User Manual...
-
Page 79: Specifications
Specifications CHAPTER 8 PowerSquare 160 Operating Conditions 10-35°C at 35-85% relative humidity, up to 3000m amsl Production Cycle time: Printer dependent Minimum interset gap: 3.0 seconds (7.4 in integrity mode) Minimum set time: 6.0 seconds (7.5 in integrity mode) Typical set time: depending on job settings Stock Sizes Minimum input size: 200 x 200mm Maximum input size: 370 x 620mm... - Page 80 8 - Specifications - PowerSquare 160 Maximum rotation sheet size: 353 x 252mm Minimum rotation sheet size: 215 x 200mm The cross-track dimension of the sheet (before rotation) must be at least 15mm greater than the in-track dimension. Staple & fold line 200mm indicates original lead edge 353x 252mm...
- Page 81 8 - Specifications - PowerSquare 160 Stacker Capacity Output conveyor: 20 standard books* Paper Input Requirements Input sheets must be of consistent size and cut square. Machine must be set to match paper size at the input to PowerSquare 160. Book quality is dependent upon quality of input sheets.
-
Page 82: P2T Two Knife Trimmer
8 - Specifications - P2T Two Knife Trimmer Approvals Complies with CE and TÜV/UL. Conforms to FCC rules Part 15 Class A and VCCI Class A. Patents GB.2360013, EP.1138521, US.6692208, JP.5059997 GB.2401820, EP.1479258, US.7325799, JP.4887449 Other patents pending Radio Frequency Emissions This equipment has been tested and found to comply with the limits for a Class A digital device, pursuant to part 15 of the FCC Rules. - Page 83 8 - Specifications - P2T Two Knife Trimmer Book Size Minimum book size: 120 x 80mm Maximum book size: 380 x 310mm 310mm 80mm 120mm 380mm Book Thickness Maximum book thickness: 10.4mm (approx 208 pages 80gsm) Minimum book thickness: one sheet folded to make a 4-page booklet Trimming Minimum trim width: 120mm Maximum trim width: 380mm (no trim);...
- Page 84 8 - Specifications - P2T Two Knife Trimmer Noise Emission stand-by: ambient in operation: 65 dB (A), peak 79 dB (A Approvals Complies with CE and UL. Conforms to FCC rules Part 15 Class A and VCCI Class A. Radio Frequency Emissions This equipment has been tested and found to comply with the limits for a Class A digital device, pursuant to part 15 of the FCC Rules.
-
Page 85: Declaration Of Conformity
9 - Declaration of Conformity - Watkiss PowerSquare™ 160 Declaration of Conformity CHAPTER 9 Watkiss PowerSquare™ 160 (According to ISO/IEC 17050-1) This declaration of conformity is issued under the sole responsibility of the manufacturer. Name of Manufacturer: Watkiss Automation Limited Address of Manufacturer: Watkiss House, Blaydon Road, Sandy, SG19 1RZ United Kingdom Object of the declaration:... -
Page 86: Watkiss P2T Two Knife Trimmer
9 - Declaration of Conformity - Watkiss P2T Two Knife Trimmer Watkiss P2T Two Knife Trimmer (According to ISO/IEC 17050-1) This declaration of conformity is issued under the sole responsibility of the manufacturer. Name of Manufacturer: Watkiss Automation Limited Address of Manufacturer: Watkiss House, Blaydon Road, Sandy, SG19 1RZ United Kingdom Object of the declaration: Watkiss P2T 2-Knife Trimmer... -
Page 87: Approvals
10 - Approvals - Approvals CHAPTER 10 Morgana PowerSquare™ 160 User Manual... - Page 88 10 - Approvals - Morgana PowerSquare™ 160 User Manual...
- Page 89 10 - Approvals - Morgana PowerSquare™ 160 User Manual...
- Page 90 10 - Approvals - Morgana PowerSquare™ 160 User Manual...
- Page 91 10 - Approvals - Morgana PowerSquare™ 160 User Manual...
- Page 92 10 - Approvals - Morgana PowerSquare™ 160 User Manual...
-
Page 93: Appendix
Appendix Image Creep About Image Creep When a stack of paper is folded to make a booklet, the thickness of the paper causes a progressive image movement between the inner-most and outer-most pages. This is called creep. To keep the image in the same place on each page, an adjustment for creep can be made. - Page 94 - - Image Creep Calculating Creep Adjustment 1. Measure the thickness of the set, before booklet-making. (i.e. the number of sheets of paper multiplied by the thickness of the paper) 2. The spine thickness of the finished booklet is two times the set thickness 3.
- Page 96 MORGANA SYSTEMS LIMITED Davy Avenue, Knowlhill, Milton Keynes, Buckinghamshire. MK5 8HJ ENGLAND Tel: +44 (0)1908 608888 Fax: +44 (0)1908 692399 Web: http://www.plockmaticgroup.com...
Need help?
Do you have a question about the Morgana PowerSquare 160 and is the answer not in the manual?
Questions and answers