Subscribe to Our Youtube Channel
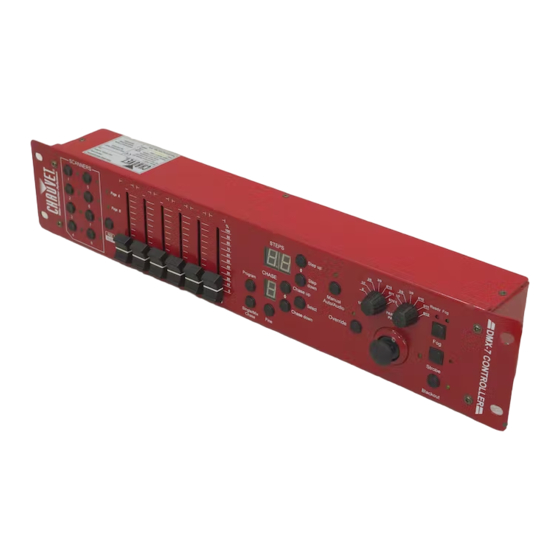
Summary of Contents for Chauvet DMX-7
- Page 1 DMX-7 Universal DMX Controller USER MANUAL Chauvet, 3000 N 29 Ct, Hollywood, FL 33020 U.S.A (800) 762-1084 – (954) 929-1115 FAX (954) 929-5560 www.chauvetlighting.com 2006-03-20/15:55...
-
Page 2: Table Of Contents
APPENDIX... 13 DMX P ... 13 RIMER Fixture Linking... 13 ... 14 ETURNS ROCEDURE ... 14 LAIMS DMX D IPSWITCH UICK EFERENCE HART ... 16 ENERAL ROUBLESHOOTING ... 17 ECHNICAL PECIFICATIONS Technical Support... 17 DMX-7 User Manual ... 15 2006-03-20/15:55... -
Page 3: Before You Begin
EFORE EGIN What is included 1 x DMX-7 1 x DC 9V-12V 500mA 90V~240V Power Adapter Warranty Card & Manual Unpacking Instructions Immediately upon receiving a fixture, carefully unpack the carton, check the contents to ensure that all parts are present, and have been received in good condition. -
Page 4: Introduction
2 rackspace General Overview The DMX-7 is a universal intelligent lighting controller. It allows the control of 8 fixtures composed of 12 channels each and up to 480 programmable scene/steps. Eight chase banks can contain up to 60 steps. Programs can be triggered by music, automatically or manually. Chases can also run individually or simultaneously. -
Page 5: Product Overview (Front)
Joystick Strobe Blackout Joystick speed LED DMX-7 User Manual Function Fixture selection during program mode, chase selection during Playback/Run mode Indicates the fixtures currently selected, or chase selected in Run mode For adjusting DMX values, Ch 1~6 can be adjusted immediately after pressing the... -
Page 6: Product Overview (Rear)
DMX-7 User Manual Function Chauvet fog controller IEC connector Chauvet Mono Strobe ¼” connector for built in strobe controller Direct audio feed for use in sound-active mode May be used to correct signal polarity DMX control signal Main power feed 9V ~ 12V DC... -
Page 7: Operating Instructions
FI XT UR E P AT CH The DMX-7 is programmed to control 12 channels of DMX per fixture, therefore the fixtures you wish to control with the corresponding “SCANNER” buttons on the unit, must be spaced 12 channels apart. -
Page 8: Pan/Tilt Patch
P AN /T ILT P AT C H Because not all intelligent lighting fixtures are alike or share the same control attributes, the DMX-7 allows the user to assign the joystick the correct pan and tilt channel for every fixture. -
Page 9: Programming
CR E AT E/ E DIT A C H AS E O R ST E P Scenes or in the case of the DMX-7 “steps” are stored in a chase bank. Each chase bank will hold up to 60 steps. -
Page 10: Copy A Step
Press Chase up or Chase down to locate the destination chase. Press the Program button to complete the copy process. All LEDs will blink twice to confirm. Press the Blackout button to exit the program editor. DMX-7 User Manual Notes Notes Appendix 2006-03-20/15:55... -
Page 11: Delete A Chase
Press the Manual Auto/Audio button until the LED blinks. Fader 1 is disabled but fader 2 (cross-fade) remains active. DMX-7 User Manual Notes Notes If the LED blinks you are in Audio mode instead. Press the Manual Auto/Audio button repeatedly until the LED is permanently on. -
Page 12: Override Mode
Select the Scanner buttons you would like to control. Move faders and joystick to achieve desired result. DMX-7 User Manual Notes If the LED blinks you are in Audio mode instead. Press the Manual Auto/Audio button repeatedly until the LED is permanently on. -
Page 13: Appendix
XLR male to female connectors. The shield connection is pin 1, while pin 2 is Data Negative (S-) and pin 3 is Data positive (S+). CHAUVET carries 3-pin XLR DMX compliant cables, DMX-10 (33’), DMX-4.5 (15’) and DMX-1.5 (5’) -
Page 14: Returns Procedure
Package must be clearly labeled with a Return Merchandise Authorization Number (RA #). Products returned without an RA # will be refused. Call CHAUVET and request RA # prior to shipping the fixture. Be prepared to provide the model number, serial number and a brief description of the cause for the return. -
Page 15: Dmx Dipswitch Quick Reference Chart
26 58 90 122 27 59 91 123 28 60 92 124 29 61 93 125 30 62 94 126 31 63 95 127 Dip Switch Position DMX-7 User Manual DMX Address Quick Reference Chart Dip Switch Position DMX Address 2006-03-20/15:55... -
Page 16: General Troubleshooting
Remote does not work Make sure connector is firmly connected to device Stand alone mode All Chauvet lighting fixtures featuring stand-alone functions do not require additional settings, simply power the fixture and it will automatically enter into this mode DMX-7 User Manual... -
Page 17: Technical Specifications
Pin Configuration...Pin 1 shield, Pin 2 (-), Pin 3 (+) Protocols...DMX-512 USITT ORDERING INFORMATION DMX-7™..DMX-7™ EC DECLARATION OF CONFORMITY We declare that our products (lighting equipments) comply with the following specification and bears CE mark in accordance with the provision of the Electromagnetic Compatibility (EMC) Directive 89/336/EEC.


Need help?
Do you have a question about the DMX-7 and is the answer not in the manual?
Questions and answers