Table of Contents
Advertisement
Quick Links
Advertisement
Table of Contents

Subscribe to Our Youtube Channel
Summary of Contents for Sectron GSM Key LITE 3
-
Page 2: Table Of Contents
CONTENTS CONTENTS ............................. 2 DECLARATION OF CONFORMITY ......................3 SAFETY INSTRUCTIONS ........................... 4 PACKAGE CONTENTS ..........................5 GENERAL DESCRIPTION .......................... 6 EXAMPLES OF USE ..........................7 FAMILY HOUSE WITH A GARAGE ........................7 PARKING IN HOTELS, GUEST HOUSES, RESIDENTIAL BLOCKS ..............7 ENTRANCE TO COMPANY PREMISES ...................... -
Page 3: Declaration Of Conformity
A Declaration of Conformity of a device according to provisions of Act No. 22/1997, Coll., as amended, stipulating technical requirements for products. We, the distributor SECTRON s. r. o. Josefa Šavla 12 709 00 Ostrava - Mariánské Hory Czech Republic Registered No.: 64617939... -
Page 4: Safety Instructions
SAFETY INSTRUCTIONS • When using the device, follow legal regulations and applicable local restrictions. • Do not use the device in hospitals as this may affect the functioning of medical devices and equipment, for example, close to cardio stimulators or hearing aids. •... -
Page 5: Package Contents
PACKAGE CONTENTS 1. 1 GSM Key PROFI 3 2. 1 GSM hinged antenna, gain of 2 dB 3. 1 2-pin WAGO terminal box 4. 1 13-pin WAGO terminal box 5. 1 WAGO terminal box tool 6. 1 Ethernet cable 7. 1 Instructions for Use, EN 8. -
Page 6: General Description
The user list can be edited by administrator using SMS or PC. Since the incoming call is declined, the operation of the gate is free. GSM Key LITE 3 is suitable for family houses and small companies with up to 20 users and is administered by... -
Page 7: Examples Of Use
FAMILY HOUSE WITH A GARAGE For controlling one garage door of a family house, GSM key LITE 3 or GSM key HOME 2 with one output are suitable (see chapter INSTALLATION AND GETTING STARTED). We recommend saving the GSM key phone number on the contacts list as a speed-dial hotkey number, i.e. -
Page 8: Installation And Getting Started
4. Should you have any questions, do not hesitate to contact your installation company or SECTRON Hotline (hotline@sectron.cz, +420 599 509 599). To install the device, you will need pincers. Insert the SIM card which you want to use in the GSM KEY in the mobile phone. - Page 9 Insert the SIM card back into the GSM KEY and send an SMS to the SIM card number in the form AD ADMINISTRATOR +420xxxxxxxxx where +420xxxxxxxxx is your phone number in the international format. Individual parts of the message must be separated by an empty space. If you use a VPN service, the displayed number of the caller may be different.
- Page 10 Plug the signal cable (at least 2x 0.35 mm Cu) into the O1A-01B terminals of the GSM key and START terminals of your gate drive. Use the power supply terminal last. The device will start working within about one minute. Now, the GSM Key is ready to be setup in administration.
- Page 11 ADMINISTRATION Administration of GSM Key Profi 3 is done via SMS from the administration phone or by using the web interface SECTRON GSM Key PROFI 3 ADMINISTRATION BY MOBILE PHONE – p. 12 Remote administration via a mobile phone can be done without any restrictions from any place.
-
Page 12: Administration By Mobile Phone
ADMINISTRATION BY MOBILE PHONE To operate the device using SMS, it is necessary to first send the following SMS “AD ADMINISTRATOR +420XXXXXXXXX”, where Xs represent your phone number. Doing this, you create the main administrator, which there can be only one. Next user must be added into a group. Default settings includes 3 groups: Admin: Can write and read using SMS and control the key by calling Readonly: Can read the key’s settings using SMS and control the key by calling Guest: Can only control the key by calling... - Page 13 ADMINISTRATION OF MANUFACTURER´S SETTING Example of Action SMS Template Description Recovery of manufacturer´s settings Checking firmware version GT FW GT FW Firmware version Device reset RESET RESET ADMINISTRATION OF INPUTS AND OUTPUTS Action SMS Template Example of SMS Description Checking GT OUTLateEval GT OUTLateEval 0 = Continual...
- Page 14 Action SMS Template Example of SMS Description Setting automatic ST CallHangUpRings=5 Number of rings hang-up function CallHangUpRings=number 0 = OFF Setting automatic SC CallHangUpRings=5 Number of rings hang-up function CallHangUpRings=number 0 = OFF with confirmation Checking impulse GT OUT1ImpulseLength Whole number length OUT[1,2,3,4]ImpulseLength in sec...
- Page 15 Action SMS Template Example of SMS Description Required text Setting SMS text IN[1,2,3,4]SMS[0,1]=numb ST IN1SMS1=Open without empty spaces Checking number GT SendRetry GT SendRetry 0 = OFF of attempts to 1 to x = number send SMS of send retry attempts Setting number of ST SendRetry=number...
- Page 16 Action SMS Template Example of SMS Description Setting activation SC IN1TriggerRun=1 0 = OFF condition when IN[1,2,3,4]TriggerRun=num 1 = connected device is on with confirmation disconnected 3 = any state Checking GT IN[1,2,3,4]AttackTime GT IN1AttackTime Whole number connection delay in sec time Setting ST IN1AttackTime=1...
- Page 17 ADMINISTRATION OF COMMUNICATION PARAMETERS Action SMS Template SMS Example Description Setting APN ST APN=number ST APT=apn APN number setup depends on your operator Checking APN GT APN GT APN Name of APN Checking IP GT IP GT IP IP address LAN and GPRS/EDGE Setting FUP limit ST FUP=number...
-
Page 18: User´s Control Options
USER´S CONTROL OPTIONS CONTROL BY DROP CALL It is very easy to open and close gates, barriers and doors by a mobile phone. Simply call the GSM key phone number and hang up. To make it as easy as possible, we recommend adding the GSM key phone number to your mobile phone contacts as a pre-selected number. - Page 19 ADMINISTRATION BY WEB INTERFACE CONNECTING AND ADMINISTRATION OF GSM KEY PROFI 3 The device connects to a pc or to an active element by an ethernet cable. If the GSM Key PROFI 3 is connected directly to a PC, it is necessary to change the IPv4 address in control panels to 192.168.0.1.
- Page 20 SIGNING INTO ADMINISTRATION INTERFACE To access the web interface, enter the username “administrator” and leave the password blank. We strongly recommend to set your own password after. You can change the language settings in the login screen of the web interface. This change applies only for the one-time login. The default language of the web interface can be changed in “Settings”...
- Page 21 Summarized informations about the GSM Key can be found in the “Info” tab. Name Meaning Application name GSM KEY PROFI 3 Company SECTRON s.r.o. Application version Actual version of FW Release date Date of release actual FW version Serial number...
- Page 22 Name Meaning LAN IP address IP address of physical Ethernet interface MAC address MAC address of physical Ethernet interface Last month send/received Status of received and sent data in lasted month This month send/received Status of received and sent data in actual month Runtime Runtime of GSM Key in second COMMUNICATION...
- Page 23 Name Meaning Network mask Network mask setting Default gateway Default gateway IP address setting DNS server DNS server IP address setting Modem Parameters for connection via GPRS/EDGE. Name Meaning GPRS Turn on or off data connection Enter the SIM card pin if requested Username If a username is required for the connection, otherwise leave it blank Password...
- Page 24 Name Meaning Password for access to web interface it can only content small and big letters Password and numbers. Phone number Admin phone number Date and time Date and time parameters settings. When the unit is connected to the internet or a PC that has access to the internet, the time gets updated from the preset server.
- Page 25 IO PARAMETERS Inputs and outputs can be setup in the “IO Parameters” tab. Any change of parameters needs to be saved by using the floppy disk icon in the bottom part of the screen. IN parameters settings The first table serves for the setting up of conditions for activation. Name Meaning This option sets the activation condition valid when the GSM key is turned...
- Page 26 Name Meaning Group Set the group to be informed about the input status SMS Log 0 Set SMS text if the input is open SMS Log 1 Set SMS text when the input is connected OUT parameters settings Output conditions settings. Name Meaning Output response...
- Page 27 USERS User administration is done in the “Users” tab. Web interface offers the option of sorting users in ascending or descending order, search, filter and paging. After the user expires, all of their rights are removed (web, SMS, controls). An expired user is highlighted red. To remove all expired users, a red clock icon appears at the bottom part of the window.
- Page 28 Name Meaning User name can only content small and big letters and numbers. Is not User possible to use “administrator” as name Phone number in international format +420123456789. Phone number used Phone for “administrator“ is possible to reuse on different user in database. Group Select the group for user Date and time to which the user have permission to control the key.
- Page 29 Name Meaning Hour Setting access time for a given group EVENT LOG The behavious of the GSM Key and activation of the interface is recorded in the “Event log” tab. Only part of the event log is shown in the window. Using the first icon “Download history” the file containing all activity will be downloaded and using the “Download events”...
- Page 30 UPDATE FW The firmware update of the GSM Key PROFI 3 is done in the “Update FW” tab. By pressing the folder icon you select a new version of the firmware and by pressing the floppy disk icon you start the update. After the update is finished, the restart will be done automatically.
-
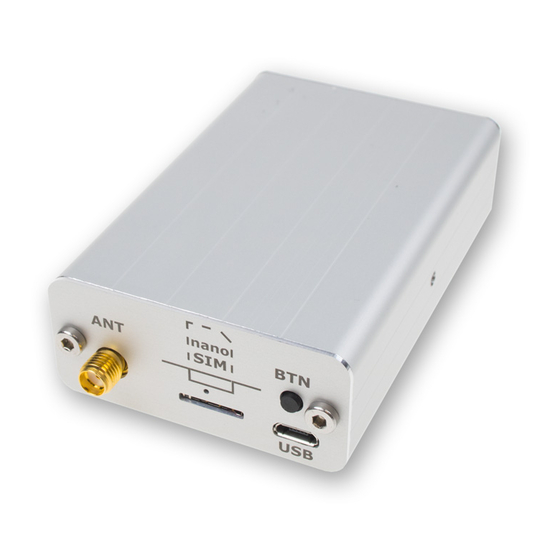
Page 31: Technical Description Of Interface
TECHNICAL DESCRIPTION OF THE INTERFACE FRONT PANEL LED diodes: information about the state of the device (I1, I2, I3, I4, P, O1, O2, O3, O4, G/S) PWR: connector for power supplykonektor k připojení napájecího zdroje NET: interface for connection to pc or active component RST: the button for device reset. -
Page 32: Sim
SIM card reader with retractable bracket. Insert and remove the SIM card only if the device is turned off. To remove the SIM card, use a needle-like tool of a radius aproximately 1 mm, with which you push on the removal button situated on the left of the SIM card. - Page 33 On - Contacts I4 and GND have a voltage of 15-40 V AC / DC Permanently Off - no power supply P (power supply) Permanently on - GSM Key is on Off – O1A and O1B contacts disconnected O1 (output 1) On - contacts O1A and O1B are connected Off –...
-
Page 34: Pwr
The power supply interface "PWR" is used to connect a power supply with a 2-pin WAGO connector. The device can be supplied with DC or AC voltage in the range of 10 - 30 V. The "RST" button is used to reset the device. Holding the reset button after connecting the power supply for: 10s - Clear "Settings"... -
Page 35: Ant
Relay output 1 (max. 30 V / 1 A) Relay output 1 (max. 30 V / 1 A) Optically isolated input 4 (LOG 0: 0-7 V / LOG 1: 15 - 40 V DC) Optically isolated input 3 (LOG 0: 0-7 V / LOG 1: 15 - 40 V DC) Optically isolated input 2 (LOG 0: 0-7 V / LOG 1: 15 - 40 V DC) Optically isolated input 1 (LOG 0: 0-7 V / LOG 1: 15 - 40 V DC) Signal ground... - Page 36 Application manuals NETWORK CARD SETTINGS If the GSM Key PROFI 3 is directly connected to the PC, it is necessary to set the desired address range on the network card of the computer and the key will then be available at 192.168.0.22. Launch the START - SETTINGS and then select Network &...
- Page 37 The Network Connections window opens. On the computer network card, right-click and select Properties. On the open tab, select IP Protocol Version (TCP / IPv4) and select the Additional Options using the Properties button. On this tab, you need to set IP address from the range. Select Use the following IP address and set these parameters: IP Address: 192.168.0.1 Subnet mask: 255.255.255.0...
- Page 38 CONNECTION OF WAGO TERMINAL BLOCK In the GSM Key package you’ll find 2 WAGO terminal blocks and hook for cable installation. 1x 13-pin a 1x 2-pin WAGO terminal block 1x hook for WAGO terminal block cable installation The hook gets attached into the upper opening, which is situated above the cable locks. Then, by applying pressure on the hook downwards, the locks will open enough for the stripped cable to be put in.
-
Page 39: Technical Parameters
TECHNICAL PARAMETERS Name Parameter GSM module Cinterion Wireless Module EES3 Frequency bands 850/900/1800/1900 MHz The user interface 4x relay outputs (for parallel motor control connection) 4x optically isolated inputs (for sensor connection) Ethernet (Configuration Interface) Temperature range working C to +55 Storage temperature range C to +85 Power voltage...
Need help?
Do you have a question about the GSM Key LITE 3 and is the answer not in the manual?
Questions and answers