
Related Manuals for MHP JNR


Summary of Contents for MHP JNR
- Page 1 JNR GAS GRILL HEAD Assembly Manual SCAN THE QR CODE FOR English ASSEMBLY VIDEO www.mhpgrills.com...
-
Page 2: Important Safety Warnings
The appliance is FOR OUTDOOR USE ONLY. It is not to be used inside a garage, other building or any type of enclosed area. Combustible materials Make sure your base is should never be within 18 inches of the bottom, back or sides of your MHP assembled before continuing. Gas Barbecue Grill. -
Page 3: Assembly Preparation
V isit our website mhpgrills.com/info/owners-manuals/ for a complete list of assembly videos & manuals INSTALLING THE CONTROL PANEL STEP 1 PARTS INCLUDED IN BOX: TOOLS NEEDED: JNR-LP Control Panel for LP Gas Grill KEP NUTS (6) CONTROL PANEL BRACKETS (2) PHILLIPS 7/16"... - Page 4 INSTALLING THE CONTROL PANEL, CONTINUED STEP 1 Attaching the Control Panel Assembly to the Front of the Bottom Casting • Attach the complete control panel assembly to the front of the grill bottom casting with two 1/4-20 Kep Nuts and hand tighten •...
- Page 5 INSTALLING THE CONTROL PANEL, CONTINUED STEP 1 Ignitor Wire Connection Attach the wire from the ignitor module, located behind the control panel, to the porcelain insulator found on the underside of the bottom casting. Be careful not to crack the IGNITOR MODULE delicate porcelain insulator PORCELAIN INSULATOR...
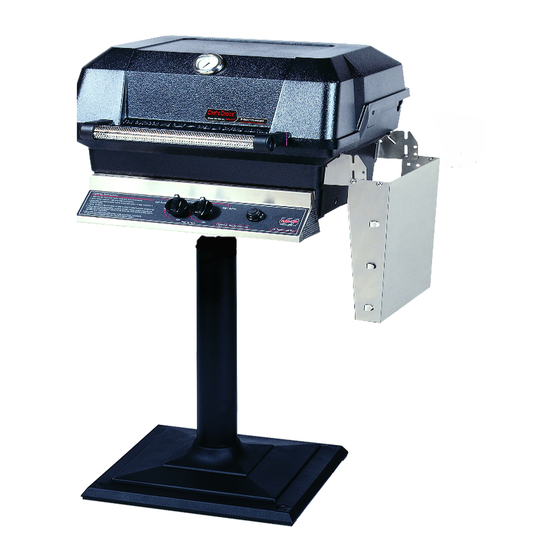
- Page 6 INSTALLING THE SIDE SHELF STEP 2 PARTS INCLUDED IN BOX: TOOLS NEEDED: SHELF SIDE BRACKETS (2) PHILLIPS HEAD PHILLIPS BOLTS (4) HHDDSK SCREWDRIVER Side Shelf Kit 7/16" 3/8" COMBINATION COMBINATION KEP NUTS (4) NYLOCK NUT (2) WRENCH WRENCH Remove Plastic Protective Sticker Before installing the side shelf, remove the plastic protective sticker from all sides of the shelf and shelf brackets.
-
Page 7: Parts Needed
INSTALLING THE BRIQUETTE GRATE STEP 3 PARTS INCLUDED IN BOX: Install the Stainless Steel Briquette Grate by placing it into the bottom grill casting. The grate should HH-GRATE-SS rest level on the Briquette Grate shelf edge just STAINLESS STEEL BRIQUETTE GRATE above the burner. -
Page 8: Attaching The Front Handle
ATTACHING THE FRONT HANDLE STEP 6 PARTS INCLUDED IN BOX: TOOLS NEEDED: HANDLE END CAP ASSEMBLY (2) END CAPS/HANDLE Each End Cap Includes: Includes hardware • End Cap 7/16" COMBINATION • Graphite Gasket WRENCH (2) • 1/4-20 x 1-1/2" Hex Bolt •... - Page 9 ADDING THE WARMING RACK STEP 9 Installing the JNR Warming Rack PART INCLUDED: • Rest the warming rack on the notches located in the back top edge of the bottom casting.
-
Page 10: Leak Testing
ATTACHING TO GAS LINE For complete steps on connecting your grill to a gas line please refer to the instructions included in the assembly manual for your specific mounting. FOR NATURAL GAS & HARD-PLUMBED LP GAS FOR LP GAS INSTALLATIONS INSTALLATIONS BENDING STAINLESS STEEL TUBING Do not make sharp bends when bending your flexible... -
Page 11: Rotisserie Kit
Visit your local dealer or our online store www.mhponlinestore.com Enhance Your Grill Our premium accessories have been designed specifically for our grills with quality materials and craftsmanship STAINLESS STEEL SIDE BURNER ROTISSERIE KIT Rotisserie Kit includes RO6 stainless The premium commercial grade stainless steel steel motor, motor mounting bracket, side burner is 12,000 BTU rated, has its own rotisserie rod, handle, bushing, forks... - Page 12 DON'T FORGET TO REGISTER YOUR GRILL! It is the responsibility of the grill owner to complete and submit the warranty registration form to MHP in order for the warranty to be valid. What you will need to register your grill: •...
Need help?
Do you have a question about the JNR and is the answer not in the manual?
Questions and answers