Table of Contents
Advertisement
Available languages
Available languages
Quick Links
Advertisement
Chapters
Table of Contents

Related Manuals for Cylinda T7400F


Summary of Contents for Cylinda T7400F
- Page 1 Bruksanvisning User manual T7400F...
-
Page 2: Table Of Contents
Innehåll Introduktion ..........................Snabbguide ........................................................ Säkerhetsföreskrifter ....................................................Beksrivning av torktumlaren ..................................................Innan du använder utrustningen för första gången ..........................................Installation och anslutning ..................................................Tips innan du använder torktumlaren ..............................................Torkprocessen, steg för steg ................................................... -
Page 3: Introduktion
Introduktion Bäste Cylinda kund! Välkommen till familjen av Cylinda kunder. Vi hoppas att ni får många års nytta av er nya maskin. Maskinen har många fi nesser. För att få största möjliga nytta av dess funktioner rekommenderar vi att ni läser bruksanvisningen innan ni använder maskinen. Information om hur man undviker följder för miljön lämnas i bruksanvisningen. -
Page 4: Snabbguide
Snabbguide Sortera plaggen Sortera plaggen efter material och hur smutsiga de är. Observera symbolerna på tvättetiketterna. Stäng dragkedjor, hakar och knappar. Slå på strömbrytaren (ON/OFF) Öppna torktumlarens lucka och lägg in tvätten Se till att trumman är tom innan du gör detta. Välj torkprogram Vrid programväljarvredet till önskat torkprogram. -
Page 5: Säkerhetsföreskrifter
• Om inte bruksanvisningen följs eller om torktumlaren används felaktigt kan det leda till skada på tvätten, produkten eller användaren. • Bruksanvisningar finns på vår webbsida www.cylinda.se. • Apparaten är avsedd för användning på platser som är öppna för allmänheten. - Page 6 • Efter installation ska torktumlaren stå stilla i minst två timmar innan den ansluts till elnätet. • Minst två personer krävs för att installera torktumlaren ovanpå en tvättmaskin. • Torktumlaren får inte anslutas till elnätet via en förlängningssladd. • Anslut inte torktumlaren till ett eluttag som är avsett för rakapparat.
- Page 7 • Luften i torktumlarens omgivning ska inte innehålla dammpartiklar. Luften där torktumlaren är installerad ska vara väl ventilerad för att förhindra att gaser som avges från gasapparater med öppen eld (t.ex. eldstäder) går ut i rummet igen. • Led inte ut luften från torktumlaren genom kanaler som används för produkter som använder gas eller andra bränslen (gäller endast frånluftstumlare).
- Page 8 • Placera inte torktumlaren på en matta med långa fibrer. Det kan försämra luftcirkulationen. • Luften i torktumlarens omgivning ska inte innehålla dammpartiklar. • Se till att det inte samlas fibrer runt torktumlaren. • BRANDFARA! Avlägsna alla föremål som tändare och tändstickor från klädernas fickor.
- Page 9 • Den maximala torkförmågan i kg anges på märkskylten. Säkerhet • BRANDFARA! Använd torktumlaren endast för att torktumla tvätt som har tvättats med vatten. Torktumla inte tvätt som har tvättats eller rengjorts med lättantändliga rengöringsmedel eller substanser (t.ex. bensin, trikloretylen etc.), eftersom det kan resultera i en explosion.
- Page 10 • Om nätfiltret är igensatt kan utlösningsenheten för automatisk värmare utlösas. Se kapitlet "RENGÖRING OCH UNDERHÅLL" (gäller endast evakuerings- och kondensatortork). • HET YTA! VARNING! Baksidan av torktumlaren kan bli mycket varm under användning. Vänta på att torktumlaren ska svalna helt innan du berör baksidan. (Observera anvisningarna i kapitlet "INSTALLATION OCH ANSLUTNING") •...
- Page 11 • Låt inte barn på under tre år komma i närheten av torktumlaren om de inte är under konstant översyn. • Torktumlaren är tillverkad enligt alla relevanta säkerhetsstandarder. Denna torktumlare kan användas av barn från 8 år samt av personer med nedsatt fysisk, sensorisk eller mental förmåga, eller med bristfällig erfarenhet och kunskap, under förutsättning att de står under uppsikt vid användningen av produkten eller om de har instruerats om...
-
Page 12: Beksrivning Av Torktumlaren
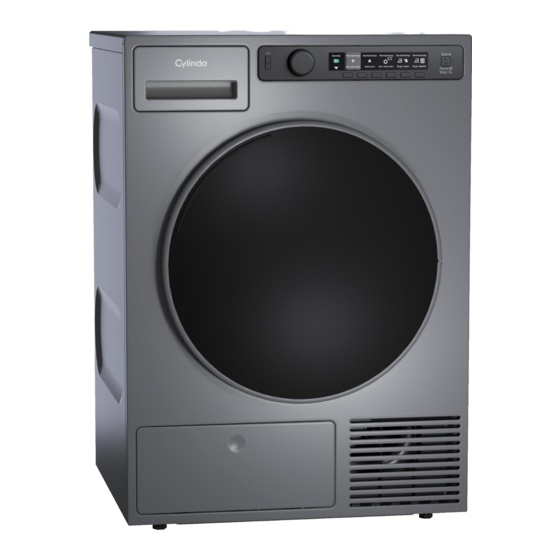
Beksrivning av torktumlaren 1. Huvudbrytare (PÅ/AV) 2. Programväljarvred 3. Display 4. Programväljarknappar 5. Knapp (start/paus) 6. Typskylt med information om torkaren (sitter på insidan av torkarens lucka) 7. QR- och AUID-kod (sitter på insidan av torka- rens lucka) 8. Torktumlare Lucka 9. -
Page 13: Innan Du Använder Utrustningen För Första Gången
Innan du använder utrustningen för första gången Förpackning Ta bort allt förpackningsmaterial. Sortera materialen i enlighet med lokala riktlinjer (se kapitlet ”Kassering”). Rengöring Koppla bort torktumlaren från vägguttaget och öppna luckan mot dig. Innan du använder torktumlaren för första gången, gör rent trumman med en mjuk bomullstrasa och vatten. Om maskinen har 3-fasanslutning ska du stänga av uttagets huvudbrytare. -
Page 14: Installation Och Anslutning
Installation och anslutning Placering av torktumlaren Torktumlaren kan antingen vara fristående eller installeras på en tvättmaskin. INFORMATION! Minst två personer krävs för att installera torktumlaren ovanpå en tvättmaskin. Torktumlaren avger värme. Placera den därför inte i ett mycket litet rum, eftersom torkningsprocessen kan bli längre på... - Page 15 Fristående apparat Torktumlaren kan placeras bredvid en tvättma- skin. Om friktionen mellan torktumlarens fötter och golvet inte är tillräcklig kan torktumlaren flyttas under användning. För att förhindra glidning, an- vänd en anti-halkmatta eller installera medföljan- de vakuumfötter på båda framfötter. Placera torktumlaren så...
- Page 16 (A+B) som medföljer i kartongen som ligger i trumman. Tippskydd del B passar på CYLINDA-tvättmaskiner och det kan vara svårt eller omöjligt att montera på produkter från andra tillverkare. Om tvättmaskinen och torktumlaren har olika storlekar, eller om du har installerat en Hidden Helper mellan de två...
- Page 17 INFORMATION! Tvättmaskinen som du vill ställa upp torktumlaren på måste klara torktumlarens vikt (se tvättmaskinens märkplåt eller teknisk information). SV 17...
- Page 18 Så placerar du en torktumlare ovanpå tvättmaskinen (CYLINDA): Det finns en kartong i trumman som innehåller vakuumfötterna och tippskyddet. Tippskyddet består av två metalldelar (A + B). Använd de två skruvarna för att ansluta del A till baksidan av torktumlaren.
- Page 19 Tabellen fortsätter från föregående sida Ställa in torktumlarens fötter: 1. Skruva in de två främre fötterna helt. 2. Lossa de bakre fötterna med 3,5 varv eller 5 mm, dra därefter åt kontramuttrarna mot botten av produkten Placera torktumlaren på tvättmaskinen: 1.
- Page 20 Ändra dörrens öppningsriktning Gör så här för att ändra riktning för luckan: Öppna luckan helt. Lossa skruvarna och ta bort luckan. Använd skruvmejseln för att ta bort lucklåsets skydd och lossa skruvarna på lucklåset. Tryck lucklåset uppåt och ta bort det. Flytta det till andra sidan och tryck det neråt.
- Page 21 Lossa gångjärnen (vänster) och lucklå- set (höger), byt sida på dem och sätt tillbaka skruvarna (gångjärnen till höger, lucklåset till vänster). INFORMATION! Använd skruvmejseln för att enklare ta bort plastdelen. Lossa luckringen ta bort den tillfälligt. Vrid luckans skydd 90° så att skylten som indikerar åt vilket håll luckan öpp- nas befinner sig på...
- Page 22 Utsug av fuktig luft Använd medföljande luftutloppsslang för att leda ut den fuktiga luften från torktumlaren till en öppning (ventilationssystem, fönster osv.). Ansluta luftutloppsslangen till torktumlaren Torktumlaren har tre möjligheter för luftutlopp: Baktill och på höger och vänster sida. Vid leverans är öppningen baktill öppen och en anslutning är installerad på...
- Page 23 INFORMATION! Led inte ut luften från torktumlaren genom kanaler som används för apparater som använder gas eller andra bränslen (gäller endast frånluftstumlare). Välja rum Placera apparaten i ett välventilerat rum med fönster eller ett rum med fl äkt. Om möjligt, anslut luftutloppsslangen så...
- Page 24 Extrautrustning Om luftutloppsslangen ansluts till en öppning i väggen kan infl öde av kall luft förhindras genom installation av ett ventilationsgaller. Om det bara fi nns en ventilationsöppning i rum- met ska ett luftlås installeras. Denna extrautrustning kan köpas hos din återförsäljare. INFORMATION! Undvik följande: •...
- Page 25 Anslutning till elnätet ELSTÖT! Efter installation ska torktumlaren stå stilla i minst två timmar innan den ansluts till elnätet. Anslut bara produkten till ett jordat vägguttag. Efter installationen ska vägguttaget vara lättåtkomligt. Uttaget ska förses med en jordkontakt (i enlighet med relevanta bestämmelser). Om du har en torktumlare med 3-fasanslutning måste inkopplingen utföras av behörig och auktoriserad fackman.
-
Page 26: Tips Innan Du Använder Torktumlaren
Tips innan du använder torktumlaren Detta kapitel innehåller många tips om hur du förbereder tvätten för torktumlaren. Sortera tvätten Sortera tvätten efter: • typ, • tygets tjocklek. För jämn torkning, se till att plaggen i tvätten är tillverkade i liknande materal. Kläder 1. - Page 27 Tabellen fortsätter från föregående sida Blekning Blekning i kallt vatten Blekning ej tillåten Kemtvätt Kemtvätt med alla tvättmedel Perkloretylen R11, R113, petroleum Kemtvätt i fotogen, i ren alkohol och i R113 Kemtvätt ej tillåten Strykning Styrkning på hög värme med en maxtemperatur på 200 °C Styrkning på...
- Page 28 • plagg som kemtvättats hemma, • skum • glasfiber SV 28...
-
Page 29: Torkprocessen, Steg För Steg
Torkprocessen, steg för steg STEG 1: Sortera plaggen Se kapitlet ”Tips innan du använder torktumlaren” STEG 2: Sätt på strömbrytaren Slå på Tryck på på/av-knappen. Avstängning Tryck på på/av-knappen. STEG 3: Öppna luckan och lägg in tvätten Öppna torktumlarens lucka mot dig. Lägg tvätten i den tomma trumman. - Page 30 STEG 4: Välj torkprogram Välj program genom att vrida programväljarvredet i valfri riktning. Bekräfta programvalet genom att trycka på knappen under programmet. Välj program baserat på typ och fuktighetsgrad hos tvätten du vill torktumla. Förväntad programtid visas på displayen. Välj mellan följande program: (ägaren/distributören kan ändra parametrarna och byta namn på...
- Page 31 Tabellen fortsätter från föregående sida Program (standardpro- M a x . Beskrivning gram från fabrik) VÄDRING 60 min Använd det här programmet för att bara fräscha upp eller mjuka upp plagg. * Max. kg torkmängd INFORMATION! Om din tvätt inte blir så torr som du önskar, bör du använda ett mer passande program. STEG 5: Välja programinställningarna Med hjälp av programinställningarna kan ytterligare justeringar göras av torkprogrammen efter önskemål.
- Page 32 Stopp (tryck och håll inne i 3 sekunder stopp eller avbryt) Återstående tid Beroende på valt program och belastning visas förväntad torktid i timmar och minuter. Faktisk torktid beror på valt program, belastning, typ av tvätt, centrifugering osv. Faktisk torktid kan vara längre eller kortare än det som först visas. Pausa, stoppa eller ändra programmet För att pausa ett program, tryck kort på...
- Page 33 STEG 7: Programslut När torkprogrammet är klart visar displayen att torkningen är färdig. Om du har valt alternativet ”skrynkelskydd” kommer torktumlaren att fortsätta köras efter torkcykelns slut. Öppna luckan mot dig och ta ut tvätten ur torktumlaren. Rengör nätfiltret i luckan (se kapitel ”Rengöring och underhåll”). Kontrollera att trumman är tom och stäng luckan.
-
Page 34: Inställningar
Inställningar Endast apparatens ägare/distributör kan ändra inställningarna! (ägare/distributörer bör kontrollera servicehandboken) Displayen på Inställning Beskrivning Rengöra filtret På/Av Rengöra filtret i luckan 0 --> 10 Rengöra vattenkondensorn 10 --> 100 (steg 10) Kondensvatten Utpumpning/Tank Betalningssystem På/Av Aktivering av värmare 2 På/Av Byte av program På... - Page 35 Tabellen fortsätter från föregående sida Displayen på Inställning Beskrivning Du kan välja upp till 5 språk, som kommer att vara tillgängliga i huvudmenyn. Inställning för ljud 0 --> 5 Inställningar för display: 1 --> 5 • Ljusstyrka På/Av • Visa loggan Standby-läge Normalt läge/Ingen standby Detaljerad vy...
-
Page 36: Rengöring Och Underhåll
Rengöring och underhåll INFORMATION! Innan rengöring, se till att produkten är avstängd och dra ut sladden från eluttaget. Rengöra nätfiltret i luckan Innan rengöring, se till att produkten är avstängd och dra ut sladden från eluttaget. Lyft locket över nätfiltret. För en hand eller en trasa dra över nätfiltret för att dra bort täcket av fibrer och trådar. - Page 37 Tabellen fortsätter från föregående sida Om det är nödvändigt att rengöra nätfiltrets bak- sida lossar du skruven och vrider filtret från låsta till olåst läge. Dra ut hela filterenheten, rengör den noggrant, och sätt filterenhetens i dess ursprung- liga läge efter rengöringen. Vrid filtret från olåsta till låst läge och dra åt skruven.
-
Page 38: Fel Vad Ska Jag Göra
vad ska jag göra? Störningar från omgivningen (t.ex. elnätet) kan ge upphov till olika felmeddelanden (se felsökningstabellen). Om detta händer: • Stäng av maskinen, vänta i 1 minut, sätt på maskinen igen och upprepa torkprogrammet. • Kontakta auktoriserad serviceverkstad om felet inte försvinner. •... - Page 39 Tabellen fortsätter från föregående sida Problem/fel Orsak Vad ska jag göra? Tvätten är in- • Filtren är inte rena. • Rengör filtren (se kapitel ”RENGÖRING te torr, eller OCH UNDERHÅLL”). torkningen tar för lång • Torktumlaren är placerad i ett •...
- Page 40 Feldisplay I händelse av fel medan ett program är igång visas relevant fel på displayen (Error X). Tryck och håll ner knappen INFO för att visa fel- beskrivningen. Stäng av torktumlaren och slå på den igen. Fel som indikeras på displayen (beroende på modell) kan omfatta följande: Problem/fel Felindikering på...
-
Page 41: Service
Kostnad för reparationer, eller garantianspråk, till följd av felaktig anslutning eller användning av torktumlaren täcks inte av produktgarantin. Användaren får följaktligen stå för reparationskostnaderna i dessa fall. Kontaktadress Cylinda Service 0771-25 25 00 Du betalar endast lokal telefontaxa www.cylinda.se SV 41... -
Page 42: Teknisk Information
Teknisk information Teknisk information Höjd 850 mm Bredd 595 mm Djup 769 mm Vikt (netto) 43 kg Trumvolym 145 l Max. torkbelastning Se typskylt Märkeffekt Se typskylt Trummans Material Rostfritt stål Material hölje Varmförzinkad och pulverlackerad stålplåt eller rostfri stålplåt. SV 42... -
Page 43: Programtabell
EN61121. Följande krav gäller för förbrukningsvärden som anges nedan: Inloppstemperatur Rumstemperatur Inloppsluftfuktighet 50 60% Torktemperatur Kan innebära en tvetydighet med 2020181 T7400F Program M ä n g d Roteringshastig- Energiförbruk- Programmets heten ning, ca (kWh)* längd,... -
Page 44: Kassering
Kassering Kassering/återvinning av förpackningsmaterial Vårt emballage är tillverkat i miljövänliga material som kan återvinnas, kasseras eller förstöras utan att belasta miljön. Därför är förpackningsmaterialen tydligt märkta. Symbolen på produkten eller emballaget anger att produkten inte får hanteras som normalt hushållsavfall. Produkten ska i stället lämnas in på en auktoriserad återvinningscentral som hanterar elektrisk och elektronisk utrustning. - Page 45 Contents Introduction ..........................Quick guide ........................................................ Safety precautions ....................................................Dryer description ...................................................... Before using the appliance for the first time ............................................Installation and connection ..................................................Advices before drying ....................................................Drying process, step by step ...................................................
-
Page 46: Introduction
Introduction Dear Cylinda customer! Welcome to the family of Cylinda customers. We hope that you will have many years of use from your new machine. The machine has many features. To make the most of its functions, we recommend that you read the operating instructions before using the machine. -
Page 47: Quick Guide
Quick guide Sort the fabrics Sort the fabric by type and by how heavily soiled the laundry is. Observe the drying symbols on the laundry labels. Close the zippers, hook-and-loop fasteners and buttons. Switch on the main ON/OFF switch Open the dryer door and insert the laundry. Before doing so, make sure the drum is empty. -
Page 48: Safety Precautions
• Instructions for use are available on our website at www.cylinda.se. • Appliance is intended to be used in an area open to the public. - Page 49 • After installation, the dryer should stand still for two hours before it is connected to the power mains. • At least two persons are required to install the tumble dryer on top of a washing machine. • The dryer shall not be connected to the power mains using an extension cord.
- Page 50 • In case of incorrect appliance connection, incorrect use, or servicing by an unauthorized person, the user shall bear the cost of any damage. • Air in the dryer environment should not contain dust particles. The air where the dryer is installed should be thoroughly ventilated to prevent reverse flow of gases released from the gas appliances with open fire (e.g.
- Page 51 • Do not place the dryer behind lockable or sliding door, or door with a hinge on the opposite side of the dryer door hinge. Install the dryer in such way that the door can always be freely opened. • Never block the air vents. •...
- Page 52 • A float will switch off the appliance if the condensed water pipe is clogged or if there is a risk of overflowing of the condensed water accumulated in the condensed water tank (only applies to the evacuation dryer). • If you wish to move the dryer or store it in a non-heated room during winter, it is essential that you first empty the condensed water tank (only applies to the condenser dryers and dryers with a heat pump).
- Page 53 • The dryer is protected with an automatic switch-off system in case of overheating. The system switches off the heater if the temperature is too high (only applies to evacuation and condenser dryer). • If the net filter is clogged, the automatic heater switch-off device can be triggered.
- Page 54 • Before closing the dryer door and running the program, make sure there is nothing except laundry in the drum (e.g. if a child climbed into the dryer drum and closed the door from the inside). • Activate the child lock. See chapter: SETTINGS •...
-
Page 55: Dryer Description
Dryer description 1. Main switch (ON/OFF) 2. Program selector knob 3. Display 4. Program selector buttons 5. Button (start/pause) 6. Rating plate with information about the dryer (on the inside of the drying machine door) 7. QR and AUID code (on the inside of the dry- ing machine door) 8. -
Page 56: Before Using The Appliance For The First Time
Before using the appliance for the first time Packaging Remove all packaging. Please sort the materials in compliance with local recommendations (see chapter "Disposal"). Cleaning Disconnect the dryer from the power mains and open the door towards you. Before using the dryer for the first time, clean the dryer drum using a soft damp cotton cloth and water. -
Page 57: Installation And Connection
Installation and connection Dryer placement The dryer can be either free standing or installed on top of a washing machine. INFORMATION! At least two persons are required to install the tumble dryer on top of a washing machine. The dryer emits heat. Therefore, do not place it in a very small room, as the drying process may be longer due to limited amount of ambient air. - Page 58 Free-standing appliance The dryer may be placed adjacent to a washing machine. If the friction between the dryer feet and the floor is not sufficient, the dryer may move during oper- ation. To prevent sliding, use a non-slide mat or install the supplied vacuum feet onto both front feet.
- Page 59 (A+B), supplied in the cardboard box in the dryer drum. Tipping guard part B is designed to fit on CYLINDA washing machines and it may be hard or impossible to mount on appliances of other brands. If the washing machine and dryer are not of matching dimensions or if you have installed a hidden helper between the two appliances, then binding plates are available as optional accessories at the service center (…...
- Page 60 INFORMATION! Washing machine on which you wish to install the dryer must be able to bear the weight of the dryer (see washing machine’s rating plate or technical information). EN 60...
- Page 61 How to stack a dryer onto the washing machine (CYLINDA): There is a cardboard box in the dryer drum, containing the vacuum feet and the tipping guard. The tipping guard consists of two metal parts (A + B). Use two screws to attach the A part to the back of the dryer.
- Page 62 Table continued from last page Set the dryer feet: 1. Tighten the front two feet all the way in. 2. Undo the back feet by 3.5 turns or 5 mm; then, fasten the jam nuts towards the bottom of the appli- ance Place the dryer onto the washing ma- chine:...
- Page 63 Changing the door opening direction To change the direction of door opening, proceed as follows: Open the door fully. Undo the screws and remove the door. Use a screwdriver to remove the door lock cover and undo the screw on the door lock.
- Page 64 Undo the door hinge assembly (left) and the door latch assembly (right), switch their positions, and replace the screws (door hinge assembly to the right-hand side, door latch assembly to the left-hand side). INFORMATION! Use a screwdriver to remove the plastic part more easily.
- Page 65 Evacuation of humid air Use the supplied air exhaust hose to convey the humid air from the dryer is through an opening (ventilation system, window etc.). Connecting the air exhaust hose to the dryer The dryer allows three possibilities for air evacuation: on the rear, on the right, and on the left side. Upon delivery, the opening on the back is open and a connection fitting is installed on it (1).
- Page 66 INFORMATION! Do not evacuate the air from the dryer through channels used for appliances or devices that use natural gas or other fuels for their operation. Selecting the room Place the appliance in a thoroughly ventilated room with a window or ventilation fan. If possible, connect the air exhaust hose so that it has no inclination, upwards (A) or downwards (C), but rather straight (B).
- Page 67 Extra equipment If the air exhaust hose is connected to an opening in the wall, influx of cool air may be prevented by installing a ventilation grille. If there is only one ventilation opening in the room, an air lock should be installed. This extra equipment can be purchased from your seller.
- Page 68 Connecting to the power mains ELECTRIC SHOCK! After installation, the dryer should stand still for two hours before it is connected to the power mains. Connect the appliance to an earthed power outlet. After installation, the wall outlet should be freely accessible.
-
Page 69: Advices Before Drying
Advices before drying This chapter includes several advices on how to prepare the laundry from drying. Laundry sorting Sort the laundry according to: • type, • fabric thickness. For the most even drying, make sure the laundry is made of a similar material. Clothing 1. - Page 70 Table continued from last page Bleaching Bleaching in cool water Bleaching not allowed Dry cleaning Dry cleaning with all agents Perchloroethylene R11, R113, petroleum Dry cleaning in kerosene, pure alcohol, and R113 Dry cleaning not allowed Ironing Ironing with a hot iron with a maximum temperature of 200 °C Ironing with a hot iron with a maximum temperature of 150°C Ironing with a warm iron with a maximum temperature of 110°C Ironing not allowed...
- Page 71 • clothing that was chemically cleaned (or dry-cleaned) at home, • foam, • glass fibres. EN 71...
-
Page 72: Drying Process, Step By Step
Drying process, step by step STEP 1: Sort the fabrics See chapter "Advices before drying" STEP 2: Turn on the main switch. Turning on Press the on/off button. Switching off Press the on/off button. STEP 3: Open the dryer door and insert the laundry. Open the dryer door towards you. - Page 73 STEP 4: Choose the drying program. Choose the program by rotating the program selector knob in either direction. Confirm the program selection by pressing the button under the program. Select the program based on the type and remaining moisture of the laundry you wish to dry. Anticipated program duration is indicated on the display.
- Page 74 * Max. kg dry load INFORMATION! If your laundry is not dried to the desired dryness level, use a more suitable programme. STEP 5: Choosing the program settings Using the program settings, the drying programs can be further adjusted to your wishes. See chapter: SETTINGS.
- Page 75 Actual drying time may be longer or shorter than initially displayed. Pausing, stopping or changing the program To pause a program, briefly press the Start/Pause button. To resume the program, press the Start/Pause button again. The drying program may also be paused by opening the dryer door. To resume the programme, simply close the door and press the Start/Pause button.
-
Page 76: Settings
Settings Only appliance owner/distributor may change the settings! (owner/distributor should check Service manual) On display Setting Description Cleaning the filter On/Off Cleaning the door filter in the 0 --> 10 door Cleaning of water condenser 10 --> 100 (step 10) Condensed water Drain/Tank Payment system... - Page 77 Table continued from last page On display Setting Description Temporary language selec- On/Off (from 0 to 5) tion You can select up to 5 lan- guages, which will be available in the main menu. Sound setting 0 --> 5 Display settings: 1 -->...
-
Page 78: Cleaning And Maintenance
Cleaning and maintenance INFORMATION! Before cleaning, make sure to switch off the appliance and disconnect it from the power mains (unplug the power cord from the outlet). Cleaning the door net filter in the door Before cleaning, make sure to switch off the appliance and disconnect it from the power mains (unplug the power cord from the outlet). - Page 79 Table continued from last page If it is necessary to clean the net filter from the back, unscrew the screw and turn the filter from the locked to the unlocked position. Pull out the entire filter unit and clean it thoroughly, and return the filter unit to its original position after cleaning.
- Page 80 INFORMATION! Always disconnect the dryer from the power mains before cleaning. In the case of a 3 phase connection of the appliance, switch off the main socket switch. EN 80...
-
Page 81: Errors What To Do
Errors what to do? Disturbances from the environment (e.g. the power grid) may result in various error reports (see Troubleshooting table). In such case: • Switch off the appliance, wait for 1 minute, switch the appliance back on, and repeat the drying program. - Page 82 Table continued from last page Problem/error Cause What to do? Laundry not • Filters are not clean. • Clean the filters (see chapter "CLEAN- dried or dry- ING AND MAINTENANCE"). ing takes too long. • Dryer is placed in a closed room; •...
- Page 83 Failure display In case of a failure while a program is in progress, the relevant Error X is indicated on the display unit. Press and hold the INFO button to display the error description. Switch off the dryer and turn it back on. Errors indicated on the display unit (depending on the model) may include the following: Problem/error Error indication on the display...
-
Page 84: Service
Repair or any warranty claim resulting from incorrect connection or use of the dryer shall not be covered by the warranty. In such cases, the costs of repair shall be charged to the user. Kontaktadress Cylinda Service 0771-25 25 00 Du betalar endast lokal telefontaxa www.cylinda.se... -
Page 85: Technical Information
Technical information Technical information Height 850 mm Width 595 mm Depth 769 mm Weight (net) 43 kg Drum volume 145 l Maximum drying load See rating plate Rated power See rating plate Drum material Stainless steel Housing material Hot-dip galvanized and powder coated sheet metal, or stainless steel sheet. -
Page 86: Program Chart
The following requirements apply to the consumption values specified below. Inlet air temperature room temperature Inlet air humidity 50 60% Drying temperature Would create an ambiguity with 2020181 T7400F Program A m o u n t Spinning speed Power con- Program dura- (rpm) -
Page 87: Disposal
Disposal Disposal / recycling of packaging Our product packaging is made of environmentally friendly materials that can be recycled, disposed of, or destroyed without any hazard to the environment. To this end, packaging materials are labelled appropriately. The symbol on the product or its packaging indicates that the product should not be treated as normal household waste. - Page 88 Service Vi har service i hela Sverige/ Nationwide service in Sweden Vi har service i hela Sverige/ Nationwide service in Sweden Besök www.cylinda.se / Visit www.cylinda.se Besök www.cylinda.se / Visit www.cylinda.se Service Ring 0771-25 25 00 (endast lokaltaxa) / Call 0771-25 25 00...
Need help?
Do you have a question about the T7400F and is the answer not in the manual?
Questions and answers