Table of Contents
Advertisement
Advertisement
Table of Contents

Related Manuals for Woodpecker U6 LED


Summary of Contents for Woodpecker U6 LED
- Page 1 U6 LED ULTRASONIC SCALER INSTRUCTION MANUAL...
-
Page 2: Table Of Contents
Contents 1. The installation and components of equipment ..............1 2. Installation and adjustment .....................5 3. Maintenance ........................6 4. Cleaning, Disinfection and Sterilization ................8 5. Precaution ........................13 6. After service ........................15 7. Symbol instruction ......................15 8. Environmental protection ....................16 9. Manufacturer’s right .....................16 10. -
Page 3: The Installation And Components Of Equipment
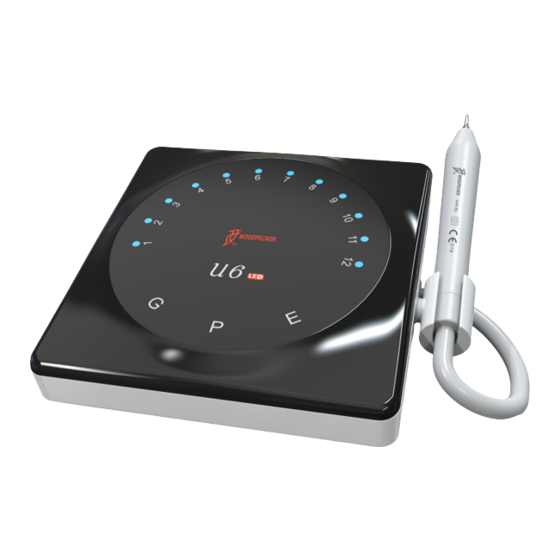
1. The installation and components of equipment 1.1 Instruction Guilin Woodpecker Medical Instrument Co., Ltd. is a professional manufacturer researching, developing and producing ultrasonic scalers. The product is mainly used for teeth cleaning and also an indisensable equipment for teeth disease prevention and treatment. - Page 4 1.3.15 Degree of protection against harmful ingress of water: Ordinary equipment, the foot switch is drip-proof equipment (IPX1) 1.3.16 Degree of safety of application in the presence of a Flammable Anesthetic Mixture with air, Oxygen or Nitrous Oxide: Equipment is not suitable for being used in the presence of a flammable anesthetic mixture with air, oxygen or nitrous oxide.
- Page 5 1.4.2 Back of the main unit sketch map picture 2 1.4.3 Instruction of using wrench Picture 3...
- Page 6 Picture 4 1.4.4 List of removable parts Picture 5 Picture 6...
-
Page 7: Installation And Adjustment
Object Remark Type No./model No./ Manufacturer/Trademark Detachable handpiece HW-6L Woodpecker Scaler tips Woodpecker Power suplly See picture 5 ZMN-03 Guilin Woodpecker F2 food switch See picture 6 Woodpecker Endochuck TW-E1 Woodpecker Torque wrench TW-1L Woodpecker Endo wrench Woodpecker 2. Installation and adjustment 2.1 Operation... -
Page 8: Maintenance
2.1.15 After operating, turn off the power switch to cut off the power, then pull off the plug of power adapter. Note: Don't screw the scaling tips when stepping on the foot switch and the machine is working. 3. Maintenance 3.1 Troubleshooting Fault Possible cause... - Page 9 Fault Possible cause Solutions The water control knob is a low grade. Turn the knob to a high grade [note 1]. The amount of spouting The water pressure is not enough. Enhance the water pressure. water is too little. The water pipe is jammed. Clean water pipe with multi-function syringe [note2].
-
Page 10: Cleaning, Disinfection And Sterilization
picture 7 a) Snip the water pipe at a distance of 10cm to 20cm from the water entrance. b) Turn on the power switch, get through to the power. c) Connect the multi-function syringe of the dental unit to the water pipe. d) Screw off the scaling tip or pull out the handpiece. - Page 11 Steps Tools: Torque wrench, tray, soft brush, clean and dry soft cloth. 1. Remove the tip from product with torque wrench provided by Guilin Woodpecker Medical Instrument Co., Ltd, and then put the tip and wrench into a clean tray.
- Page 12 4.3 Cleaning The cleaning should be performed no later than 24 hours after the operation. The cleaning can be divided into automated cleaning and manual cleaning. Automated cleaning is preferred if conditions permit. 4.3.1 Automated cleaning •The cleaner is proved to be valid by CE certification in accordance with EN ISO 15883. •There should be a flushing connector connected to the inner cavity of the product.
- Page 13 3. Start the program. 4. After the program is finished, remove the product from the washer-disinfector, inspect (refer to section “Inspection and Maintenance”) and packaging (refer to chapter “Packaging”). Dry the product repeatedly if necessary (refer to section “Drying”). Notes a) Before use, you must carefully read the operating instructions provided by the equipment manufacturer to familiarize yourself with the disinfection process and precautions.
- Page 14 In this chapter, we only check the appearance of the product. After inspection, if there is no problem, the handpiece should be immediately reassembled, installing the sealing ring, LED, light guide, and cone head in sequence to the handpiece, and then tighten the cone head clockwise. 4.6.1 Check the product.
-
Page 15: Precaution
* Fractional pre-vacuum procedure = steam sterilization with repetitive pre-vacuum. The procedure used here is to perform steam sterilization through three pre-vacuums. 4.9 Storage 1. Store in a clean, dry, ventilated, non-corrosive atmosphere with a relative humidity of 10% to 93%, an atmospheric pressure of 70KPa to 106KPa, and a temperature of -20 °C to +55 °C;... - Page 16 III. Maintenance is forbidden while the device is used for treatment. 5.1.16 The screw thread of the scaling tips produced by other manufacturers maybe coarse, rusty and collapsed, which will damage the screw thread of the handpiece irretrievably. Please use "WOODPECKER" brand scaling tip. 5.2 Contraindication 5.2.1 The patient who has hemophilia is not allowed to use this equipment.
-
Page 17: After Service
5.4.3 Avoid getting it exposed to sun, rain or snow during transportation. 5.5 Working condition 5.5.1 Environment temperature: +5°C to +40°C 5.5.2 Relative humidity: 30%~75% 5.5.3 Atmosphere pressure: 70kPa to 106kPa 5.5.4 A temperature of the water at the inlet : not higher than +25°C 6. -
Page 18: Environmental Protection
Guidance and manufacturer’s declaration - electromagnetic emissions The models U6 LED are intended for use in the electromagnetic environment specified below. The customer or the user of the models U6 LED should assure that it is used in such an environment. - Page 19 Guidance & Declaration — electromagnetic immunity The models U6 LED are intended for use in the electromagnetic environment specified below. The customer or the user of the models U6 LED should assure that It is used in such an environment.
- Page 20 Guidance & Declaration - Electromagnetic immunity The models U6 LED are intended for use in the electromagnetic environment specified below. The customer or the user of the models U6 LED should assure that it is used in such an environment.
-
Page 21: Statement
The models U6 LED are intended for use in electromagnetic environment in which radiated RF disturbances is controlled. The customer or the user of the models U6 LED can help prevent electromagnetic interference by maintaining a minimum distance between portable and mobile RF communications equipment (transmitters) and the models U6 LED are recommended below, according to the maximum output power of the communications equipment. - Page 22 ZMN-SM-128 V1.4-2020317...
Need help?
Do you have a question about the U6 LED and is the answer not in the manual?
Questions and answers