Metrohm 916 Ti-Touch Tutorial
Hide thumbs
Also See for 916 Ti-Touch:
- Manual (502 pages) ,
- Tutorial (68 pages) ,
- Manual - short instructions (46 pages)
Table of Contents
Advertisement
Advertisement
Table of Contents

Subscribe to Our Youtube Channel
Related Manuals for Metrohm 916 Ti-Touch


Summary of Contents for Metrohm 916 Ti-Touch
- Page 1 916 Ti-Touch Tutorial 8.916.8002EN...
- Page 3 Metrohm AG CH-9100 Herisau Switzerland Phone +41 71 353 85 85 Fax +41 71 353 89 01 info@metrohm.com www.metrohm.com 916 Ti-Touch Tutorial 8.916.8002EN 10.2011 dm/ebe...
- Page 4 Teachware Metrohm AG CH-9100 Herisau teachware@metrohm.com This documentation is protected by copyright. All rights reserved. Although all the information given in this documentation has been checked with great care, errors cannot be entirely excluded. Should you notice any mistakes please send us your comments using the address given above.
-
Page 5: Table Of Contents
Carrying out the determination ........37 6.3.1 Preparing the titration ............37 6.3.2 Carrying out the titration ............38 6.3.3 Displaying the results ............. 39 6.3.4 Recalculating the determination ..........40 6.3.5 Printing a report manually ............42 ■■■■■■■■ 916 Ti-Touch... - Page 6 Carrying out titrations using the sample table ....52 Showing the statistics data ..........53 8 Setting up the user administration Creating a user list ............. 54 Automatic login with USB flash drive ....... 56 Login with password ............58 ■■■■■■■■ 916 Ti-Touch...
-
Page 7: Structure Of The Tutorial
Structure of the tutorial This tutorial describes the installation and the first steps with the 916 Ti-Touch. You will be guided step by step through the most important dialog pages by using a simple pH titration as an example. In addition, you will find information regarding titrations with extended functions and for user administration. - Page 8 ■■■■■■■■■■■■■■■■■■■■■■ 1.3 Symbols and conventions Warning This symbol draws attention to a possible biological hazard. Caution This symbol draws attention to a possible damage of instruments or instrument parts. Note This symbol marks additional information and tips. ■■■■■■■■ 916 Ti-Touch...
-
Page 9: Setting Up And Connecting The Instrument
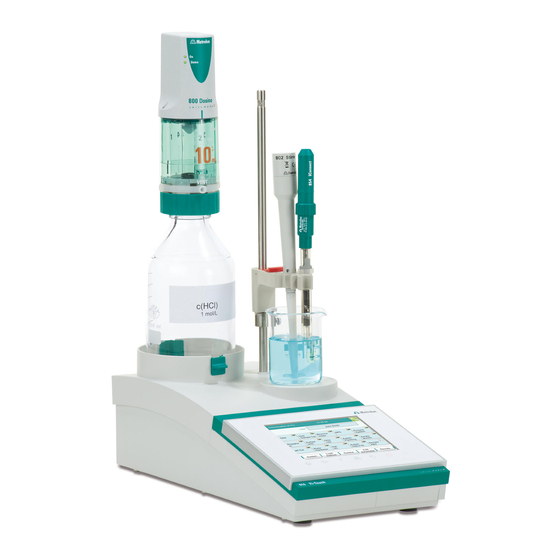
■■■■■■■■■■■■■■■■■■■■■■ 2 Installation 2 Installation Setting up and connecting the instrument 916 Ti-Touch Mounting the support rod ■■■■■■■■ 916 Ti-Touch... - Page 10 If you wish to pull out the plug, you will first need to pull back the outer plug sleeve marked with arrows. Connecting a propeller stirrer 802 Stirrer ■■■■■■■■ 916 Ti-Touch...
- Page 11 Observe the marking on the socket. Connecting an iConnect and electrode cable 1 Make sure that the marking on the plug matches the marking on the Ti-Touch. 2 Ensure that the guide pin is in the correct position. 854 iConnect ■■■■■■■■ 916 Ti-Touch...
- Page 12 . 0 5 0 6 . 2 1 4 8 The USB/RS-232 adapter can be connected to the 916 Ti-Touch directly or by means of a USB hub. Connect the 9-pin plug of the respective balance connecting cable to the RS-232 connector.
-
Page 13: Mounting The Propeller Stirrer
2 Attach the 6.2021.020 electrode holder to the support rod. Keep the locking lever pressed down until it can be released at the desired position. 3 Readjust the clamping ring 6.2013.010 in order to fix the position. ■■■■■■■■ 916 Ti-Touch... -
Page 14: Inserting An Electrode And Buret Tip
In addition, the distance between the addition of the titrant and the electrode should be as large as possible. Also take into account the stirring direction (counterclockwise or clockwise) when posi- tioning electrode and buret tip. ■■■■■■■■ 916 Ti-Touch... - Page 15 In the manual for the 807 Dosing Unit, you will find information about assembling the dosing unit and mounting it on the bottle. 1 Place the reagent bottle with 800 Dosino and dosing unit in the bot- tle holder of the 916 Ti-Touch. ■■■■■■■■ 916 Ti-Touch...
- Page 16 The microvalve of the buret tip must not impede the stirring propel- ler. 3 Insert the electrode at the front on the right. Make sure that the electrode cable is inserted at the rear of the device. ■■■■■■■■ 916 Ti-Touch...
-
Page 17: Switching The Instrument On And Off
Press the mains switch on the left-hand side of the rear panel of ■ the 916 Ti-Touch. The 916 Ti-Touch is initialized. A system test is performed. This process takes some time. If a buret unit is attached, then a request appears to carry out the ■... -
Page 18: Selecting The Dialog Language
Switching off the instrument Caution The 916 Ti-Touch must be switched off by pressing the mains switch on the rear of the instrument before the electricity supply is interrupted. If this is not done, then there is a danger of data loss. - Page 19 Tap on the list box Dialog language and select the desired lan- ■ guage. 3 Save the settings Tap on the fixed keys [ ] or [ The main dialog is displayed in the respective dialog language. ■■■■■■■■ 916 Ti-Touch...
-
Page 20: Touch-Sensitive Screen
In the default setting, the software is configured in such a way that an acoustic signal will be generated every time an active operating element is touched. This setting can be deactivated in the system settings. Display and operating elements The following display and operating elements are available: ■■■■■■■■ 916 Ti-Touch... - Page 21 Input fields open an input dialog when tapped with the finger. Tapping on the selection symbol opens a selec- tion list. A check box can also be activated or deactiva- ted by tapping on it. ■■■■■■■■ 916 Ti-Touch...
-
Page 22: Status Display
In the editing dialog for text or numerical input, enter the individual char- acters by tapping in the input field. The following functions are available: Text editor Editing function Description [OK] The modification is applied and the editing dialog is exited. ■■■■■■■■ 916 Ti-Touch... - Page 23 Special characters are displayed. You can use the ters] button [More] to navigate through all available characters. Number editor Editing function Description [OK] The modification is applied and the editing dialog is exited. [Cancel] The editing dialog is exited without applying the modification. ■■■■■■■■ 916 Ti-Touch...
- Page 24 You can select the result variable by touching [R1]. Note A commercially available USB keyboard can be connected to make it easier to enter text and numbers. The key assignment is described in the chapter Device manager of the detailed manual. ■■■■■■■■ 916 Ti-Touch...
-
Page 25: Preparing Devices And Material
■■■■■■■■■■■■■■■■■■■■■■ 5 Setup and configuration 5 Setup and configuration Preparing devices and material What you will need: A 916 Ti-Touch with mounted support rod, clamping ring and elec- ■ trode holder A propeller stirrer 802 Stirrer ■ An intelligent dosing unit (IDU) with a drive of the type 800 Dosino ■... - Page 26 You will now see an entry which depicts the attached buret unit. Tap on [Select]. ■ 2 Enter the titrant data You can now enter the necessary data for the titrant. Each of the buttons with the selection symbol opens selection lists with useful suggestions. ■■■■■■■■ 916 Ti-Touch...
- Page 27 Enter additional data, e.g. the titer and the concentration. ■ The detailed 916 Ti-Touch manual contains additional information regarding the settings which can be specified for titrants. The new titrant has been entered in the list. The cylinder size and the type of the buret unit are displayed.
-
Page 28: Configuring A New Sensor
1 Open the sensor list In the main dialog, tap on [System]. ■ Tap on [Sensors]. ■ Tap on [New]. ■ You now see the list of the sensor types that can be selected. Tap on [pH electrode]. ■ ■■■■■■■■ 916 Ti-Touch... - Page 29 Confirm the entry with [OK]. ■ Enter additional data, e.g. the serial number. ■ The detailed 916 Ti-Touch manual contains additional information regarding the settings which can be specified for sensors. Note If you are working with an intelligent sensor (iTrode), then the sen- sor data will be adopted automatically in the Ti-Touch.
-
Page 30: Configuring A Printer
Tap on the selection symbol next to the input field Printer and ■ select a printer type. Once you have connected a USB printer, tap on the selection sym- ■ bol next to the input field Connector and select USB. ■■■■■■■■ 916 Ti-Touch... - Page 31 You will find information as to which settings are necessary for sharing of a data directory in the Device manager chapter contained in the more detailed manual. ■■■■■■■■ 916 Ti-Touch...
-
Page 32: Creating A Titration Method
In the main dialog, tap on [Load method] and then on [New ■ method]. Select the template Dynamic Titration pH and tap on [Load ■ template]. Use [Yes] to confirm any message which may appear concerning the modification of an existing method. ■■■■■■■■ 916 Ti-Touch... - Page 33 Contains the list of the individual reports which are printed out. Note If you have not connected a printer, delete the command REPORT. If this is not done, then an error message will appear at the start of the determination. ■■■■■■■■ 916 Ti-Touch...
- Page 34 2 Select the dosing device connector Tap on the selection symbol under Dosing device and select an ■ MSB connector. Make sure that the dosing device is also connected to the MSB con- nector that you have selected. ■■■■■■■■ 916 Ti-Touch...
- Page 35 2 Define a stop volume Tap on the input field Stop volume. ■ Enter a value corresponding to the cylinder volume of the buret ■ unit used. Apply the value by tapping on [OK] and close the input dialog. ■ ■■■■■■■■ 916 Ti-Touch...
- Page 36 Defining a calculation You will now see the three commands again in the dialog with the method run. 1 Open the selection of result templates Select the CALC command and tap on [Edit command]. ■ Tap on [New]. ■ ■■■■■■■■ 916 Ti-Touch...
- Page 37 Enter the molar mass of the sample and confirm with [OK]. ■ Tap on [Next]. ■ 4 Define the result properties Now you can change the specifications for the result calculation (e.g. result name or the number of decimal places). ■■■■■■■■ 916 Ti-Touch...
- Page 38 Select Result report and tap on [Edit]. ■ Here you can select the data which will be printed in a result report. Select additional data (e.g. Sensor data and Titrant data) by ■ tapping accordingly. Close the dialog with [ ■ ■■■■■■■■ 916 Ti-Touch...
- Page 39 Tap on the input field y2 axis and then select ERC. Afterwards, close the dialog with [ ] or [Select]. When the report is printed out, the ERC curve (1st derivative) will be printed out along with the standard titration curve. ■■■■■■■■ 916 Ti-Touch...
- Page 40 Use [OK] to confirm the entry and close the text editor. ■ Save the method by tapping on [Save]. ■ The method is stored in the "Main group" folder. Return to the main dialog with [ ] or [ ■ ■■■■■■■■ 916 Ti-Touch...
-
Page 41: Entering User Name And Sample Data
Tap on the input field Identification 2. ■ Enter a further designation for the sample (e.g. batch number or ■ sampling date). Confirm the entry with [OK]. ■ 3 Enter the sample size Tap on the input field Sample size. ■ ■■■■■■■■ 916 Ti-Touch... - Page 42 On the balance, press the key (with the printer symbol) for printing the weight. The sample size and the corre- sponding unit are transferred to the 916 Ti-Touch and are displayed in the main dialog.
-
Page 43: Carrying Out The Determination
] (= Manual control). ■ Select Dosing. ■ 2 Carry out the dosing function Prepare Note Make sure that the buret tip is directed into a vessel that can accommodate the cylinder volume of your buret unit several times over. ■■■■■■■■ 916 Ti-Touch... -
Page 44: Carrying Out The Titration
■ Preparing is carried out. The proceeding of the function is shown on the display. Details on the function Prepare can be found in the manual for the 916 Ti-Touch. Tap on [ ■ 1 Rinse electrode, buret tip and propeller stirrer Place an empty vessel on the titration stand. -
Page 45: Displaying The Results
The results of the last determination are always available under Results. Result name and result are displayed. Furthermore, the measured value and volume of the endpoints found are displayed. Proceed as follows to display the titration curve: ■■■■■■■■ 916 Ti-Touch... -
Page 46: Recalculating The Determination
1 Open the CALC command Return to the main dialog with [ ■ Open the method with [Edit parameters]. ■ Select the CALC command and tap on [Edit command]. ■ 2 Add a new calculation Tap on [New]. ■ ■■■■■■■■ 916 Ti-Touch... - Page 47 Select the variable MCD and tap on [Insert]. ■ Confirm with [OK]. ■ Tap on the input field of the result name and type in a name. ■ If needed, define the result unit and decimal places. ■ ■■■■■■■■ 916 Ti-Touch...
-
Page 48: Printing A Report Manually
You can have the report of a determination printed out manually. Printing a report 1 Open the print dialog Press the fixed key [ ■ Numerous reports are available to you for printing in the print dialog. ■■■■■■■■ 916 Ti-Touch... - Page 49 Numerous other reports, e.g. measuring point list, parameters report or titrant list, can also be selected under [More reports]. 2 Initiate the printing Tap on the selected report ■ under [More reports], select another report and tap on [Print]. ■ ■■■■■■■■ 916 Ti-Touch...
-
Page 50: Performing Titration With Supplementary Functions
These settings apply for all determinations which are carried out with this method. Tap on the check box Statistics. ■ Enter a value under Number of determinations. ■ Tap on [ ■ ■■■■■■■■ 916 Ti-Touch... -
Page 51: Saving The Determination And The Pc/Lims Report
PC, then you can save it in a report called PC/LIMS report or transfer it directly to a PC through a serial port. The tiBase database from Metrohm is available to you for administering the determination data on the PC. - Page 52 (memory location in a computer network). A USB flash drive (external memory) must be plugged in on the 916 Ti-Touch before a determination is carried out. This memory location must already be defined in the device manager at the time of the selection of a shared memory location in a computer network.
-
Page 53: Modifying The Titration Parameters
7 Performing titration with supplementary functions Note Details concerning the PC/LIMS report can be found in the more detailed manual for the 916 Ti-Touch. Note These settings are method-specific. The determination data is saved to the defined memory location for all determinations which are carried out with this method. - Page 54 1 Modify the dosing rate Tap on [Titration parameters]. ■ Under Titration rate, select the selection user. ■ Now all of the settings of the previously set parameter set will be available under User-defined parameters. Tap on [User-defined parameters]. ■ ■■■■■■■■ 916 Ti-Touch...
-
Page 55: Creating A Sample Table
You will now see once again the method run with the three com- mands. Creating a sample table If you would like to prepare a sample series in advance, you can use the sample table. Proceed as follows: ■■■■■■■■ 916 Ti-Touch... - Page 56 1 Activate the sample table In the main dialog, tap on [Control]. ■ Activate the Sample table check box. ■ Return to the main dialog with [ ■ A new button is now visible in the main dialog. ■■■■■■■■ 916 Ti-Touch...
- Page 57 Tap on the selection symbol next to the input field Method. ■ Select a saved method. ■ A particular method can be selected for each sample which is to be processed. If no method is specified, then the currently loaded method is executed. ■■■■■■■■ 916 Ti-Touch...
-
Page 58: Carrying Out Titrations Using The Sample Table
The sample data of the next line down will be used for the next titration. A result report will be printed out and a PC/LIMS report will be saved after each titration if you have activated these options. ■■■■■■■■ 916 Ti-Touch... -
Page 59: Showing The Statistics Data
[Result on/off] or [Determ. on/off]. The recalculation of the statistics data will be performed immediately. If you would like to add other titrations to the statistics, you can do this in the statistics overview. ■■■■■■■■ 916 Ti-Touch... -
Page 60: Setting Up The User Administration
8 Setting up the user administration If different persons are working on the instrument, we recommend that the user administration of the 916 Ti-Touch be used. This means that everyone can use their user identification to log on to the instrument. The reports will then automatically contain the respective user name. - Page 61 The user administration can be used only with administrator rights. At least one person must be in possession of administrator rights. Return to the user administration with [ ■ Define additional users. ■ Return to the main dialog with [ ■ ■■■■■■■■ 916 Ti-Touch...
-
Page 62: Automatic Login With Usb Flash Drive
1 Plug in the USB flash drive Return to the main dialog with [ ■ Plug a USB flash drive into the rear of the 916 Ti-Touch. ■ Wait until a message appears which confirms that the USB flash ■... - Page 63 ID profile. In order to log in another user with ID profile, tap in the main dia- ■ log on [Control/ Logout] and afterwards on [Logout]. The request appears once again to insert a USB flash drive. ■■■■■■■■ 916 Ti-Touch...
-
Page 64: Login With Password
2 Carry out the settings Activate Login via user name. ■ Activate Password required. ■ There are numerous possible settings in the login options. Consult the manual of the 916 Ti-Touch to look these up if necessary. ■■■■■■■■ 916 Ti-Touch... - Page 65 You must define a password at the time of the first login on the instru- ment. Proceed as follows: 1 Enter the user name Tap on the input field User, enter the user name (abbreviation) ■ and confirm with [OK]. Tap on [Change password]. ■ ■■■■■■■■ 916 Ti-Touch...
- Page 66 Confirm the entry with [OK]. ■ Enter the password once again under Confirm password. ■ Tap on [OK]. ■ 3 Log in Enter the new password under Password and tap on [OK] in the ■ login dialog. ■■■■■■■■ 916 Ti-Touch...
Need help?
Do you have a question about the 916 Ti-Touch and is the answer not in the manual?
Questions and answers