Advertisement
Quick Links
Advertisement

Related Manuals for Techni Mobili RTA-0054


Summary of Contents for Techni Mobili RTA-0054
- Page 1 MODEL RTA-0054 ASSEMBLY INSTRUCTIONS Thank you for purchasing our product.
- Page 2 RTA-0054 • Please read carefully the assembly instructions before the installation. • Do not discard this manual or any of the packaging material until the unit has been completely assembled. • Might require two people.
-
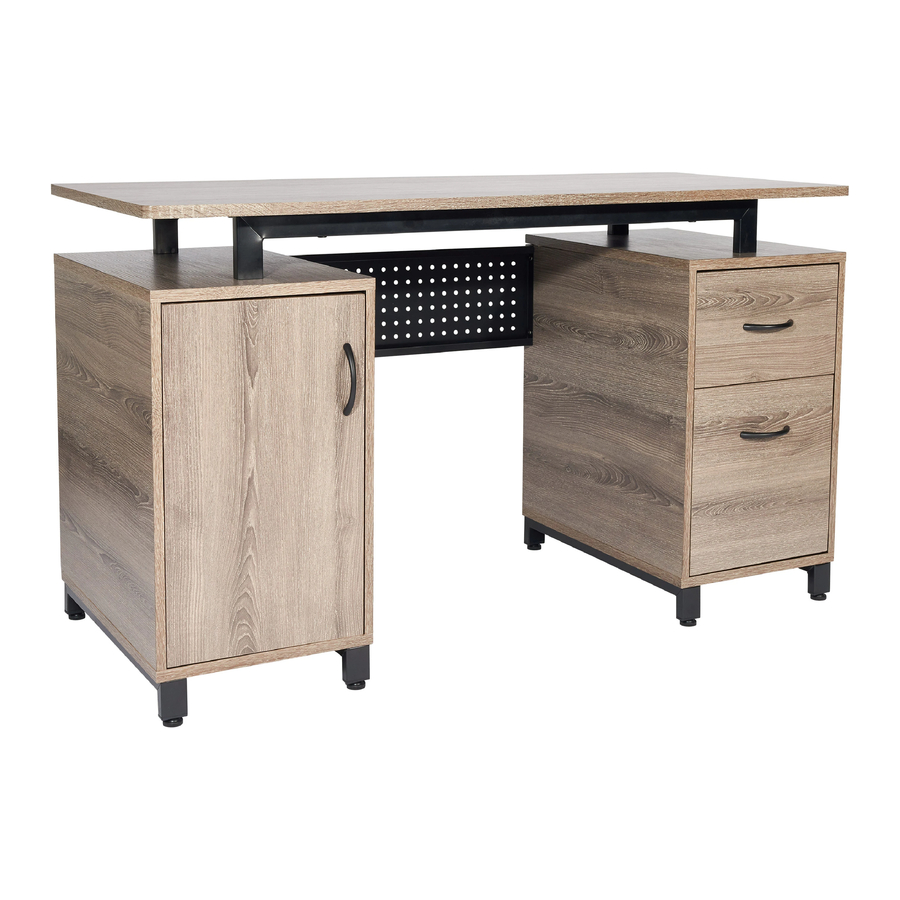
Page 3: Main Parts List
RTA-0054 MAIN PARTS LIST Left panel for left Right panel for left Main panel cabinet cabinet Left panel for Right panel for drawers’ Top panels for both Bottom panel for drawers’ cabinet cabinet cabinets both cabinets Back panels for both... - Page 4 RTA-0054 MAIN PARTS LAYOUT (FOR REFERENCE): ���� ���� ���� ���� ���� ���� ���� ���� ���� ���� ���� ���� SCREWS LIST: THE FOLLOWING COME IN BAG#1: THE FOLLOWING COME IN BAG#2: ❿ ❶ PART SIZE / DESCRIPTION / FIGURE PART SIZE / DESCRIPTION / FIGURE ❷...
- Page 5 RTA-0054 ☛ This unit uses cam bolts and locks. The following explains how to use them. This is not an assembly step; it is a guide for when you are actually doing the assembly using this kind of hardware. Cam Lock Cam Bolt 1.
- Page 6 RTA-0054 BEFORE YOU START THE ASSEMBLY, PLEASE READ THE FOLLOWING TIPS AND WARNINGS. ❶ ❼ To avoid misalignments, Do a quick inventory to make sure the package always leave the screws contains all the parts and loose and tighten them until...
- Page 7 RTA-0054 STEPS 1 THRU 8: DRAWERS ASSEMBLY ➈ to the side panels using screws ⑦ STEP 1 First insert the small wooden pins into the bottom holes on the front profile of the side panels , then assemble the back panel Hardware/Tools: as shown.
- Page 8 RTA-0054 STEP 4 Assemble one of the handles Ⓢ to the front panel using its own screws from the inside as shown. Hardware/Tools: ���� (NOT INCLUDED) using screws ⑦ as shown. STEP 5 Assemble the back panel to the side panels ❼...
- Page 9 RTA-0054 locks ⑧ just as in step 3 and as explained in page 5. STEP 7 using cam bolts ② and cam Assemble the front panel to the side panels ❷ Hardware/Tools: (This view is from ❽ behind with the front...
- Page 10 P.10 RTA-0054 P.10 ④, making sure the smaller rails attach to the panels, and the larger rails slides in and out. STEP 10 With the side panels Ⓓ and Ⓔ oriented as shown, assemble the sliders Ⓠ using screws ❹...
- Page 11 P.11 RTA-0054 P.11 Assemble the side panels Ⓑ and Ⓒ to the second panel Ⓖ using wooden pins ①, cam bolts ② and cam locks ③ just as it was explained in step 11 and in page 5. STEP 12 ❶...
- Page 12 P.12 RTA-0054 P.12 wooden pins ①, cam bolts ② and cam locks ③ as shown and as explained in page 5. STEP 14 Assemble the cabinet top panels Ⓕ to the side panels Ⓑ-Ⓒ and Ⓓ-Ⓔ respectively using ❶ Hardware/Tools: ❷...
- Page 13 P.13 RTA-0054 P.13 Assemble the top metal support frames Ⓜ to both cabinet top panels Ⓕ using screws ⑪ STEP 16 as shown. ⓫ Hardware/Tools: (This view shows the unit from the front and from below facing to the left) ⓮...
- Page 14 P.14 RTA-0054 P.14 STEP 19 Assemble the door Ⓘ to the hinges Ⓡ using hinge screws Ⓡ as shown. Note: there will be still 4 screws Ⓡ left for step 20. Hardware/Tools: ���� (NOT INCLUDED) STEP 20 First fine-tune the hinges Ⓡ to make the door Ⓘ close smoothly by adjusting the screws indicated below, then secure using the last screws Ⓡ...
- Page 15 P.15 RTA-0054 P.15 First install the metal pins ⑤ into the sets of holes on panels Ⓑ and Ⓒ of the left cabinet, STEP 21 ❺ then insert and place the removable panel Ⓙ over the pins. Hardware/Tools: You might need to insert the panel...
- Page 16 P.16 RTA-0054 P.16 STEP 22 On the right cabinet pull out the bottom sliders Ⓠ and assemble the large drawer to the with screws ⑥ from inside the drawer as shown. ❻ sliders by fitting them into the grooves on the side panels...
- Page 17 P.17 RTA-0054 P.17 assemble the panel using screws ⑫ from underneath the unit as shown. STEP 24 Place the main panel Ⓐ over the top metal supports Ⓜ making the holes coincide, and ⓬ Hardware/Tools: ☛ Assembly tip: To avoid misalignments, screw loosely and tighten the screws only after all are in place.
-
Page 18: Weight Limits
P.18 RTA-0054 P.18 AFTER THE ASSEMBLY IS DONE, PLEASE READ CAREFULLY THE FOLLOWING CARE AND MAINTENANCE WARNINGS: WEIGHT LIMITS 44 Lbs. (20 Kg) 88 Lbs. (40 Kg) 33 Lbs. (15 Kg) 44 Lbs. (20 Kg) 33 Lbs. (15 Kg) 22 Lbs. (10 Kg) 22 Lbs. - Page 19 P.19 RTA-0054 P.19 TECHNI MOBILI WARRANTY DESKS/LAPTOP CARTS/FILE CABINETS: LIMITED 5-YEAR WARRANTY TV Stand/Entertainment Center: 2 YEAR WARRANTY RTA Products, LLC warrants to the Original Purchaser who acquired a new product from RTA Products or its authorized resellers that this product will be free from defects in its workmanship and materials, under normal use and service conditions, as described herein.
- Page 20 P.20 RTA-0054 P.20 FOR SEVERAL HELP OPTIONS INCLUDING REPLACEMENT PARTS ORDERS _________________________________________________________________ WWW.TECHNIMOBILI.COM VISIT: CLICK ON SUPPORT TAB Scan QR Code to order replacement parts SUPPORT@RTAPRODUCTS.COM OR EMAIL US:...
Need help?
Do you have a question about the RTA-0054 and is the answer not in the manual?
Questions and answers