Tekmar Invita Installation, Operation And Maintenance Manual
Wifi thermostat
Hide thumbs
Also See for Invita:
- User manual (8 pages) ,
- Quick setup manual (12 pages) ,
- User manual (9 pages)
Table of Contents
Advertisement
Quick Links
Installation, Operation and Maintenance
Invita
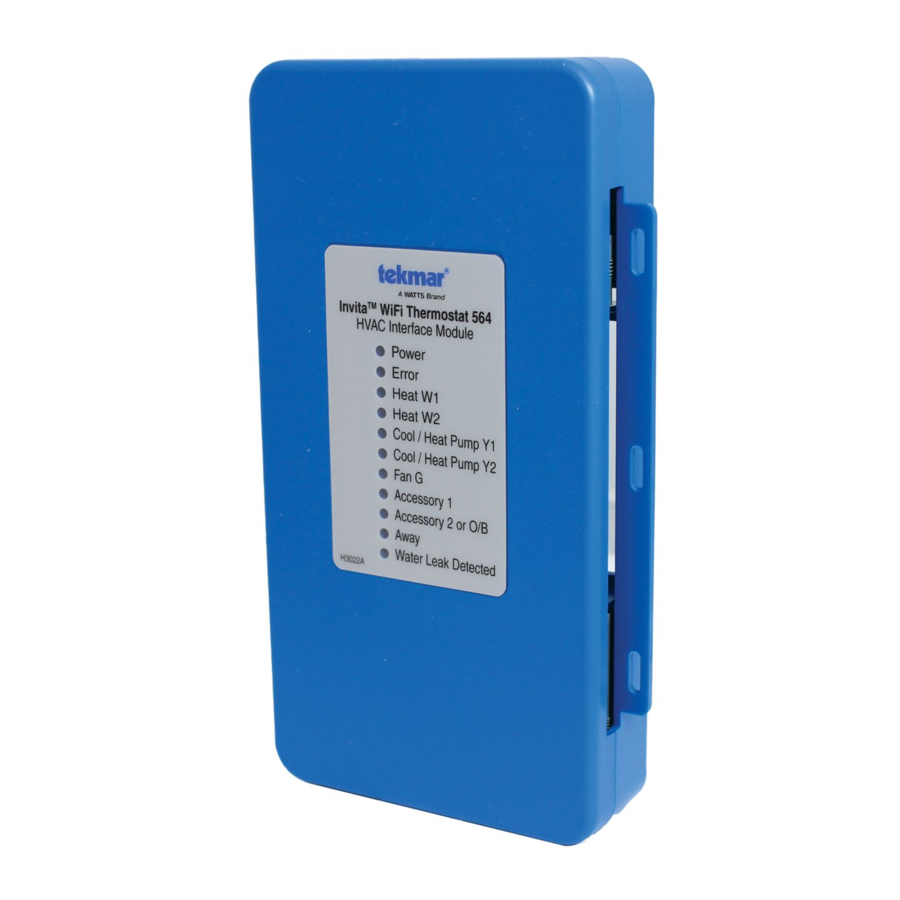
HVAC
Interface Module
Compatible With
• Conventional systems:
2-stage heating, 2-stage cooling, fan and 2 accessories
• Heat pump systems:
4-stage heating, 2-stage cooling, fan,reversing valve and 1 accessory
• Supports dual fuel systems
• Accessory options:
Humidifier, dehumidifier, HRV/ERV ventilator, heat pump loop valve
WARNING
!
Please read carefully before proceeding with
installation. Your failure to follow any attached
instructions or operating parameters may lead to the
product's failure.
Keep this Manual for future reference.
WiFi Thermostat
®
Invita
®
WiFi Thermostat
Installation Manual
Wall Plate
IOM-T-564
Advertisement
Table of Contents

Related Manuals for Tekmar Invita


Summary of Contents for Tekmar Invita
- Page 1 Installation Manual IOM-T-564 Installation, Operation and Maintenance Invita WiFi Thermostat ® Wall Plate HVAC Invita ® Interface Module WiFi Thermostat Compatible With • Conventional systems: 2-stage heating, 2-stage cooling, fan and 2 accessories • Heat pump systems: 4-stage heating, 2-stage cooling, fan,reversing valve and 1 accessory •...
-
Page 2: Table Of Contents
Table of Contents Page Important Safety Information . . . . . . . . . . . . . . . . . . . . . . . . . . . . . . . . . . . . . . . . . . . . . . . . . . . . . .3 Installation . -
Page 3: Important Safety Information
Important Safety Information It is your responsibility to ensure that this thermostat is safely installed according to all applicable codes and standards . tekmar is not responsible for damages resulting from improper installation and/ ® or maintenance . This is a safety-alert symbol . -
Page 4: Installation
1. Remove the old thermostat If more than 2 wires are present, identify the R & C wires for use when connecting the Invita WiFi Thermostat . Additional wires should be secured in a way that prevents them from touching the circuit... - Page 5 Interface Module Connect the 2 wires from the old thermostat to the Cover towards the terminals on the back of the Invita WiFi Thermostat . base . Top and bottom This connection is not polarity sensitive . clips hold the cover...
-
Page 6: Equipment Connections
• Up to 4-stage heating, 2-stage cooling, fan, reversing valve and 1 accessory Accessory options: • Humidifier, dehumidifier, HRV/ERV ventilator HRV/ERV Ventilator Optional Outdoor Sensor Humidifier HVAC Interface Module Electric Coil Invita WiFi Thermostat Watts FloodSafe ® Water Detector Air Conditioner Shutoff Heat Pump Furnace Hot Water Tank... -
Page 7: Wiring The Hvac Interface Module
Wiring the HVAC Interface Module Ensure power to connecting equipment is off . To prevent the risk of personal injury and/or death, make sure power is not applied to the thermostat or HVAC Interface Module until they are fully installed and ready for configuration . All work must be done with power to the circuit being worked on turned off . -
Page 8: Up To 2-Stage Furnace And 2-Stage Air Conditioner
Up to 2-Stage Furnace and 2-Stage Air Conditioner Essential Settings: Jumpers: Heating Type = Conventional J1 = On Equipment = 2 Heat/2 Cool J2 = On Radiant Floor Heating = No J3 = On Furnace Conditioner Up to 2-Stage Hydronic Boiler and 2-Stage Air Conditioner Essential Settings: Heating Type = Conventional Equipment = 2 Heat/2 Cool... -
Page 9: Up To 2-Stage Heat Pump With Auxiliary Heat
Up to 2-Stage Heat Pump with Auxiliary Heat The thermostat operates high cost electric resistance heat when the heat pump is unable to meet the building heating load . Jumpers: Essential Settings: J1 = On Heating Type = Heat Pump J2 = On Equipment = 2 Heat Pump/1 Aux J3 = On... -
Page 10: Dehumidification Using A Dx Coil
Accessory Relay 1 = Ventilation HRV / ERV Ventilator Outdoor Sensor • Installing an outdoor sensor provides more accurate tekmar Outdoor outdoor temperature readings compared to using Sensor 070 the weather information from the Internet which may cause delays in updating weather . -
Page 11: Room Sensor
LFWDS detects a water and shuts off the supply line to the water heater . Watts FloodSafe Water Detector Shutoff Startup Restore power to the connected equipment . Once energized, the Invita WiFi Thermostat will display the home screen . -
Page 12: Home Screen
Home Screen After 60 seconds of inactivity, the thermostat home screen displays only the time and the temperature . Go to schedule Swipe to view: Current time • Weather • Outdoor temperature • Floor temperature • Heat To setting Current temperature •... -
Page 13: User Settings
User Settings Away Use the Away setting to • Selecting the Away set- Home / Away save energy when the ting on a thermostat or building is unoccupied the mobile app will affect all devices linked to that location through the app . •... -
Page 14: Display
Display Setting Range Default TEMPERATURE UNITS °F or °C °F Select °F or °C . ENERGY USE 0 to 24 (daily) 0 hours View the number of hours the heating or cooling has 0 to 744 (monthly) operated either daily or monthly . Daily Usage Today 0 hrs... -
Page 15: Time
Time When connected to the Internet, the time can be set automatically . NOTICE TIME & DATE Incorrectly setting the time and date manually may prevent the thermostat from communicating to the mobile app . 2019 Automatic time source is recommended when using an Internet connection . -
Page 16: Wifi
WiFi NOTICE Before using the WiFi features of this product, you must accept the Terms of Use, as amended from time to time and available at Watts .com/terms-of-use . If you do not accept these terms, this product can still be used without WiFi features . The thermostat includes a step by step tutorial to setup the WiFi connection . -
Page 17: Wifi And Connectivity Troubleshooting
MAC filter list . Network Troubleshooting (1) WiFi Signal Strength • tekmar provides free access to a network • The WiFi signal must measure between 0 and troubleshooting tool called RouteThis Helps . -69 dB to have a reliable connection to the •... -
Page 18: Installer Settings
Installer Settings Setup The Setup menu contains seven sub-menus that SETUP MENU determine how the thermostat operates . The Access Level setting in the Toolbox menu TOOLBOX TEMP determines how many settings are available to the user . SENSORS ALERTS HUMIDITY RELAYS Press back to return to the main... -
Page 19: Setup - Temp
Setup - Temp Setting Range Default Screen Page 1 FLOOR MIN - WAKE Off, 40 to 95°F Select the floor temperature while in the wake schedule . Off, 4 .5 to 35 .0°C Applies when there is both a floor and an air sensor . FLOOR MIN - LEAVE Off, 40 to 95°F Select the floor temperature while in the leave schedule . -
Page 20: Setup - Sensors
Setup - Sensors Setting Range Default SENSOR 1 Off, Room, Select the type of sensor connected to S1 and Com Floor wiring terminals . Off, SENSOR 2 Room, Select the type of sensor connected to S2 and Com Floor, wiring terminals . Outdoor Off, SENSOR 3... -
Page 21: Setup - Alerts
Setup - Alerts Setting Range Default ROOM HOT WARNING Off, 40 to 100°F Sends an email notification if the room exceeds this Off, 4 . 5 to 38 . 0 °C temperature . ROOM COLD WARNING Off, 40 to 100°F Sends an email notification if the room falls below this Off, 4 . -
Page 22: Setup - Relays
Setup - Relays (1 of 3) Setting Range Default HEATING TYPE Conventional, Conventional Heat Pump Select between conventional heating or heat pump . Conventional 1 Heat/1 Cool, 1 Heat/ 1 Heat/2 Cool, 1 Cool 2 Heat/1 Cool, 2 Heat/2 Cool, EQUIPMENT Heat Pump Select the number of stages of the heating and... - Page 23 Setup - Relays (2 of 3) Setting Range Default HEAT 4 DELAY Select the time delay when the fourth stage heating turns 0 to 180 minutes 1 minute on . The time delay starts counting after the third stage heating is turned on . This setting is available when a heat pump is selected and there are at least 4 heating stages .
- Page 24 Setup - Relays (3 of 3) Setting Range Default HEAT PUMP REVERSING VALVE Select O for heat pumps designed for normally heating O (Orange), operation . Select B for heat pumps designed for normally B (Blue) cooling operation . This setting is only available for heat pump systems .
-
Page 25: Setup - Humidity
Setup - Humidity Set the lowest relative Humidity humidity level . Set the highest relative Range is 10 to 80% humidity level . Humidify To: 40% Default is 40% Range is 20 to 90% Available when Accessory 1 Default is 60% Dehumidify To: 60% or 2 operates a humidifier . -
Page 26: Setup - Hrv / Erv Ventilation
Setup - HRV / ERV Ventilation VENTILATION FAN VENTILATION Wake When a programmable schedule is used, there is a Wake 30 min/hr ventilation setting for each time period . 45 min/hr Leave Auto The ventilation fan runs Return 45 min/hr 30 min/hr for the set amount of time per hour . -
Page 27: Sequence Of Operation
Sequence of Operation Heating and Cooling Operation • The Heat On symbol is shown on the display when the thermostat is heating . • Heating for freeze protection is provided whenever the air or floor temperature falls below 40°F (4 .5°C), regardless of operating mode . - Page 28 When radiant floor heating is installed, it is always the first stage of heating, followed by the heat pump, and lastly any backup heating . This allows the floor to remain warm in the heating season . EQUIPMENT SETTING 1HP/1AUX 1HP/2AUX 2HP/1AUX 2HP/2AUX...
- Page 29 Cooling Differentials The first and second stage cooling have adjustable differentials and time delay setting to determine when the stage turns on, and shut off when the room temperature reaches 0 .5 and 0 .0°F (0 .25 and 0 .0°C) above the Cool To setting respectively . Heat Pump Balance Point An air source heat pump’s Coefficient of Performance (COP) declines with falling outdoor air tempera- ture .
-
Page 30: Relative Humidity Operation
Relative Humidity Operation Relative Humidity Sensor The thermostat includes an internal relative humidity (RH) sensor and has the option to connect to an external RH sensor . The installer has the option to disable the internal RH sensor when an external RH sensor is installed . -
Page 31: Hrv / Erv Ventilator Operation
HRV / ERV Ventilator Operation Ventilation with fresh outdoor air is important for maintaining indoor air quality . The thermostat can operate a heat recovery ventilator (HRV) or energy recovery ventilator (ERV) on a timer by closing the Accessory 1 relay to operate the ventilator fan at low speed . Heat Pump Loop Valve Operation The thermostat supports water-to-air heat pump systems that absorb or reject heat to a hydronic building loop . -
Page 32: Error Messages
. If sensor 1, 2 or 3 is set to room the thermostat continues to operate, otherwise operation stops . The error cannot be field repaired . Contact your tekmar sales representative for warranty or repair procedures . INTERNAL HUMIDITY SENSOR FAULT Due to an open or short circuit, the thermostat is unable to read the internal humidity sensor . - Page 33 Description INTERNET UNAVAILABLE The thermostat has a WiFi connection to the router but is unable to communicate to the Internet . Steps to clear the error include: 1) power off and on the router, 2) power off and on the thermostat . WATER LEAK DETECTOR WARNING A water leak has been detected and the water line has been shut off .
- Page 34 Notes _ _ _ _ _ _ _ _ _ _ _ _ _ _ _ _ _ _ _ _ _ _ _ _ _ _ _ _ _ _ _ _ _ _ _ _ _ _ _ _ _ _ _ _ _ _ _ _ _ _ _ _ _ _ _ _ _ _ _ _ _ _ _ _ _ _ _ _ _ _ _ _ _ _ _ _ _ _ _ _ _ _ _ _ _ _ _ _ _ _ _ _ _ _ _ _ _ _ _ _ _ _ _ _ _ _ _ _ _ _ _ _ _ _ _ _ _ _ _ _ _ _ _ _ _ _ _ _ _ _ _ _ _ _ _ _ _ _ _ _ _ _ _ _ _ _ _ _ _ _ _ _ _ _ _ _ _ _ _ _ _ _ _ _ _ _ _ _ _ _ _ _ _ _ _ _ _ _ _ _ _ _ _ _ _ _ _ _ _ _ _ _ _ _ _ _ _ _ _ _ _ _ _ _ _ _ _ _ _ _ _ _ _ _ _ _ _ _ _ _ _ _ _ _ _ _ _ _ _ _ _ _ _ _ _ _ _ _ _ _ _ _ _ _ _ _ _ _ _ _ _ _ _ _ _ _ _ _ _ _ _ _ _ _ _ _ _ _ _ _ _ _ _ _ _ _ _ _ _ _ _ _ _ _ _ _ _ _ _ _ _ _ _ _ _ _ _ _ _ _ _ _ _ _ _ _ _ _ _ _ _ _ _ _ _ _ _ _ _ _ _ _ _ _ _ _ _ _ _ _ _ _ _ _ _ _ _ _ _ _ _ _ _ _ _ _ _ _ _ _ _ _ _ _ _ _ _ _ _ _ _ _ _ _ _ _ _ _ _ _ _ _ _ _ _ _ _ _ _ _ _ _ _ _ _ _ _ _ _ _ _ _ _ _ _ _ _ _ _ _ _ _ _ _ _ _ _ _ _ _ _ _ _ _ _ _ _ _ _ _ _ _ _ _ _ _ _ _ _ _ _ _ _ _ _ _ _ _ _ _ _ _ _ _ _ _ _ _ _ _ _ _ _ _ _ _ _ _ _ _ _ _ _ _ _ _ _ _ _ _ _ _ _ _ _ _ _ _ _ _ _ _ _ _ _ _ _ _ _ _ _ _ _ _ _ _ _ _ _ _ _ _ _ _ _ _ _ _ _ _ _ _ _ _ _ _ _ _ _ _ _ _ _ _ _ _ _ _ _ _ _ _ _ _ _ _ _ _ _ _ _ _ _ _ _ _ _ _ _ _ _ _ _ _ _ _ _ _ _ _ _ _ _ _ _ _ _ _ _ _ _ _ _ _ _ _ _ _ _ _ _ _ _ _ _ _ _ _ _ _ _ _ _ _ _ _ _ _ _ _ _ _ _ _ _ _ _ _ _ _ _ _ _ _ _ _ _ _ _ _ _ _ _ _ _ _ _ _ _ _ _ _ _ _ _ _ _ _ _ _ _ _ _ _ _ _ _ _ _ _ _ _ _ _ _ _ _ _ _ _ _ _ _ _ _ _ _ _ _ _ _ _ _ _ _ _ _ _ _ _...
-
Page 35: Technical Data
3.3 V (dc) humidity sensor power, 3.0 mA maximum Temperature sensor NTC thermistor, 10 kΩ @ 77°F (25°C ±0.2°C) ß=3892 Optional sensors tekmar type # 070, 072, 073, 076, 077, 079, 084, 086, 087 Communications WiFi 802.11n, 2.4 GHz, WPA2 encryption Mobile app... -
Page 36: Limited Warranty
The liability of tekmar under the Limited Warranty shall be limited to, at tekmar’s sole discretion: the cost of parts and labor provided by tekmar to repair defects in materials and / or workmanship of the defective product; or to the exchange of the defective product for a warranty replacement product;...
Need help?
Do you have a question about the Invita and is the answer not in the manual?
Questions and answers