Table of Contents
Advertisement
Quick Links
Advertisement
Table of Contents

Related Manuals for SE Controls SHEVTEC

Summary of Contents for SE Controls SHEVTEC
- Page 1 SHEVTEC® Repeater Panel Technical Information and Operating Instructions...
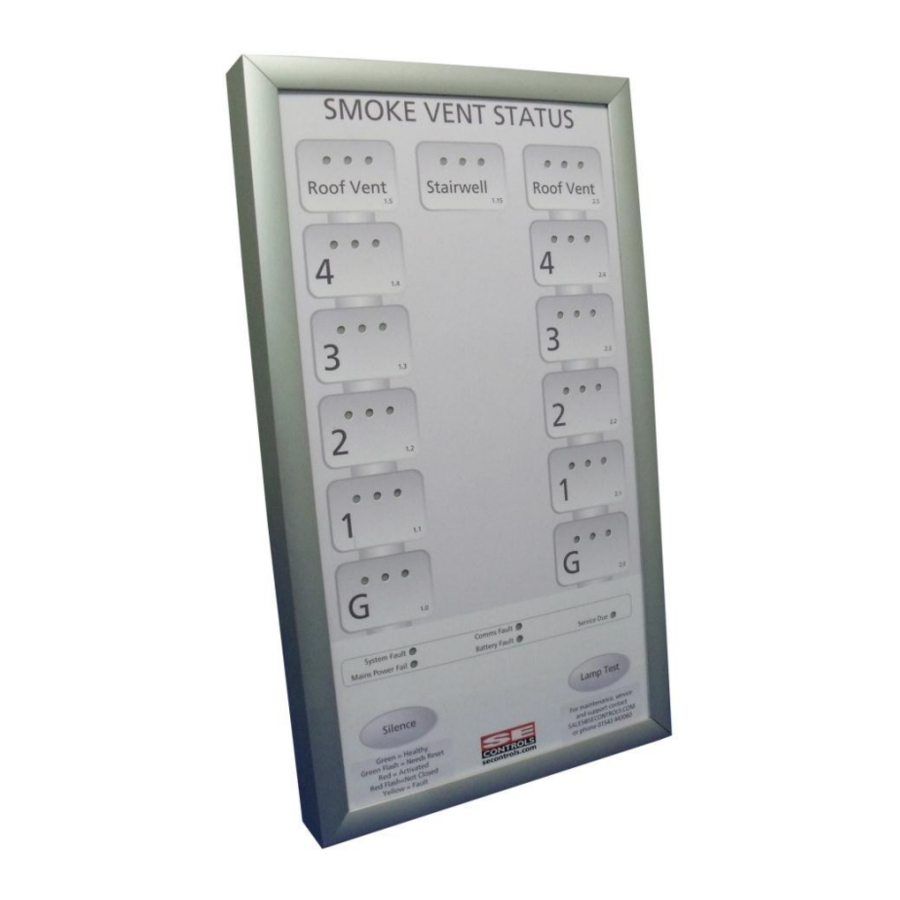
- Page 2 Currently OS1.75 and OS2 OSLon are not supported. The SHEVTEC® Repeater Panel is implemented using modular construction. The size of the panel is matched to the job requirements, from four to twelve rows of indicators as standard. The indicators are arranged in a grid of three columns which allows buildings with one, two or three smokestacks to be represented.
-
Page 3: Table Of Contents
Binding addresses (OS2) Binding addresses (OSLoop) Connection to OSLoop Coordinator 10.0 Connection to OS2 with OSLink 11.0 Address and DIP Switch 12.0 Connection to the SHEVTEC® Repeater Panel 13.0 Electrical Installation and Commissioning 14.0 Recommended maintenance 15.0 END-USER INFORMATION 16.0 Disposal... -
Page 4: Important Notices
OSLoop systems require the parameter [OADD] set – this may be preset at the factory or may require use of an SEC POP configuration tool. 4.0 Preparation SHEVTEC® Repeater Panels are custom built for each application. After unpacking the SHEVTEC® Repeater Panel and check the reference printed on the data badge is correct. 5.0 Cable installation Install a four-way fire rated cable between the nearest OS2 or OSLoop Coordinator and the required location of the panel. -
Page 5: Fixing The Mounting Plate
6.0 Fixing the mounting plate The top of the mounting plate is identified by a screw fixing lug. Ensure the area to mount the panel is flat. Hold the mounting plate up against the surface to which it is to be fixed, with the cable coming though the central hole. -
Page 6: Connection To Osloop Coordinator
9.0 Connection to OSLoop Coordinator The OSLOOP coordinator has an OSLink repeater comms connector CN3 supplying both data and SHEVTEC® Repeater Panel. NA and NB connections are duplicated to allow daisy-chaining of devices. Signal Device Terminal FP+4 core and earth 1.5mm... - Page 7 When the cable has an overall screen, the screen may optionally be connected to the OS2 SCR terminal.
-
Page 8: Address And Dip Switch
Allows oslink addresses 16-31 to be used. Should be pre-set off at the factory. 12.0 Connection to the SHEVTEC® Repeater Panel Connection to the SHEVTEC® Repeater Panel is made using a pluggable terminal block (CN3). Connections are labelled on the rear of the panel. -
Page 9: Electrical Installation And Commissioning
Remove the protective film from the front panel or leave in place until the building is complete. 14.0 Recommended Maintenance The SHEVTEC Repeater Panel requires no maintenance and contains no replaceable parts. Operation of the LEDs and sounder may be tested using the lamp test button. -
Page 10: Disposal
If enabled, an audible alarm will sound with a rising tone (smoke vent active), intermittent beep (fault) or continuous tone (SHEVTEC® Repeater Panel fault). Press the silence button to cancel the panel audible alarm. The alarm override will remain until the cause of the alarm is cleared. On OSLoop systems, the silence button will also globally silence the local sounders at the coordinators and MCPs.
Need help?
Do you have a question about the SHEVTEC and is the answer not in the manual?
Questions and answers