Table of Contents
Advertisement
Available languages
Available languages
Quick Links
Advertisement
Table of Contents

Summary of Contents for Unold 75025
- Page 1 Safety lift Bedienungsanleitung Modell Safety Lift Exclusive 75025 Modell Safety Lift 75014 Instructions for use - Notice d´utilisation Gebruiksaanwijzing - Istruzioni per l’uso Manual de instrucciones - Návod k obsluze...
- Page 2 Impressum: Bedienungsanleitung Modell 75014/75025 Stand: Januar 2011 /nd Copyright © Mannheimer Straße 4 68766 Hockenheim Telefon +49 (0) 62 05/94 18-0 Telefax +49 (0) 62 05/94 18-12 E-Mail info@unold.de Internet www.unold.de...
- Page 3 SERVICE-HOTLINE Bei Fragen zum Gebrauch des Gerätes können Sie sich direkt an unsere Beraterin Frau Blum wenden: Montag und Dienstag von 8 bis 12 Uhr und 13 bis 17 Uhr Rufnummer: 0 18 05/94 18 99* *derzeit 0,14 EUR/Minute aus dem Festnetz der Deutschen Telekom. Bei Anrufen aus Mobilfunknetzen und aus dem Ausland (+49 18 05/94 18 99) können abweichende Kosten anfallen.
-
Page 4: Table Of Contents
Probleme lösen ........................13 Garantiebestimmungen ....................... 52 Service-Adressen ........................ 54 Entsorgung / Umweltschutz ....................56 Instructions for use Model 75014/75025 Technical Specifications ...................... 14 Safety Information ......................14 Description of the Safety-Lift technology ................15 Before first use ........................17 3 easy steps to ironing ...................... - Page 5 Tips voor een optimaal strijkresultaat ..................36 Problemen oplossen ......................37 Garantievoorwaarden ......................52 Verwijderen van afval / Milieubescherming ................56 Istruzioni per l’uso Modello 75014/75025 Dati tecnici ........................38 Avvertenze di sicurezza ....................... 38 Spiegazione della tecnologia Safety Lift ................39 Prima del primo utilizzo ......................
-
Page 6: Bedienungsanleitung Modell 75014/75025
Wasserstandsanzeige Bewegliche Knickschutztülle Vertikaldampf-Funktion Automatische Abschaltung 5 Jahre Garantie (außer auf die Bügelsohle) Modell 75014: Große hochglanzpolierte Edelstahl-Bügelsohle Modell 75025: Kugelgestrahlte Edelstahl-Bügelsohle mit Leichtlauf-Beschichtung und Präzisionsspitze Zubehör: Bedienungsanleitung, Messbecher technische Änderungen vorbehalten. SicherheitShinweiSe 1. Bitte lesen Sie die folgenden Anweisungen 8. -
Page 7: Erklärung Der Safety-Lift-Technologie
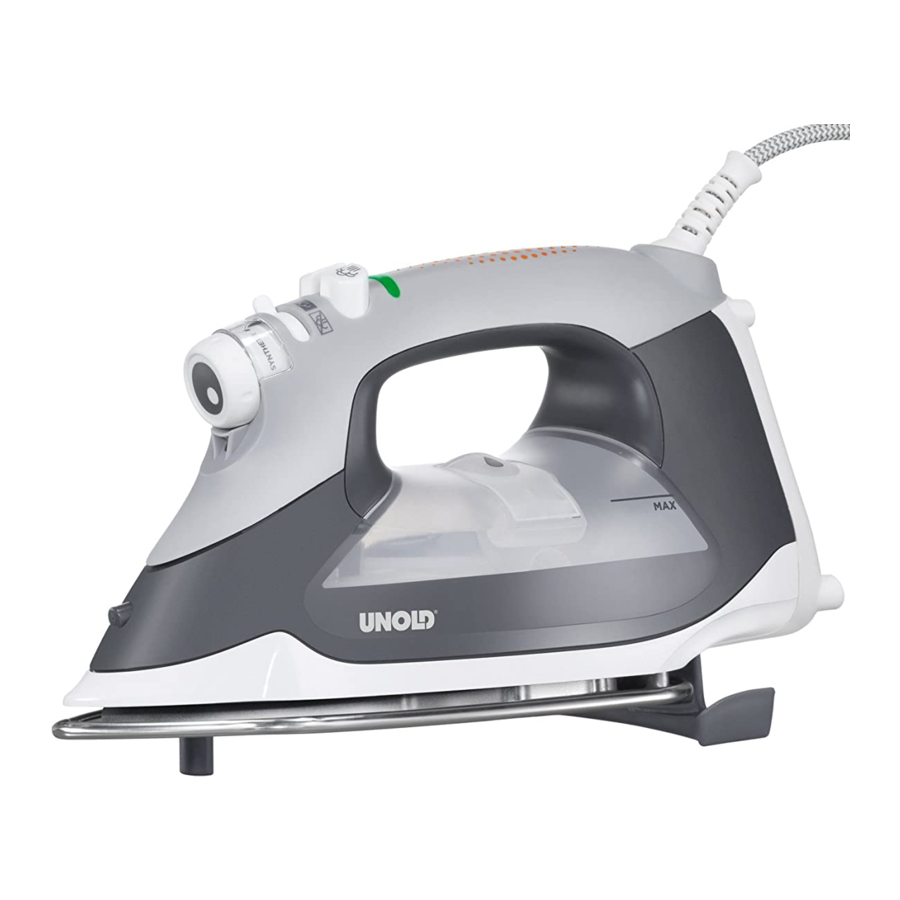
13. Das Gerät wird während des Betriebs sehr 22. Das Gerät niemals unbeaufsichtigt lassen, heiß. Achten Sie darauf, nicht mit den wenn der Netzstecker eingesteckt ist. heißen Teilen des Gerätes in Berührung zu 23. Wenn das Gerät abgekühlt ist, wickeln Sie kommen, um Verbrennungen zu vermeiden. - Page 8 IhR NEUER BüGELaUtoMat Kontrollleuchte Wahlschalter für Safety-Lift (EIN/AUS) Dampfstoß-Taste Einfüllöffnung Wassertank Sprühnebel-Taste Wassertank Dampfwahl-Taste Bügelsohle Materialwahl-Regler Safety-Lift Sprüh-Düse Bewegliche Knickschutztülle Griff mit Safety-Lift-Sensor...
-
Page 9: Vor Dem Ersten Benutzen
Vor Dem erSten benutzen 1. Entfernen Sie alle Verpackungsmaterialien 2. Entfernen Sie bitte ebenfalls die Papp- und ggf. Transportsicherungen. abdeckung, die eventuell an der Bügelsohle befestigt ist! 3 einfache Schritte zum bügeln Stecken Sie den Stecker Wenn die Kontroll- Öffnen Sie die Einfüll- in eine Steckdose, leuchte grün bleibt, öffnung und füllen Sie... -
Page 10: Bügeln
bügeln Grundsätzliche Hinweise: Bitte prüfen Sie vorher, welche Bügeltemperatur für das jeweilige Kleidungsstück die richtige ist. Testen Sie die richtige Einstellung im Zweifelsfall an einer nicht sichtbaren Stelle des Kleidungsstückes. Empfindliche Gewebe bitte „auf links“ bügeln, so können Sie Glanzstellen am Gewebe vermeiden. 1. -
Page 11: Reinigen Und Aufbewahren
Kontrollleuchte rot zu blinken und zeigt damit an, dass sich das Gerät automatisch ausgeschaltet hat. Um den Bügelautomat wieder einzuschalten, genügt eine kurze Berührung des Griffs. In der folgenden Tabelle sind die verschiedenen Abschaltzeiten aufgeführt: Bügelposition abschaltung nach ca. 75014 75025 Safety-Lift eingeschaltet Horizontal, angehoben 8 Min. 8 Min. Vertikal 8 Min. -
Page 12: Tipps Für Ein Optimales Bügelergebnis
Bügelposition abschaltung nach ca. 75014 75025 Safety-Lift ausgeschaltet Horizontal, abgesenkt: 1 Min. 1 Min. Aus Sicherheitsgründen wird das Gerät mit dem Safety-Lift angehoben achtung! Das Gerät verfügt durch den Safety-Lift über eine zusätzliche Funktion, die das Bügeln erleichtert. Dennoch entbindet dies nicht von entsprechender Sorgfalt im Umgang mit dem Gerät. -
Page 13: Probleme Lösen
probleme löSen Problem Bitte prüfen Lösung Der Bügelautomat wird Materialwahl-Regler auf Am Regler das gewünschte Material nicht heiß „AUS“? auswählen Stecker richtig in der Stecker richtig einstecken Steckdose? Ist die automatische Den Griff berühren Abschaltung aktiv? Safety-Lift nicht aktiv Ist der Safety-Lift -Schalter Safety-Lift -Schalter auf „EIN“... -
Page 14: Instructions For Use Model 75014/75025
Automatic shutoff 5 years warranty (apart from the sole plate) Model 75014: Large mirror-polished stainless steel surface for easy ironing Modell 75025: Bead-blast scratch-resistant surface for improved easy-glide with precision tip for precise ironing Accessories: Instruction manual, measuring cup We reserve the right to introduce technical modifications. -
Page 15: Description Of The Safety-Lift Technology
13. The appliance becomes very hot during 22. Never leave the appliance unattended when operation. Do not touch any hot parts of the it is connected to the wall socket. appliance in order to avoid burns. 23. When the appliance has cooled off, loosely 14. - Page 16 GEttING to kNoW thE aPPLIaNcE Indicator light Selector for Safety-Lift mode (ON/OFF) Steam burst Feed opening for water tank Spray mist Water tank Steam selector Sole plate Fabric selector Safety-Lift Spray nozzle Flexible protective sleeve Handle with Safety-Lift sensor...
-
Page 17: Before First Use
before firSt uSe 1. Remove all packaging material and any 2. Also remove the cardboard that might cover transport safety devices. the ironing soleplate. 3 eaSy StepS to ironing Connect the plug to a When the indicator light Open the feed opening wall socket, select the stays green you can and fill the water tank... -
Page 18: Ironing
ironing General instructions: Please check the ironing temperature indicated for the corresponding fabric before you start ironing. In case of doubt, prove the right adjustment on a non-visible part of the clothing. In order to avoid that delicate fabrics become shiny, always iron these clothes from the left side. -
Page 19: Cleaning And Storage
To switch it on again, just touch the handle shortly. The following table shows the different shut-off times: Ironing position Shut-off after 75014 75025 Safety-Lift mode activated Horizontal, lifted 8 min 8 min Vertical... -
Page 20: Tips For An Optimum Ironing Result
tipS for an optimum ironing reSult 1. Before ironing check each fabric for care 4. Before ironing, separate the cloths accor- instructions and follow those instructions. ding to the necessary temperature and start with those cloths that need the lowest 2. -
Page 21: Trouble Shooting
trouble Shooting Problem Please check Solution The iron does not heat Material selector adjusted to Select the desired material. "AUS/OFF“? Plug properly connected? Connect the plug properly to the wall socket. Is the automatic shut-off Touch the handle. feature activated? Safety-Lift mode is not Is the Safety-Lift selector on Switch the Safety-Lift selector to... -
Page 22: Notice D´utilisation Modèle 75014/75025
Garantie 5 ans (sauf sur la semelle) Modèle 75014: Grande semelle de repassage en acier inoxydable poli brillant Modèle 75025: Semelle de repassage en acier inoxydable, passée au jet de bille, facilitant le glissement Revêtement et pointe de précision pour un repassage exact Accessoires : Notice d’utilisation, récipient gradué... -
Page 23: Explication De La Fonction Safety-Lift
11. Le cordon doit être placé de façon qu’on ne 21. Si vous remplissez le réservoir directement puisse pas le tirer ou trébucher sur lui. au robinet, il est impératif pour des raisons de sécurité de débrancher d’abord 12. Pour éviter d’endommager le cordon, l’appareil. - Page 24 FaItES coNNaISSaNcE avEc votRE FER Voyants de contrôle Sélecteur Safety-Lift EIN/AUS (MARCHE/ARRÊT) Touche Jet de vapeur Ouverture de remplissage du réservoir Touche Spray Réservoir d’eau Sélecteur de vapeur Semelle Sélecteur de tissu Safety-Lift Buse Spray Bec mobile anti-plis Poignée avec capteur Safety-Lift...
-
Page 25: Avant La Première Utilisation
aVant la première utiliSation 1. Retirez tous les matériaux d’emballage et le 2. Veuillez retirer également le revêtement en cas échéant les sécurités pour le transport. carton qui est éventuellement fixé sur la semelle du fer ! le repaSSage en troiS étapeS SimpleS Branchez la fiche Vous pouvez commencer Ouvrez l‘ouverture du... -
Page 26: Repassage
repaSSage Remarques générales : Veuillez contrôler au préalable la bonne température de repassage pour le tissu respectif. En cas de doute, testez le réglage du fer sur un emplacement non visible du tissu. Repassez les tissus délicats sur l‘envers, vous éviterez ainsi la formation de marques. 1. -
Page 27: Nettoyage Et Rangement
Pour remettre en marche le fer, il suffit de toucher brièvement la poignée. Le tableau suivant indique les différents délais avant l’arrêt Position du fer arrêt au bout de 75014 75025 Fonction Safety-Lift activée horizontal, relevé 8 min 8 min... -
Page 28: Quelques Conseils Pour Un Repassage Optimal
quelqueS conSeilS pour un repaSSage optimal 1. Avant le repassage, veuillez consulter les 4. Avant le repassage, triez le linge en fonction étiquettes d’entretien qui se trouvent sur de la température nécessaire, et commencez chaque vêtement. Suivez les instructions par les tissus qui se repassent à basse qui s’y trouvent. -
Page 29: Un Problème Avec Votre Fer
un problème aVec Votre fer ? Problème veuillez vérifier Solution Le fer ne chauffe pas Sélecteur de tissu sur AUS/ Sélectionnez la température ARRÊT ? souhaitée Fiche électrique correctement Branchez correctement la fiche branchée dans la prise électrique secteur ? L’arrêt automatique est-il Touchez la poignée actif ? -
Page 30: Gebruiksaanwijzing Model 75014/75025
Verticale stoomfunctie 5 jaar garantie (behalve op de zoolplaat) Automatische uit-functie Model 75014: Grote hoogglans gepolijste edelstalen zoolplaat Model 75025: Kogelgestraalde edelstalen zoolplaat met coating en spitse punt voor het soepele en nauwkeurige strijken Toebehoren: Gebruiksaanwijzing, maatbeker technische wijzigingen voorbehouden VeiligheiDSinStructieS 1. -
Page 31: Toelichting Van De Safety-Lift-Technologie
12. Let erop dat het snoer niet met de hete 22. Laat het apparaat nooit zonder toezicht zoolplaat in contact komt om schade aan wanneer netstekker zich het snoer te voorkomen. contactdoos bevindt. 13. Het apparaat wordt tijdens het gebruik 23. - Page 32 toELIchtING vaN hEt toEStEL Controlelampje Keuzeschakelaar voor Safety-Lift (EIN/ AUS) (aan/uit) Stoomstoot-toets Vulopening waterreservoir Spuitnevel-toets Waterreservoir Stoomkeuze-toets Zoolplaat Materiaalregelaar Safety-Lift Sproeier Beweegbare knikbescherming Handgreep met Safety-Lift-sensor...
-
Page 33: Voor Het Eerste Gebruik
Voor het eerSte gebruik 1. Verwijder alle verpakkingsmaterialen en 2. Verwijder ook de kartonnen afdekking die eventuele transportbeveiligingen. eventueel aan de zoolplaat is bevestigd! 3 eenVouDige Stappen om te beginnen Steek de stekker in Wanneer het controle- Open de vulopening en een contactdoos, kies lampje constant groen vul water in tot aan de... -
Page 34: Strijken
Strijken Algemene aanwijzingen: Controleer vooraf de juiste strijktemperatuur voor het betreffende strijkgoed. In geval van twijfel, test de juiste instelling eerst uit op een niet zichtbare plek van het strijkgoed. Strijk gevoelige weefsels aan de binnenkant om glanzende plekken op het weefsel te voorkomen. 1. -
Page 35: Reinigen En Opbergen
Om het strijkijzer weer in te schakelen is het voldoende om even de handgreep aan te raken. De volgende tabel geeft de verschillende uitschakeltijden weer: Strijkpositie Uitschakeling na 75014 75025 Safety-Lift ingeschakeld Horizontaal, omhoog gebracht 8 min 8 min... -
Page 36: Tips Voor Een Optimaal Strijkresultaat
tipS Voor een optimaal StrijkreSultaat 1. Voordat u met het strijken begint, controleer met de kledingstukken met een lage bij elk kledingstuk of dit is voorzien van strijktemperatuur. een waslabel. Volg de aanwijzingen op het 5. Wanneer u van een hogere temperatuur naar label. -
Page 37: Problemen Oplossen
problemen oploSSen Probleem controleren oplossing Het strijkijzer wordt Materiaalregelaar op “UIT”? Aan de regelaar het gewenste niet heet. materiaal kiezen. Stekker goed in contactdoos? Stekker correct in contactdoos steken. Is de automatische uit- De handgreep aanraken. functie actief? Safety-Lift is niet Staat de Safety-Lift- Safety-Lift-schakelaar op “EIN”... -
Page 38: Istruzioni Per L'uso Modello 75014/75025
Spegnimento automatico 5 anni di garanzia (salvo la base del ferro) Modello 75014: Ampia base in acciaio inox lucidato a specchio Modello 75025: Base in acciaio inox pallinato con rivestimento e punta di precisione per una stiratura Accessori: Istruzioni d'uso, misurino con riserva di modifiche tecniche. -
Page 39: Spiegazione Della Tecnologia Safety Lift
13. Durante l’utilizzo l’apparecchio si riscalda 22. Non lasciare mai l’apparecchio incustodito molto. Prestare attenzione a non toccare le quando la spina è nella presa di corrente. parti calde dell’apparecchio, onde evitare di 23. Quando l’apparecchio si è raffreddato, scottarsi. arrotolare il cavo morbidamente attorno 14. - Page 40 LEGENDa Spie di controllo Interruttore Safety Lift (EIN/AUS = ACCESO/SPENTO) Pulsante getto vapore Foro di riempimento serbatoio Pulsante nebulizzatore Serbatoio Pulsante selezione vapore Base del ferro da stiro Selettore tessuto Safety Lift Spruzzatore Manicotto rimovibile Impugnatura con sensore Safety Lift...
-
Page 41: Prima Del Primo Utilizzo
prima Del primo utilizzo 1. Rimuovere tutto il materiale di imballaggio 2. Rimuovere anche la protezione residua e le eventuali protezioni dalle aperture. eventualmente rimasta sulla base del ferro! guiDa Veloce all’utilizzo Del ferro Inserire la spina nella Quando la spia di Aprire il foro di presa di corrente, controllo rimane verde... -
Page 42: Stiratura
Stiratura Istruzioni generali: prima di iniziare, informarsi sulla temperatura da impostare per ciascun capo d’abbigliamento. In caso di dubbio, provare l’impostazione in un punto non visibile del capo da stirare. I tessuti delicati vanno stirati “al rovescio”, onde evitare che le stoffe diventino lucide. 1. -
Page 43: Pulizia E Manutenzione
è spento automaticamente. Per riaccendere il ferro da stiro basta toccare brevemente l’impugnatura. Nella seguente tabella sono riportati i diversi tempi di spegnimento: Posizione di stiratura Spegnimento dopo 75014 75025 Safety Lift attivato Orizzontale, sollevato 8 min 8 min Verticale... -
Page 44: Consigli Per Ottenere Un Ottimo Risultato Di Stiratura
conSigli per ottenere un ottimo riSultato Di Stiratura 1. Prima di stirare controllare se i capi sono 4. Prima di stirare, suddividere i capi in base muniti dell’etichetta con le istruzioni di alla temperatura da usare e iniziare con i lavaggio e pulitura. -
Page 45: Risoluzione Dei Problemi
riSoluzione Dei problemi Problema verificare Soluzione Il ferro da stiro non si Il selettore tessuti è su Selezionare il tessuto desiderato riscalda “AUS” (spento)? servendosi dell’apposito selettore La spina è correttamente Inserire correttamente la spina inserita nella presa di corrente? Lo spegnimento automatico Toccare l’impugnatura è... -
Page 46: Manual De Instrucciones Modelo 75014/75025
5 años de garantía (excepto a la suela de planchado) Modelo 75014: Suela grande de acero inoxidable pulido al brillo intenso Modelo 75025: Suela de acero inoxidable granallada con superficie de deslizamiento y punta de precisión para un planchado perfecto... -
Page 47: Descripción De La Tecnología Safety-Lift
13. El equipo alcanza unas temperaturas muy 22. Nunca deje el equipo sin control si está altas durante el funcionamiento. Para evitar conectado a la toma de corriente. quemaduras, procure no tocar las partes 23. Cuando el equipo se haya enfriado, enrolle calientes del equipo. - Page 48 coNozca SU PLaNcha Piloto de control Selector para Safety-Lift EIN/AUS (CONEXIÓN/DESCONEXIÓN) Botón de golpe de vapor Orificio de llenado del depósito de Botón de rociado agua Depósito de agua Selector de vapor Suela Selector de material Safety-Lift Tobera de rociado Protector flexible del cable Mango con sensor Safety-Lift...
-
Page 49: Puesta En Servicio
pueSta en SerVicio 1. Retire todo el material de embalaje así de cartón de la suela de la plancha, si los como los seguros de transporte y el protector hubiera. 3 paSoS SimpleS al planchaDo Conecte el conector Podrá iniciar el Destape el orificio de red a la toma de planchado cuando... -
Page 50: Planchar
planchar Instrucciones generales: Antes de empezar a planchar, compruebe si la temperatura ajustada es la adecuada para cada prenda. En caso de duda, compruebe el ajuste correcto en una parte no visible de la prenda. Planche las telas delicadas al revés para evitar que brillen. 1. -
Page 51: Limpieza Y Almacenamiento
Para volver a conectar la plancha basta con tocar brevemente el mango. La siguiente tabla muestra los diferentes tiempos de desconexión: Posición de planchado tiempo hasta la desconexión 75014 75025 Safety-Lift activado Horizontal, elevada 8 min 8 min... -
Page 52: Garantiebestimmungen
conSejoS para un planchaDo perfecto 1. Previo al planchado compruebe si cada comience con las prendas a planchar a prenda dispone de instrucciones de cuidado temperatura baja. y sígalas. 5. Si cambia de una temperatura superior a 2. Si la prenda no dispone de las instrucciones una inferior, deje que el equipo se enfríe de cuidado, pruebe en una parte no visible durante un rato. -
Page 53: Norme Die Garanzia
Solución De problemaS Problema a comprobar Solución La plancha no se El selector de material se Seleccione el material deseado. calienta. encuentra ajustado a AUS/ DESCONEXIÓN. El conector no está Conectar el conector de red debidamente conectado a la correctamente a la toma de toma de corriente. -
Page 54: Service-Adressen
Funkce vertikálního působení páry Automatické odpojení 5 let záruka (mimo žehlící plochu) Model 75014: Velká vysoce lesklá nerezová žehlící plocha Model 75025: Žehlící plocha z brokované nerezové oceli s vrstvou ulehčující skluz a precizní špičkou pro přesné žehlení Příslušenství: Návod k obsluze, odměrka Technické... -
Page 55: Objasnění Technologie "Safety-Lift
13. Přístroj se za provozu silně zahřívá. Dbejte 22. Přístroj nenechávejte bez dozoru, pokud je na to, abyste se nedotkli žehlící plochy a zástrčka v zásuvce. nepřivodili si tak popálení. 23. Po vychladnutí omotejte před uskladněním 14. Vystupující pára je rovněž velmi horká. přívodní... -
Page 56: Entsorgung / Umweltschutz
Seznámení S PříSTrojem Kontrolky Volící tlačítko pro “Safety-Lift” (ZAP/ VYP) Tlačítko parního rázu Otvor pro plnění vodou Tlačítko rozprašování Nádržka na vodu Tlačítko navolení páry Žehlící plocha Regulátor volby materiálu / regulátor teploty Safety-Lift Rozprašovací tryska Pohyblivá ochrana přívodního kabelu Rukojeť... -
Page 57: Smaltimento / Tutela Dell'ambiente
před prvním použitím 1. Odstraňte všechen obalový materiál popř. 2. Odstraňte také prosím krycí karton, který je přepravní zajištění. upevněn na žehlící ploše! rychlý úvod – 3 jednoduché kroky k žehlení Zástrčku zasuňte Zůstane-li kontrolka Otevřete otvor pro do zásuvky, navolte zelená, můžete začít se naplnění... -
Page 58: Žehlení
žehlení Základní pokyny: Nejprve prosím ověřte, jaká teplota žehlení je pro příslušné kusy oblečení ta správná. V případě pochybností vyzkoušejte správnost nastavení na skrytém místě kusu oděvu. Citlivé materiály žehlete z rubové strany, tak se můžete vyhnout vzniku lesklých míst. 1. -
Page 59: Čištění A Skladování
červeně a signalizuje tím, že se přístroj automaticky vypnul. Pro opětovné zapnutí žehlícího automatu postačí krátký dotek rukojeti. V následující tabulce jsou uvedeny různé časy vypnutí Žehlící poloha vypnutí po 75014 75025 Zapnuto „Safety-Lift“ Horizontálně zvednuto 8 min 8 min Vertikálně... -
Page 60: Tipy Pro Optimální Výsledek Žehlení
tipy pro optimální výsledek žehlení 1. Před každým žehlením se podívejte, zda 4. Před žehlením si rozdělte oděvy dle potřebné je na daném kusu oděvu lísteček s pokyny teploty žehlení a začínejte těmi, které pro ošetření. Postupujte podle pokynů zde potřebují... -
Page 61: Řešení Problémů
řešení proBlémů Problém zkontrolujte prosím řešení Žehlící automat se Regulátor volby materiálu na Na regulátoru nastavte požadovaný nezahřívá „VYP“? materiál Zástrčka správně v zásuvce? Zasuňte zástrčku správně Je aktivní automatické Dotkněte se rukojeti odpojení Neaktivní „Safety-Lift“ Volící tlačítko pro “Safety- Volící... - Page 62 garantiebeStimmungen Wir gewähren auf dieses Gerät eine Garantie von 5 Jahren, bei gewerblichem Gebrauch 12 Monate, ab dem Kaufdatum für Schäden, die bei bestimmungsgemäßem Gebrauch nachweislich auf Werksfehler zurückzuführen sind. Ausgenommen hiervon ist die Bügelsohle. Innerhalb der Garantiezeit beheben wir Material- und Herstellungsfehler nach unserem Ermessen durch Reparatur oder Umtausch.
-
Page 63: Záruční Podmínky
norme Die garanzia Questo prodotto è garantito per 5 anni (in caso di utilizzo professionale per 12 mesi) dalla data di acquisto per i guasti mani- festatisi nel corso di un utilizzo conforme alle disposizioni e attribuibili in modo dimostrabile a difetti di fabbricazione. Fatta eccezione per la base del ferro. - Page 64 DeutSchlanD Kundendienst Deutschland Telefon +49 (0) 62 05/94 18-27 Telefax +49 (0) 62 05/94 18-22 Mannheimer Straße 4 E-Mail service@unold.de 68766 Hockenheim Internet www.unold.de öSterreich Schweiz Kundendienst-Annahme Österreich MENAGROS SA ESC Electronic Service Center GmbH Route der Servion Molitorgasse 15 CH - 1083 Mezières...
- Page 65 notizen...
- Page 66 entSorgung / umweltSchutz Unsere Geräte werden auf hohem Qualitätsniveau für eine lange Nutzungsdauer her ge stellt. Regelmäßige Wartung und fachge rechte Reparaturen durch unseren Kunden dienst können die Nutzungsdauer des Gerätes verlängern. Wenn ein Gerät defekt und nicht mehr zu reparieren ist, beachten Sie bitte: Dieses Produkt darf nicht zusammen mit dem normalen Hausmüll entsorgt werden.
-
Page 67: Likvidace / Ochrana Životného Prostředí
Smaltimento / tutela Dell’ambiente I nostri apparecchi vengono prodotti rispettando un elevato standard qualitativo per una lunga durata di utilizzo. Una corretta manutenzione e riparazioni adeguate a cura dal nostro servizio clienti possono prolungare la durata di utilizzo del prodotto. Se un apparecchio è... - Page 68 aus dem hause...
Need help?
Do you have a question about the 75025 and is the answer not in the manual?
Questions and answers