AddBike CarryBox User And Installation Manual
Applicable to the addbike and addbike+
Hide thumbs
Also See for CarryBox:
- User and installation manual (18 pages) ,
- User manual (59 pages) ,
- Instruction manual (18 pages)
Table of Contents
Advertisement
Quick Links
Your Bike
The AddBike
A reversible cargo bike
Loads
Child
Groceries
Non-contractual Photographs
User's and Installation Guide
Carry'Box Module
November 2019
Applicable to the AddBike and AddBike+
This document indicates the correct practices to be respected during use and assembly /
disassembly of the module Carry'Box. It is imperative to read this document entirely in order to
keep your bike, your AddBike, and your Carry'Box in good working conditions for as long as
possible.
Please keep this document.
Advertisement
Table of Contents

Related Manuals for AddBike CarryBox


Summary of Contents for AddBike CarryBox
- Page 1 This document indicates the correct practices to be respected during use and assembly / disassembly of the module Carry’Box. It is imperative to read this document entirely in order to keep your bike, your AddBike, and your Carry’Box in good working conditions for as long as possible.
- Page 2 Welcome to the big family of AddBikers!! There is no need to invest in expensive and large cargo bicycles. With the AddBike you can quickly and easily turn your own bike into a compact cargo bike.
-
Page 3: Table Of Contents
Table of contents General warning ............................4 Lexicon of the Carry’Box module......................5 Content of the Carry’Box parcel ......................6 Installing the Carry’Box .........................6 Using the Carry’Box module ......................14 Uninstalling the Carry’Box module ....................14 Cleaning ..............................15 Guarantee Charter ..........................15 Assistance in case of problem ...................... -
Page 4: General Warning
Using the Carry’Box module The Carry’Box module is designed to be used on the AddBike produced by our company. Do not try to install or use this module on other cargo bikes or on a classic bike. The Carry’Box module is not designed to be stored outdoors for prolonged periods. It must be stored in a dry and temperate place away from corrosive products. -
Page 5: Lexicon Of The Carry'box Module
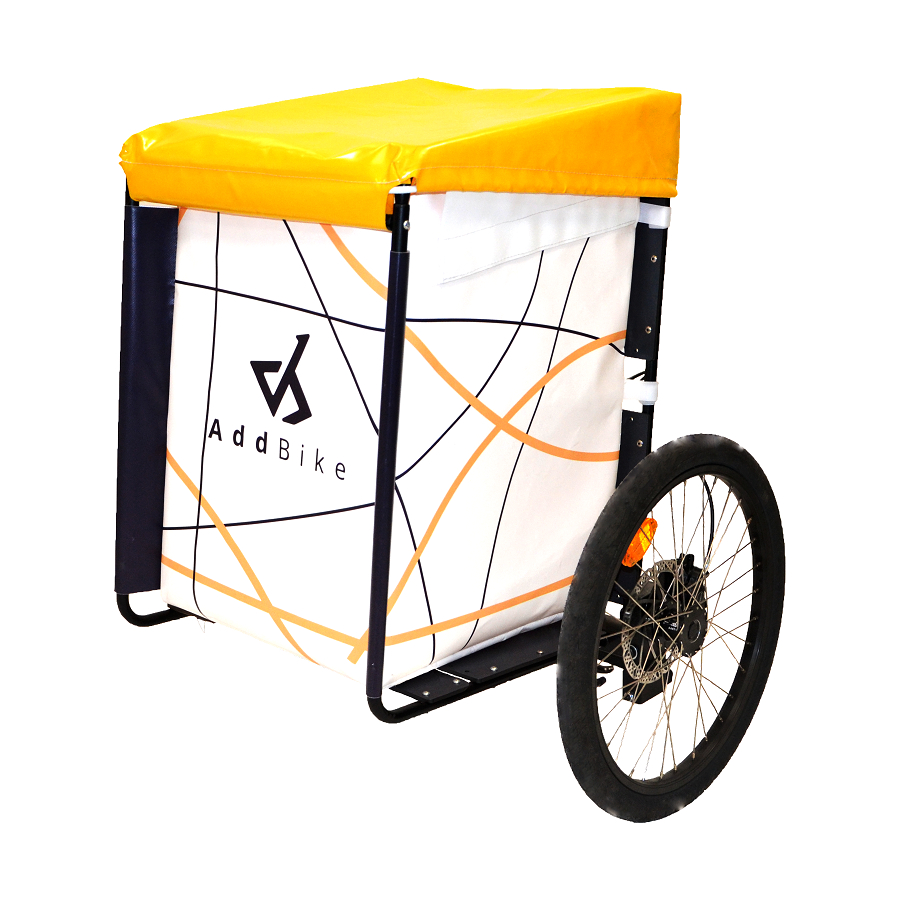
2. Lexicon of the Carry’Box module Transerve tube Front tubes Upper tubes Compact slat Front tubes Compact slat Upper tubes Transverse tube Figure 1 – Lexicon of the Carry'Box module VERSION V4.1... -
Page 6: Content Of The Carry'box Parcel
The Carry’Box module must be installed and uninstalled as explained. Improper installation can lead to accidents that could cause serious injury. We advise you to add the Carry’Box module to your AddBike only when the latter is properly installed on your bike so as to make it easier to assembly For the installation you will need an Allen wrench size 3, and an open-end wrench 8 (Cf. - Page 7 Figure 3 – Fixing the compact slat to the lower tubes During this step, if your AddBike isn't equipped with 4 plastic caps at the 4 bar ends of the backrest and base structure (at the level of the connection sleeve), the only preparation to install the bars is to remove the screws at each bar end (screw without nut).
- Page 8 Make sure to keep in a safe place the 4 plastic caps removed during the previous step. Insert the front tubes into the holes of the seat and line up the screw holes of both parts; • Figure 5 - Insertion of bottom tubes into the seat Put back the screws and nuts previously removed from the seat (but not the plastic •...
- Page 9 Install the textile : • The front tubes slip on the black textile sheaths The rear of the textile is positioned simply in front of the backrest Figure 7 - Insertion of the textile VERSION V4.1...
- Page 10 At the back of the module, attach the six Velcro straps of the textile on the Addbike’s backrest; • Tighten the fabric on each side, centering very well the textile on the backrest Figure 8 – Fastening the back of the textile...
- Page 11 Open the upper flaps on both sides of the module by pulling on the Velcro strips; • Figure 9 – Textile strip to undo Insert the upper tubes in the backrest’s holes and, simultaneously, on those of the front tubes. •...
- Page 12 Put back on the backrest the screws and nuts previously removed making them pass through • the holes of the upper tubes; Figure 11 – Screws to be put back in the backrest Fold the textile over the upper tubes and fasten it on the Velcro strap provided for this •...
- Page 13 Put the textile lid on the top of the module. Place the crossbar between the two holes • in the front of the module between the upper tubes and the front tubes, and attach it to the rest of the structure using the supplied M5x30 BHC screws . Figure 14 –...
-
Page 14: Using The Carry'box Module
Do not transport children in the Carry’Box. Riding the AddBike with load Please read chapter 9.C of the “AddBike User's and Installation Guide» 6. Uninstalling the Carry’Box module Take out the crossbar by removing the screws attaching it;... -
Page 15: Cleaning
9. Assistance in case of problem If a given part of the Carry’Box does not function correctly, please contact the AddBike Company (support@addbike.fr) or your dealer. We will do our best to help you. In our website, www.add-bike.com, you will find a list of dealers who are trained for installation and maintenance of AddBike products. - Page 16 61 cours de la République 69100 VILLEURBANNE, FRANCE You may order additional user’s guides from AddBike. This user’s guide has been drafted with the utmost care. If you have any proposal to improve the clarity of this document we would...
Need help?
Do you have a question about the CarryBox and is the answer not in the manual?
Questions and answers