
Related Manuals for Osmio Fusion


Summary of Contents for Osmio Fusion
- Page 1 Osmio Fusion direct flow reverse osmosis system Telephone: 0330 113 7181 Email: info@osmiowater.co.uk...
-
Page 2: Table Of Contents
Contents 1. Safety Precautions 1.1 Power Safety Precautions 1.2 Setup Precautions 1.3 Usage Precautions 2. Product Description 2.1 Appearance Sketch Map 2.2 Display and Operation Interface 2.3 Product Specifications 3. Start Up 3.1 Introduction 3.2 Connecting the feed in valve 3.3 How to use quick connect fittings 3.4 installing the drain sadle 3.5 Connecting to the system... -
Page 3: Safety Precautions
1 Safety Precautions 1.1 Power Safety Precautions • The system should be plugged into a normal UK 3 pin plug at your home or workplace and not be used in addition to AC 220-240V, 220V. • Should be used in a grounding socket with rated current above 10A. •... -
Page 4: Usage Precautions
1.3 Usage Precautions • On first use or if the unit has been idle for more than 2 days, run a complete cycle and discard the first batch of water produced. Install the system and then allow the machine to run until it fills the internal tanks. -
Page 5: Product Description
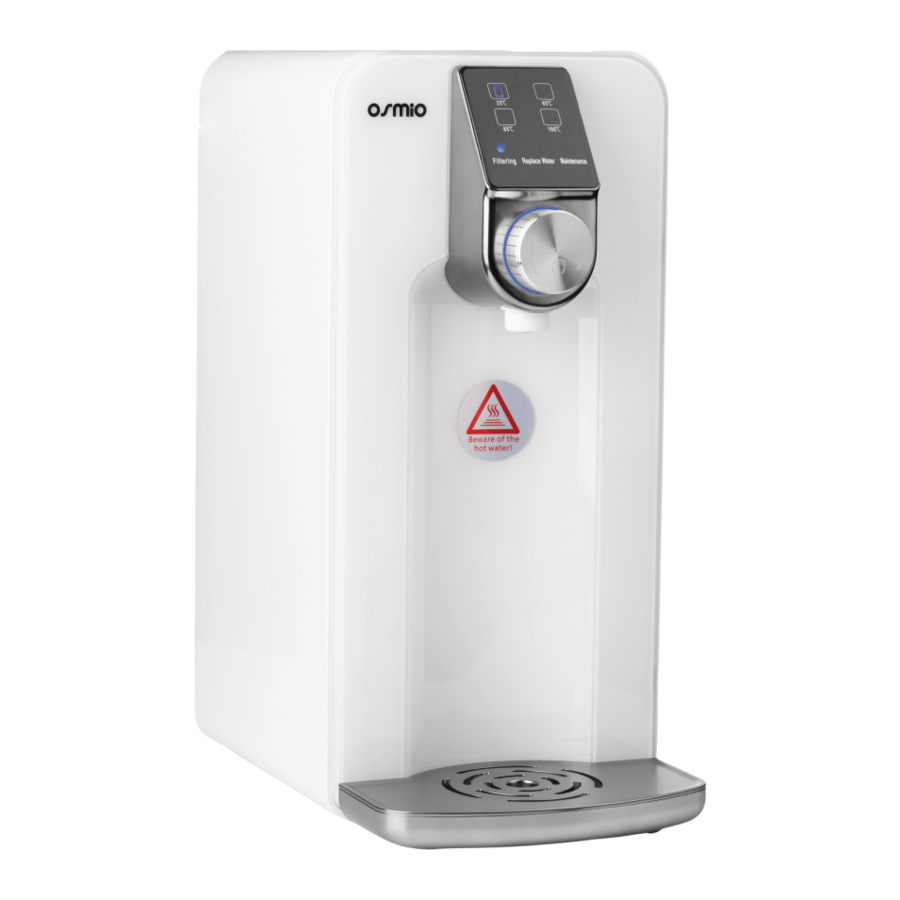
2 Product Description 2.1 Appearance FIGURE 1 1. Display Panel 2. Control Button (Rotate & Press) 3. Drip Tray 4. Source water tubing 5. Waste water 6. Power Plug Telephone: 0330 113 7181 Email: info@osmiowater.co.uk... -
Page 6: Display And Operation Interface
2.2 Display and Operation Interface FIGURE 2 A. Normal Water B. Warm Water ( 40℃-50℃) C. Hot Water ( 80℃-88℃) D. Boiled Water (90℃-98℃) E. Filtering Water F. Renew Water G. Filter Maintenance H. Rotate (Choose the Water Temp) I. Press to Get Water... -
Page 7: Product Specifications
2.3 Product Specifications Electrical Properties Rated Voltage : 220 - 240 V Rated Frequency : 50 Hz Rated Power: 2200W-2600W Heating System Rated Heating Power: 2180W-2580W Hot Water Capacity: 30 l/h (≥ 90°C) Filter Stages 1 - Quick-Change activated carbon filter: removes chlorine and organic impurities 2 - Quick-Change Membrane 50GPD: removes all pollutants and flavours to almost 100%... -
Page 8: Start Up
3 Start Up 3.1 Introduction • Please place the system in a cool, ventilated, solid horizontal surface, away from any heat source. 3.2 Connecting the feed in valve - Step 1: assembling the feed in valve The feed in valve has 1/2” male and 1/2”... -
Page 9: Connecting The Feed In Valve
Step 2: Connecting the feed in valve The Feed in valve connects to the cold hose of the existing cold tap on the sink. Shut the water off and disconnect the existing cold water hose. If your tap does not use hoses then you can use another adaptor. - Page 10 3.3 How to Use Quick Connect Fittings Quick connect fittings (push fittings) are used in a wide variety of plumbing, heating, electrical and fire suppression systems. Quick connect works by inserting the tubing into a connection mechanism that deploys fastening teeth onto the tubing surface.
-
Page 11: How To Use Quick Connect Fittings
How to Use Quick Connect Fittings Step 1: It is essential that the outside diameter of the tubing being inserted into the fitting is completely free of scratch marks, dirt and any other material. Inspect the outside of the tubing carefuly. Step 2: It is also very important that the sliced edge of the tubining is cut cleanly. -
Page 12: Installing The Drain Sadle
3.4 Installing the drain sadle The purpose of the drain saddle is to prevent the tubing connected to drain from popping out of place and potentially leaking where the system is installed. Please see the figure below for instructions on how to make the drain saddle connection. -
Page 13: Power Connection
3.5 Connecting to the tubing Fisrt Remove the blanking plugs by Inlet Outlet following steps in section 3.3. Insert the tubing, which is running from the feed water, into the inlet. Place the ittle c-clip back into place to avaid the pushfitting disconnecting. -
Page 14: Sleeping State
4.5 Dispense Water • Place the water container on the tray (see Figure 1). Rotate the knob to select the desired water temperature (Figure 3), and then click on (or push on for 3 second) the middle part of the knob (see Figure 4) to dispense one cup (or bottle) of water. -
Page 15: Filter Maintenance
5 Filter maintenance 5.1 Introduction First skip to section 5.2.4 to read about sanitisation and come back to this section. Use the company's certified filters. Disconnect the power. Do not disassem- ble or attempt to modify this product. 5.2 Replacement of the carbon filter, reverse osmosis and post filter Step 2: Place the back panel Step 1: Open the back pa... - Page 16 5.2 Replacement of the carbon filter, reverse osmosis and post filter, Starting at the base of the filter, tilt the filter towards you STEP 3 slightly and rotate the Carbon Filter and Membrane filter clockwise and remove them from the head. STEP 4 Pull out the Post Filter slowly with your finger and insert a new one fully.
- Page 17 5.2 Replacement of the carbon filter, reverse osmosis and post filter, STEP 6 Start with the new Carbon Filter so the label is on the left hand side twist the filter on anticlockwise. Repeat the same with the Membrane Filter. STEP 8 Press and hold the button and STEP 7 Place the back at the same time connect the power...
- Page 18 5.2.4 Sanitisation We suggest sanitising the system every 6 months prior to the filter change. Contact your dealer to order the Fusion Sanitisation Kit. 1) Shut of the feed water by turning the lever of the feed in valve. Press the button repeatedly to dispense all the water out of the internal RO storage tank.
-
Page 19: Failure State
5.3 Failure state 5.3.1 Purification exception The system will show the purification exception state if the machine purifies water for a long time and cannot stop, all the four temperature icons on the display will flash. The machine may make louder noises leading up to this. This happens when the Carbon Filter is blocked, and also the RO Membrane might be blocked. -
Page 20: Common Usage Problem
6 Common usage problems If you have some problems during the usage, please check the problems by following the guide below. Likely Cause Suggested Solution Usage Problems Check the power plug is Power is disconnected. Cannot dispense loose or not in place. Not pressing on the right ambient temperature Press the button again. - Page 21 Likely Cause Suggested Solution Usage Problems Turn the system on and Air blocked in the water Abnormal sound during off and try to flush air system. the filtering. from the system. Some- times air may take a few days to clear Change the RO Filters are blocked and Membrane Filter first and...
-
Page 22: Quality Assurance
(no free returns). If any part is no longer available, or out of manufacture, Osmio reserve the right to replace it with a suitable alternative. -
Page 23: After-Sale Service
8 After-sale service Our products have 1 year guarantee (for repair, replacement or compensation of faulty products). If the product you bought has any quality problem, please bring your invoice and to the dealer’s shop, exchange or refund service will be offered within 30 days, maintenance service will be offered within 5 years. - Page 24 3) Determination of extractive residue according to US FDA 21 CFR 177.2600 4) Determination of identification test, heavy metal(as Pb),lead and water extractables test refer to FCC standard The Osmio Fusion Direct Flow Reverse Osmosis System © Osmio Solutions Ltd. All Rights Reserved...
Need help?
Do you have a question about the Fusion and is the answer not in the manual?
Questions and answers