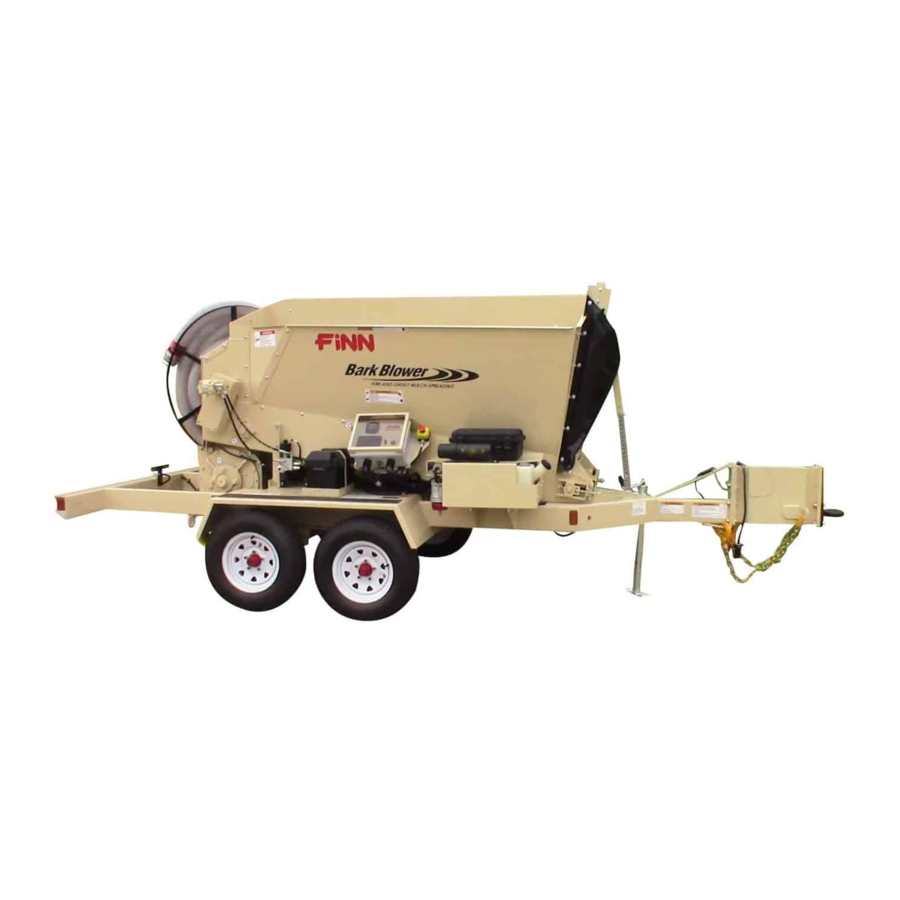
Finn Bark Blower BB302 Operator Instructions And Parts Manual
Hide thumbs
Also See for Bark Blower BB302:
- Parts and operator's manual (55 pages) ,
- Troubleshooting manual (9 pages) ,
- Technical bulletin (6 pages)
Table of Contents
Advertisement
Advertisement
Table of Contents

Related Manuals for Finn Bark Blower BB302


Summary of Contents for Finn Bark Blower BB302
- Page 1 Activate Activate Your Warranty Your Warranty By Registering By Registering TODAY!!! TODAY!!! 9281 LeSaint Drive • Fairfield, Ohio 45014 Phone (513) 874-2818 • Fax (513) 874-2914 1-800-543-7166 Model BB302 Operator Instructions and Parts Manual Model MU Serial No. ____________ BB302 MU2018 Rev B...
- Page 2 FOR OFFICE USE ONLY DATE UPDATE DESCRIPTION CODE 06/31/17 Initial release; new LED lighting system MU0631 11/10/17 Revision A: Pintle Hitch is standard equipment MU1110 02/28/18 Revision B: added Trailer Safety Decals parts list MU2018...
- Page 3 Labor hours must coincide with the published “Labor Schedule” or estimate approved by the Finn Warranty Administrator. Once work is done, a Finn Warranty Claim Form must be fi lled out and emailed along with any related receipts or invoices to the Warranty Administrator. We ask that this is done ASAP after work is completed.
-
Page 5: Table Of Contents
The Finn Bark Blower And Its Functions ........ - Page 6 INDEX (Continued) Crew Members and their Duties ........32 The Material-Feed System .
-
Page 7: Safety First
SAFETY FIRST With any piece of equipment, new or used, the most important part of its operation is SAFETY! FINN Corporation encourages you and your employees to familiarize yourselves with your new equipment and stresses safe operation. The first five pages of this manual are a summary of the main safety aspects associated with this unit. -
Page 8: Bark Blower Safety Summary Section
BARK BLOWER SAFETY SUMMARY SECTION It is important that all operators of this machine are familiar with all the safety aspects mentioned below before operating the machine. Always keep a copy of this manual with the machine. It is the responsibility of the operator of the machine to fully understand this safety section. - Page 9 II. MACHINE OPERATION (Continued) 8. Never operate machine in an 15. When leaving the blower unattended for any reason, be sure to: enclosed area without venting the engine exhaust of both the A. Shut off the rotary air valve and conveyor, then equipment and the towing vehicle.
- Page 10 III. MAINTENANCE It is recommended that only authorized, genuine FINN replacement parts be used on the machine. Battery posts, Do not use ether cold start fluid, if engine is terminals, and equipped with glow plug-type preheater, or other related accessories contain lead and lead intake manifold-type preheater.
- Page 11 COMMON SAFETY SYMBOLS Hazard / Electrical Hearing Attention Shock Hazard Hazard Arc Flash Hazard or Electrocution Fire Hazard Explosion Hazard Hazard Body Electrostatic Fumes / Dust Entanglement Discharge Hazard Hazard Hazard Electrostatic Pinch Point / Burn Hazard Sensitive Area Entanglement Hazard Hazard Carbon...
- Page 12 COMMON SAFETY SYMBOLS Vision Heavy Object Skin Puncture Protection Hazard Hazard Required Hearing Hot Surface Splash / Spray Protection Hazard Hazard Required Vision, Hearing Loose Clothing Stumble and Head Entanglement Hazard Protection Hazard Required Breathing, Pinch Point / Vision, Hearing Moving Belt Trip Hazard and Head...
- Page 13 COMMON SAFETY SYMBOLS Do Not Do Not Do Not Spray Remove Obstruct Power Lines Guards or Block Do Not Do Not Touch Diesel Engine Pressure Wash SAFETY DECALS DANGER DANGER SEVER HAZARD! ENTANGLEMENT HAZARD! Keep arms and feet out! Keep hands and feet out! Never climb on or in unit before: Sharp knives will sever.
-
Page 14: Operation And Maintenance Of The Finn Bark Blower
OF THE FINN BARK BLOWER INTRODUCTION The FINN Corporation would like to thank you for your latest FINN purchase. In our efforts to maintain a quality and growing relationship with every customer, we would like to encourage you to contact us for help with service, genuine replacement parts, or for any other information you may require. -
Page 15: Towing Vehicle
TOWING VEHICLE The truck that will be used to tow the FINN BB302 Bark Blower must be equipped with a 2-5/16 in. ball or pintle-type hitch. The tow vehicle must also be able to support a 600 lbs. (272 kg) hitch load as well as safely tow a trailer with a GVWR of 6000 lbs. (2722 kg). -
Page 16: Pre-Start Equipment Check
PRE-START EQUIPMENT CHECK Equipment check must be made with the engine off and all rotating parts stopped. Failure to comply could result in minor personal injury, product damage, or property damage. 1. Check all trailer connections to the towing vehicle, as well as the condition of the safety chains, and bolts connecting the ball coupler or pintle eye to the tongue. -
Page 17: Control Guide
CONTROL GUIDE Main Control Start / Stop Panel Pendant Radio Remote Transmitter... -
Page 18: Control Panel Guide And System Operation
CONTROL PANEL GUIDE AND SYSTEM OPERATION MENU NAVIGATION Engine Data Alarm The control unit has three Symbol Indicator navigation buttons which are configured as softkeys. The system softkeys are used to Engine navigate between displays, Data select menu items and change data. -
Page 19: Main Menu Access
MAIN MENU ACCESS To access the Main Menu, press any of the three navigation buttons. The unit will display a softkey popup window defining the available navigation possibilities. Select the Main Menu using the center softkey as shown. MAIN MENU NAVIGATION Access the main menu using the center softkey. -
Page 20: Fault Codes
FAULT CODES Engine fault codes (active and stored) are generated by the engine ECU and communicated to the control panel. ACTIVE FAULT CODES The control system reads standard messages to indicate active fault codes. When a fault is active the control system activates a popup fault display containing a check engine icon, fault code number (if applicable),... -
Page 21: Stored Fault Codes
STORED FAULT CODES The control unit allows the operator to request any stored fault codes that may be contained in the engine ECU. To view stored faults select the “Fault Codes” menu selection from the main menu. The control system will send a request to the engine ECU for any faults that the ECU may have stored. -
Page 22: Resetting Maintenance Timer
RESETTING MAINTENANCE TIMER The maintenance timer is operator configurable and can be accessed through the engine settings menu. See “Reset MaintTimer” selection in engine settings menu. When the maintenance timer has expired, a pop-up alert window indicating that “Engine Maintenance is Due” will be displayed. -
Page 23: Contrast Setting
CONTRAST SETTING The LCD contrast is adjustable from 0 to 100%. To adjust the LCD contrast enter the Main Menu and navigate to the “Display Setup” menu using the “ ” softkey. When highlighted enter the Display Setup menu by selecting the “ ” softkey. -
Page 24: Display Mode Setting
DISPLAY MODE SETTING Two display formats are available: “Single” display and “Dual” display formats. To access the display format setting, enter the Main Menu. Navigate to the “Display Setup” menu entry using “ ” softkey. When highlighted, enter the Display Setup menu by selecting the “... -
Page 25: Engineering Units
ENGINEERING UNITS Displayed engineering units can be configured for Pressure, Temperature and Volume. To access the engineering unit’s settings, enter the Main Menu. Navigate to the “Display Setup” menu entry using “ ” softkey. When highlighted enter the Display Setup menu by selecting the “... -
Page 26: Display List
DISPLAY LIST SINGLE DATA FORMAT DUAL DATA FORMAT... -
Page 27: About Menu
MISCELLANEOUS DISPLAYS ABOUT MENU The About Menu indicates the software information used for programming the control unit. ENGINE SETTINGS The Engine Settings are factory-specified. This feature is password-protected to ensure the correct use of the engine in this unit. -
Page 28: Regeneration
REGENERATION See Engine Owner’s Manual for information on the Diesel Particulate Filter (DPF). Particulate Matter (PM) in the engine exhaust accumulates in the Soot Filter (SF) within the DPF causing it to clog, reducing engine performance. Therefore, it is necessary to burn off the accumulated PM. -
Page 29: Reset Regeneration Operation - Displays
RESET REGENERATION NORMAL OPERATION - DISPLAYS The engine control panel is set at the factory to allow Reset Regeneration to occur automatically. However, the operator has the option to inhibit Reset Regeneration via the control panel [Main Menu “ ” Regeneration “... -
Page 30: Reset Regeneration Standby Due To Inhibit Switch
RESET REGENERATION STANDBY DUE TO INHIBIT SWITCH During machine operation with Regeneration in the Inhibit state on the control panel, a notification and regeneration inhibited icon will display at the bottom of the screen. If the ECU determines that Reset Regeneration is required, a Auto Regeneration request will be displayed. If the operator allows the regeneration, it will begin and a notification and regeneration icon will display at the bottom of the screen. -
Page 31: Reset Regeneration Standby Due To Low Doc Temperature
RESET REGENERATION STANDBY DUE TO LOW DOC TEMPERATURE For Reset Regeneration to begin, the DOC temperature has to be at a sufficient level. If the DOC has not reached this temperature and Reset Regeneration is required, then a notification to Increase RPM / Load and the Regeneration icon will be displayed. - Page 32 STATIONARY REGENERATION BY ENGINE MANAGEMENT (CONTINUED) Note: Stationary Regeneration will not begin if any of the following conditions are present: Coolant temperature is less than 60° C (140° F) The engine has not been running for 15 minutes ...
-
Page 33: Manual Stationary Regeneration - Operator Request
STATIONARY REGENERATION BY ENGINE MANAGEMENT (CONTINUED) If the Stationary Regeneration is delayed by pressing the right soft key marked “NO” when the request is displayed, a 15% power reduction is immediately applied to the engine. A notification stating that “If no stationary performed within 2 hours, Power Reduction is 50%”... - Page 34 MANUAL STATIONARY REGENERATION - OPERATOR REQUEST (CONTINUED) 4. At this point, the ECU will take over control of the engine to perform the Stationary Regeneration and a notification of “Stationary Active” and the regeneration icon will be display along with a status bar (0 to 35 minutes) at the bottom of the screen. Note: When the Stationary Regeneration starts, the engine speed increases gradually to high idle speed, then the regeneration begins and may modulate engine speed throughout the process.
-
Page 35: Recovery Regeneration
RECOVERY REGENERATION If Recovery Regeneration is not performed within the allowed 10 hours, the engine will go into Limp Home Mode and a DTC will be displayed. There are only two ways out of Limp Home Mode, perform a Recovery Regeneration or perform a SF exchange at a Yanmar certified service center. - Page 36 RECOVERY REGENERATION (CONTINUED) Note: Recovery Regeneration will not begin if any of the following conditions are present: Coolant temperature is less than 60° C (140° F) The engine has not been running for 15 minutes An important DTC is active ...
-
Page 37: Starting Procedure
STARTING PROCEDURE See Safety Summary section of the manual before operating the machine. Failure to comply could result in minor personal injury, product damage, or property damage. 1. Verify that the rotary air valve cleanout / inspection doors are closed and secured in place. 2. -
Page 38: Crew Members And Their Duties
CREW MEMBERS AND THEIR DUTIES 1. The Operator controls the placement of the mulch by moving and aiming the discharge hose. 2. The Loader(s) feed material to the machine by using a skid steer or loader tractor, dumping it directly into the hopper or by shoveling from the tow vehicle to the feed floor via the feed chute. -
Page 39: Subsystem 2: Hydraulic System
At time of manufacture, this unit contains Finn Vulhydra hydraulic oil. The chart below illustrates the operating temperature range of the Finn Vulhydra hydraulic oil as well as the closest ISO equivalents. NOTE: When changing the hydraulic fi lter, use 5 micron or better filter element. -
Page 40: B. Floor (Drag Conveyor)/Feed Roll
B. FLOOR (DRAG CONVEYOR)/FEED ROLL The fixed displacement hydraulic pump feeds hydraulic oil to a flow divider manifold and from the flow divider manifold, the other 33% of the oil flow is routed to the floor motor through a dump valve system. - Page 41 SUBSYSTEM 3: HYDRAULIC CONTROL SYSTEM (CONTINUED) During auto-reverse, the rotary air valve reverses direction for approximately 1 second. While in reverse, it also cuts power to the floor, shutting it OFF. At the end of the auto-reverse cycle, power is restored to the forward solenoid, putting the rotary air valve back into forward and restarting the floor after a 2-second delay.
-
Page 42: Subsystem 4: Radio Remote Transmitter
If the RPM INC button is pressed and then released, the engine RPMs will only increase by 10 RPMs, but if the button is pressed and held, the engine RPMs will ramp up at a much faster rate. For additional info, see Cervis Engineered Application Specific Supplement: WSMB-7454 FINN. -
Page 43: Mulching With The Bark Blower
MULCHING WITH THE BARK BLOWER 1. Check all areas listed under PRE-START EQUIPMENT CHECK. 2. Start the engine following all the steps listed under STARTING PROCEDURE. 3. Press the START button on the hardwired pendant to activate the MATERIAL START/ STOP feature on the remote. -
Page 44: Excessive Auto-Reversing
BARK BLOWER ADJUSTMENTS (CONTINUED) B. EXCESSIVE AUTO-REVERSING If the rotary air valve starts to auto-reverse more than three times per minute, that means the rotary air valve is being overfed and the floor speed should be turned down or the knife is dull and should be resharpened or replaced and / or the quality of the mulch is poor. -
Page 45: Troubleshooting Chart
Troubleshooting Chart Symptom Probable Cause Suggested Solutions Engine will not start ECM has generated a fault Check fault code and remedy. code for the engine. No fuel. Check fuel gauge and water separator bowl. Rotary air valve not Hydraulics master toggle Flip switch to ON position and press turning switch is not on. -
Page 46: Maintenance
MAINTENANCE Turn engine OFF and disconnect battery before servicing equipment. Allow all moving parts to stop. To prevent accidental starting, disconnect battery cables. Tag the engine operating area to show that the machine is being serviced. Use lockout/tagout procedure (OSHA 29 CFR 1910.147). Failure to comply could result in minor personal injury, product damage, or property damage. - Page 47 MAINTENANCE (CONTINUED) WEEKLY - AFTER EVERY 50 HOURS OF OPERATION F) Lay the knife on the knife shelf. Ensure the knife is installed with the cutting angle edge facing down, as shown in Figure 5. Loosely install the two outer, and the middle knife mounting bolts.
-
Page 48: After First 100 Hours Of Operation
MAINTENANCE (CONTINUED) AFTER FIRST 100 HOURS OF OPERATION 1. Change engine oil and filter after 100 hours, then every 250 hours after that, following the engine manufacturer’s recommendations. 2. Change the gear box oil on the blower; use ISO Grade 100 Extreme Pressure Gear Oil if your ambient operating range is from 32°... - Page 49 NOTES...
- Page 51 Pressure Gear Oil] Motor Oil, 15W - 40 50/50 Anti-Freeze and Water Diesel Fuel HO Hydraulic Oil [Finn Vulhydra hydraulic oil or the closest ISO equivalent (see Hydraulic System section)] 90 W Gear Oil TIME KEY FLUID CAPACITIES Daily (8 Hours)
-
Page 52: Technical Specifications
® FINN BB302 BARK BLOWER TECHNICAL SPECIFICATIONS 11 ft. 2 in. (340 cm) 6 ft. 6 in. (198 cm) 6 ft. 11 in. (211 cm) - Page 53 ® FINN BB302 BARK BLOWER TECHNICAL SPECIFICATIONS POWER ............Yanmar 3TNV88C-DYEM, 35.1hp (26.2kW), 3 cylinder water cooled diesel engine. Tier 4Final. 1.642L ENGINE SAFETY SYSTEM ......Low oil pressure, Electronic Engine Control and Monitoring ..........CAPACITY 1.5 cubic yards (1.15 m FUEL TANK CAPACITY ........
- Page 54 NOTES...
-
Page 55: Parts Manual
BARK BLOWER Model BB302 Parts Manual Model MU WHEN ORDERING PARTS, BE SURE TO STATE SERIAL NUMBER OF MACHINE BB302 MU2018 Rev B... - Page 56 WHEN ORDERING PARTS, BE SURE TO STATE SERIAL NUMBER OF MACHINE BB302 MU2018 Rev B...
-
Page 57: Hopper And Trailer Parts
HOPPER AND TRAILER PARTS Ref. No. Part Number Description No. Req’d 055531 Hopper Left Side 055530 Hopper Right Side 055533 Hopper Corner 055583 Front Cross Member 055529-01 Front-Left Support Angle 055529-02 Front-Right Support Angle 055638 Feed Chute 055629 Material Retaining Flaps 055577 Feed Chute Support Jack Base 055577-03... - Page 58 WHEN ORDERING PARTS, BE SURE TO STATE SERIAL NUMBER OF MACHINE BB302 MU2018 Rev B...
-
Page 59: Trailer Components
TRAILER COMPONENTS Ref. No. Part Number Description No. Req’d 055871 Fuel Tank Assembly 055871-01 Fuel Tank 031464-02 Drain Cock 031464-03 Grommet 031464-04 Fuel Tube Assembly 031459 Fuel Level Gauge 005726 Fuel Tank Cap A1487-001 Toolbox (Modified) A1096-001 Manual Canister 055737 Tire and Rim Assembly 055789 Axle with Brake Assembly (see Wheel / Axle Assembly) - Page 60 WHEN ORDERING PARTS, BE SURE TO STATE SERIAL NUMBER OF MACHINE BB302 MU2018 Rev B...
-
Page 61: Wheel/Axle Assembly
WHEEL/AXLE ASSEMBLY Ref. No. Part Number Description No. Req’d 055789 #3000 Rubber Torsion Axle 055737 Wheel / Tire Assembly (Not Shown) 2 per axle 005811-01 Rubber Plug Insert 1 per side 005812-02 Grease Cap 1 per side 055789-20 Spindle Nut 1 per side 005814-01 Cotter Pin... - Page 62 WHEN ORDERING PARTS, BE SURE TO STATE SERIAL NUMBER OF MACHINE BB302 MU2018 Rev B...
-
Page 63: Air Lock Parts
AIR LOCK PARTS Ref. No. Ref. Part Number Description No. Req’d ----------- 1/2-13 X 3-3/4 in. Long Socket Head Cap Screw * 4 per ----------- 1/2 in. Lock Washer 4 per 055552 Hydraulic Motor 1 per 055464 Air Lock Gearbox 1 per... - Page 64 AIR LOCK PARTS Ref. No. Ref. Part Number Description No. Req’d NOT SHOWN Air Lock Inlet End Plate Hardware ----------- 7/16-14 X 2 in. Long Hex Head Cap Screw 4 per ----------- 7/16-14 X 1-3/4 in. Long Hex Head Cap Screw 4 per ----------- 7/16 Flat Washer...
- Page 65 THIS PAGE LEFT BLANK INTENTIONALLY WHEN ORDERING PARTS, BE SURE TO STATE SERIAL NUMBER OF MACHINE BB302 MU2018 Rev B...
- Page 66 WHEN ORDERING PARTS, BE SURE TO STATE SERIAL NUMBER OF MACHINE BB302 MU2018 Rev B...
-
Page 67: Feeder Parts
FEEDER PARTS Ref. No. Part Number Description No. Req’d 055817 Conveyor Weldment 055532-01 Feeder Top Cover 055631-01 Top Cover Hinge 055532-02 Feeder Door (Center Panel) 055631-02 Feeder Door Hinge 055532-03 Feeder Door (Bottom Panel) 055586 Feeder Door Handle 085152 Feeder Door Stop 055625 Feed Roll 055563-01... - Page 68 WHEN ORDERING PARTS, BE SURE TO STATE SERIAL NUMBER OF MACHINE BB302 MU2018 Rev B...
-
Page 69: Conveyor Parts
CONVEYOR PARTS Ref. No. Part Number Description No. Req’d 055817 Conveyor Weldment 055483 Conveyor Drag Chain Assembly 055703 Replacement Individual Slat 055483-RK Chain Link Repair Kit 055524 Conveyor Floor Pan 021517-04 Conveyor Drive Sprocket 190123-32 1/4 in. Square X 2 in. Long Key 021517-02 Conveyor Take-Up Sprocket (no key) F302-0006-02... - Page 70 11 15 WHEN ORDERING PARTS, BE SURE TO STATE SERIAL NUMBER OF MACHINE BB302 MU2018 Rev B...
-
Page 71: Blower Components
BLOWER COMPONENTS Ref. No. Part Number Description No. Req’d 055144 Filter 055145 Filter Element 055850 Air Intake Assembly 055497 Clamp 350 Series 055335 Clamp 400 Series 055498 Hump Reducer 055575-02 Blower Inlet Adapter 055706 Blower 055575-01 Blower Outlet Adapter 055141 Relief Valve 055585 Outlet Silencer... - Page 72 WHEN ORDERING PARTS, BE SURE TO STATE SERIAL NUMBER OF MACHINE BB302 MU2018 Rev B...
-
Page 73: Hydraulic Parts
HYDRAULIC PARTS Ref. No. Part Number Description No. Req’d 011466 Hyd Suction Strainer S-15-60 160484 Nipple 1 X 3 LG SCH 40 160010 Elbow 90 Deg 1 160498 Nipple 1 X 7 LG SCH 40 021559 1 in. Ball Valve FW71452 1 in. - Page 74 WHEN ORDERING PARTS, BE SURE TO STATE SERIAL NUMBER OF MACHINE BB302 MU2018 Rev B...
- Page 75 HYDRAULIC PARTS Ref. No. Part Number Description No. Req’d 055837-06 1/4 in. Working Hose X 26 in. OAL FW71450 1/4 in. MNPT X #4 MJIC 90° Elbow 055598 1/4 in. MNPT X #4 MJIC 90° LL Elbow 005686 #10 MSAE X #4 FJIC Reducer 055698 Hydraulic Motor, Feed/Floor 055820...
- Page 76 WHEN ORDERING PARTS, BE SURE TO STATE SERIAL NUMBER OF MACHINE BB302 MU2018 Rev B...
-
Page 77: Specific Engine Parts
SPECIFIC ENGINE PARTS Ref. No. Ref. Part Number Description No. Req’d 031542 Overflow Bottle Assembly, 1 quart Hose Clamp, 24 - 44 mm Hex Flange Machine Screw, M8 - 16 x 1.25 in. LG 031534 Radiator Support, Upper ... - Page 78 SPECIFIC ENGINE PARTS Ref. No. Ref. Part Number Description No. Req’d 031564 Filter, Fuel Oil 031560 Oil Cooler Assembly Hex Head Cap Screw, M10 - 25 UNC x 1 in. LG 005861 Snubbing Washer 005860-02 Engine Mounting Isolators 055804 Front Engine Foot Weldment 055805 Rear Engine Foot Weldment...
- Page 79 THIS PAGE LEFT BLANK INTENTIONALLY WHEN ORDERING PARTS, BE SURE TO STATE SERIAL NUMBER OF MACHINE BB302 MU2018 Rev B...
- Page 80 TRAILER PLUG TAIL LIGHTS (BROWN) NOT USED LEFT RIGHT TURN TURN (YELLOW) (GREEN) BLACK BLACK GROUND ELECTRIC BRAKES (WHITE) (BLACK) WHITE WHITE WHITE BLACK BLACK STARTER GREEN YELLOW BROWN BROWN WHITE WHITE WHEN ORDERING PARTS, BE SURE TO STATE SERIAL NUMBER OF MACHINE BB302 MU2018 Rev B...
-
Page 81: Trailer Wiring
TRAILER WIRING Ref. No. Part Number Description No. Req’d 075592 7-Blade Trailer Plug 023424 Breakaway Switch 190029 Chain – 2 Tenso Weldless 2 ft 005016 “S” Hook 005017 Snap Hook A1228-001 Taillight - Left-Hand Side A1259-001 Taillight - Right-Hand Side A1220-001 License Plate Light A1227-001... - Page 82 Start / Stop Pendant (Cord Not Shown) Main Control Panel Radio Remote Transmitter WHEN ORDERING PARTS, BE SURE TO STATE SERIAL NUMBER OF MACHINE BB302 MU2018 Rev B...
-
Page 83: Control Panel And Control Systems
CONTROL PANEL AND CONTROL SYSTEMS Ref. No. Ref. Part Number Description No. Req’d 031520 Controller/Display, Yanmar T4F 055841 BB302 Control Box Decal (2014 Yanmar) 055828-01 Box, Modified 055851 Ignition Switch, 2 Position 031506-01 Ignition Switch Key ... - Page 84 View A View A WHEN ORDERING PARTS, BE SURE TO STATE SERIAL NUMBER OF MACHINE BB302 MU2018 Rev B...
-
Page 85: Hose Reel Assembly
HOSE REEL ASSEMBLY Ref. No. Part Number Description No. Req’d 055714 Hose Reel Drum 055725 Drum Brake F302-0004-03 Brake Arm WL1504 Dust Cap WLSN-750 Spindle Nut WLSW-751 Spindle Washer WLLM11949 Outer Cone WLH-15-450E Hub Assembly WLLM67048 Inner Cone WLSL-150 Seal F302-0008 Hose Reel Bracket 055713... -
Page 86: Discharge Hose
DISCHARGE HOSE Part Number Description No. Req’d 055399B 4 in. x 100 ft. BB Hose Assembly 055398B 4 in. x 50 ft. BB Hose Assembly 055377 Hose Adapter 2 per 055374A Aluminum Adapter Part A 1 per 055375A Aluminum Coupler Part D 1 per WHEN ORDERING PARTS, BE SURE TO STATE SERIAL NUMBER OF MACHINE... -
Page 87: Tool Kit
TOOL KIT Part Number Description No. Req’d 055385 4 in. Coupler Gasket 012681A FINN Beige Aerosol Paint 053075 4 in. Red Diffuser Cone Assembly 020365 Grease, Multi Purpose 021375 Grease Gun (Hose Not Included) 021741 12 in. Whip Hose W/1/8 in. Male Ends... - Page 88 WHEN ORDERING PARTS, BE SURE TO STATE SERIAL NUMBER OF MACHINE BB302 MU2018 Rev B...
-
Page 89: Decals
Part Number Description No. Req’d “WARNING! Burn Hazard” Decal “WARNING! Sever Hazard / Flying Debris” Decal 031235 Red "FINN" Medium Decal 055639 "BARK BLOWER" Decal 055877 “Operating Instructions” Decal “DANGER! Entanglement Hazard” Decal “WARNING! FLYING OBJECT” Decal ... - Page 90 WHEN ORDERING PARTS, BE SURE TO STATE SERIAL NUMBER OF MACHINE BB302 MU2018 Rev B...
-
Page 91: Trailer Safety Decals
TRAILER SAFETY DECALS Ref. No. Part No. Description No. Required Decal ”Warning! Control Hazard! Tires...” (Dual Axle) Decal ”Warning! Control Hazard! Lights...” Decal ”Warning! Runaway Vehicle Hazard! Breakaway...” and ”Control Hazard! Chains...” Decal “Warning! Personal Injury Hazard! Trailer Jack...” ...
Need help?
Do you have a question about the Bark Blower BB302 and is the answer not in the manual?
Questions and answers