Advertisement
Table of Contents
Operation Guide
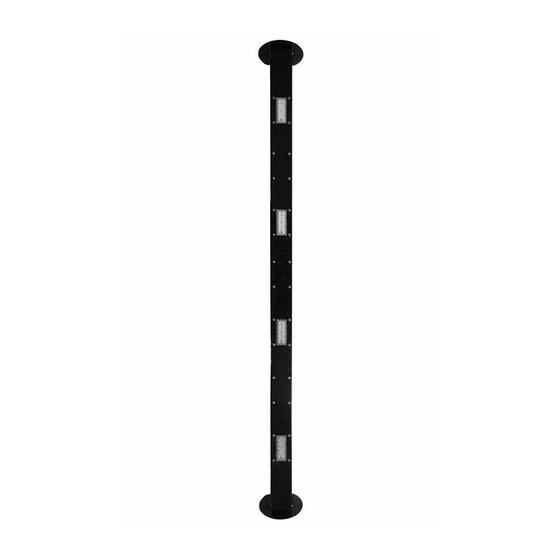
Thank you for purchasing the Larson Electronics ORS-120-8M-4X150W-
LED-1227 10ft LED light array. Follow the steps below for installing and
maintaining your unit.
Installation
1. Carefully unpack the unit(s) from the shipping crate and place it on a flat
surface near your mounting location.
2. Mount the unit using the predrilled mounting holes on the top and bottom
brackets of the light system. Power will be supplied from one end of the
fixture. For multiple units, refer to step 3 in order to attach each end together
before mounting.
3. For multiple units, line each 10ft unit up on a flat surface and use the
included hardware to bolt them together. Attach each interlocking bracket to
the back, sides, and front.
Left Side Plate (4 bolts)
Right Side Plate (4 bolts)
Bottom Plate (4 bolts)
Front Cover Plate (4 bolts)
The unit will be mounted as one using the mounting brackets on each end.
4. Supply power to each 10ft light array. Each 10ft unit requires 120-277V AC
50/60Hz. Each unit draws 10A @ 120V & 5A @ 240V.
Rotation
The mounting brackets allow full 180° rotation of the light array. Slightly
loosen the top and bottom bolts and rotate the lights. Once the light array is
facing in the desired direction, tighten the two bolts.
ORS-120-8M-4X150W-LED-1227
1. First, remove the cover plate (placeholder) that joins the two main face
2.
3.
v
Larson Electronics LLC
Add/Remove Light Modules
The ORS-120-8M-4X150W-LED-1227 contains placeholders and deutsch
wire connections for mounting additional light modules. Follow the steps
below for adding or removing light modules.
Each LED light module is held in place by the front face plate. There is a
total of 2 face plates per 10ft unit with each plate holding 2 LED modules
and 1½ placeholders for up to three additional lights. While light modules
may be added or removed vertically, it is recommended to lay the unit
horizontal with the LED modules facing up to prevent potential damage or
injury from lights falling out of place.
plates. Loosen the 4 hex bolts to remove the plate. Remove each cover
plate where additional modules will be added.
Next, remove the 3 hex bolts on each side (6 total) holding the main face
plate.
Carefully lift the face plate up and gently tap out any LED modules that
may have stuck to the plate.
Ver.1216-1
1
Advertisement
Table of Contents

Related Manuals for Larson Electronics ORS-120-8M-4X150W-LED


Summary of Contents for Larson Electronics ORS-120-8M-4X150W-LED
- Page 1 Ver.1216-1 Add/Remove Light Modules Operation Guide Thank you for purchasing the Larson Electronics ORS-120-8M-4X150W- The ORS-120-8M-4X150W-LED-1227 contains placeholders and deutsch LED-1227 10ft LED light array. Follow the steps below for installing and wire connections for mounting additional light modules. Follow the steps maintaining your unit.
- Page 2 Materials: Aluminum Housing, Polycarbonate Lens Mounting: Flat Surface Brackets / Thru Holes Wire Diagram 9419 US-HWY 175 Kemp, TX 75143 USA P: 800-369-6671 | INTL: 903-498-3363 F: 903-498-3364 sales@larsonelectronics.com www.larsonelectronics.com ORS-120-8M-4X150W-LED-1227 Larson Electronics LLC...
Need help?
Do you have a question about the ORS-120-8M-4X150W-LED and is the answer not in the manual?
Questions and answers