
Related Manuals for Power Fist Metal Punch Kit


Summary of Contents for Power Fist Metal Punch Kit
- Page 1 V 3.01 8460131 Metal Punch Kit User Manual Please read and understand all instructions before use. Retain this manual for future reference.
-
Page 2: Specifications
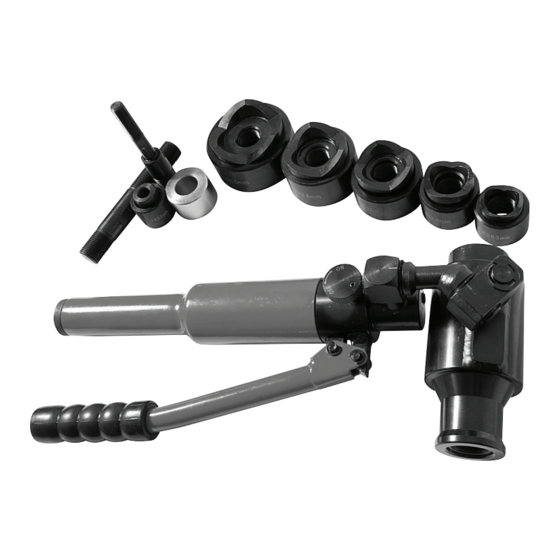
3/4 in. (19.05 mm) Draw Stud INTRODUCTION The metal punch kit produces clean perforation through 1/8 in. thick mild steel with a 2-2/5 in. diameter. IMPORTANT SAFETY PRECAUTIONS WARNING! Read and understand all instructions before using this tool. The operator must follow basic... -
Page 3: Work Area
8460131 Metal Punch Kit V 3.01 precautions to reduce the risk of personal injury and / or damage to the equipment. Before allowing someone else to use this tool, make sure they are aware of all safety information. WARNING! The warnings, cautions and instructions discussed in this instruction manual cannot cover all possible conditions and situations that may occur. -
Page 4: Specific Safety Precautions
V 3.01 Metal Punch Kit 8460131 SPECIFIC SAFETY PRECAUTIONS Keep hands and fingers away from the cutting area. Do not put your fingers in the head of the hydraulic punch tool during operation. Do not slide fingers along the blade of the punch dies. - Page 5 8460131 Metal Punch Kit V 3.01 TOOL USE AND CARE WARNING! Do not use the tool if the pump action does not function properly. Any tool that cannot be controlled is dangerous and must be repaired. WARNING! Do not exceed the maximum 1/8 in. thick mild steel when cutting metal with this tool.
-
Page 6: Parts Identification
V 3.01 Metal Punch Kit 8460131 PARTS IDENTIFICATION Name Function Outputs high pressure to activate the piston Turn Screw For releasing pressure Pump Handle For operating Fixed Handle For storing oil and protecting the rubber bladder Punch & Die For Punching... -
Page 7: Maintenance
8460131 Metal Punch Kit V 3.01 WARNING! An improper setup could cause damage to the components. CAUTION! If the ram stops before the hole is complete, stop pumping, check that the setup is correct and that you have not exceeded the tool’s capacity. If necessary, disassemble the punch and remove the spacer. -
Page 8: Adding Hydraulic Oil
V 3.01 Metal Punch Kit 8460131 ADDING HYDRAULIC OIL Place the punch tool in a vise in a vertical position with the handles up. Unscrew the fixed handle and remove the bladder plug. Open the turn screw to assure the ram is fully extended. -
Page 9: Troubleshooting
8460131 Metal Punch Kit V 3.01 STORAGE Lubricate before storing. In the event that it becomes necessary to store the tool for an extended period of time (overnight, weekend, etc.,) it should receive a generous amount of lubrication at that time to prevent rust. -
Page 10: Parts Breakdown
V 3.01 Metal Punch Kit 8460131 PARTS BREAKDOWN For technical questions call: 1-800-665-8685... -
Page 11: Parts List
8460131 Metal Punch Kit V 3.01 PARTS LIST Description Qty. Description Qty. Spring Seat O-Ring Spring Cartridge Back-Up Ring Pin 6x22 O-Ring Split Washer 4 Piston Pump Handle O-Ring Rubber Grip Back-Up Ring Back-Up Ring Suction Valve Back-Up Ring Filter O-Ring Steel Ball C 4.5... - Page 12 V 3.01 Metal Punch Kit 8460131 For technical questions call: 1-800-665-8685...
- Page 13 V 3,01 8460131 Trousse de poinçon pour métal Manuel d'utilisateur Vous devez lire et comprendre toutes les instructions avant d'utiliser l'appareil. Conservez ce manuel afin de pouvoir le consulter plus tard.
-
Page 14: Spécifications
V 3,01 8460131 Trousse de poinçon pour métal SPÉCIFICATIONS Force du poinçon 8 tonnes Tailles Poinçons ronds de 1/2, 3/4, 1, 1 1/4, 1 1/2 et 2 po Caractéristiques La tête du poinçon tourne sur 360° afin d’en faciliter l’utilisation. GUIDE DE SÉLECTION DE CAPACITÉ... -
Page 15: Consignes De Sécurité Importantes
8460131 Trousse de poinçon pour métal V 3,01 CONSIGNES DE SÉCURITÉ IMPORTANTES AVERTISSEMENT ! Veuillez lire et comprendre toutes les instructions avant d’utiliser cet outil. L’utilisateur doit respecter les précautions de base lorsqu’il utilise cet outil afin de réduire le risque de blessure ou de dommage à... -
Page 16: Consignes De Sécurité Spécifiques
V 3,01 Trousse de poinçon pour métal 8460131 ou de médicaments. N’utilisez pas d’outil si vous devez étirer les bras pour vous en servir. Une stabilité et un équilibre appropriés sont nécessaires afin d’avoir un meilleur contrôle de l’outil en cas de situations inattendues. - Page 17 8460131 Trousse de poinçon pour métal V 3,01 PRÉCAUTIONS RELATIVES AU SYSTÈME HYDRAULIQUE N’essayez pas de faire des réparations de fortune au système hydraulique. De telles réparations peuvent être sujettes à des défaillances soudaines et causer une condition dangereuse. Portez des protections appropriées pour les mains et les yeux lorsque vous recherchez une fuite hydraulique sous haute pression.
-
Page 18: Identification Des Pièces
V 3,01 Trousse de poinçon pour métal 8460131 AVERTISSEMENT ! Si des pièces sont manquantes, ne faites pas fonctionner l’outil avant que les pièces manquantes soient remplacées. Le non-respect de cet avertissement peut entraîner de graves blessures. IDENTIFICATION DES PIÈCES Fonction Vérin Produit une pression élevée afin d’actionner le piston... -
Page 19: Entretien
8460131 Trousse de poinçon pour métal V 3,01 Au moyen d’une perceuse électrique, percez un avant-trou de Φ11,5 mm (0,45 po) dans la tôle. Tournez la vis dans le sens antihoraire afin de déployer complètement le vérin. Voir la figure 2. Vissez le goujon à... - Page 20 V 3,01 Trousse de poinçon pour métal 8460131 matrices afin de prévenir la rouille. Si des réparations sont nécessaires, apportez l’outil à un centre de réparation autorisé. Les trousses d’étanchéité devront être remplacées après avoir utilisé l’outil à plusieurs reprises. S’il y a des fuites, communiquez avec un centre de service autorisé...
-
Page 21: Dépannage
8460131 Trousse de poinçon pour métal V 3,01 LUBRIFICATION Il est important que l’outil soit lubrifié correctement. Sans une lubrification adéquate, l’outil ne fonctionnera pas bien et ses mécanismes s’useront prématurément. Évitez une lubrification excessive de l’outil. Utilisez le bon lubrifiant et ne remplissez ou ne lubrifiez les pièces que lorsque cela est nécessaire. - Page 22 V 3,01 Trousse de poinçon pour métal 8460131 RÉPARTITION DES PIÈCES LISTE DES PIÈCES Description Qté Description Qté Siège de ressort Anneau de plastique Ressort Joint torique Rondelle d’appui Cartouche Joint torique Goupille 6 x 22 Piston Rondelle fendue 4 Joint torique Poignée de la pompe Rondelle d’appui...
- Page 23 8460131 Trousse de poinçon pour métal V 3,01 Visitez www.princessauto.com pour plus d'informations...
Need help?
Do you have a question about the Metal Punch Kit and is the answer not in the manual?
Questions and answers