Table of Contents
Advertisement
Quick Links
Advertisement
Table of Contents

Subscribe to Our Youtube Channel
Summary of Contents for 3B6 TOP MASTER
- Page 1 Top Master User Manual Rev 8 3-29-10 Software WS02_19 & RL02_20...
- Page 2 Top Master User Manual Table of Contents Features and functions Page 3 Central Unit Page 4 Displays Page 5 Setting and operating pushbuttons Page 6 Operating the remote control Page 7 Weighing mode Page 8 Setting a new tare Page 9...
-
Page 3: Features And Functions
•Load up to 10 different materials on the same truck •Load up to 10 different trucks in the same time. TOP MASTER systems have RS-232/C serial communication for connections with other intelligent external units: infrared port, modem, radio etc. and to enter further code No. from... -
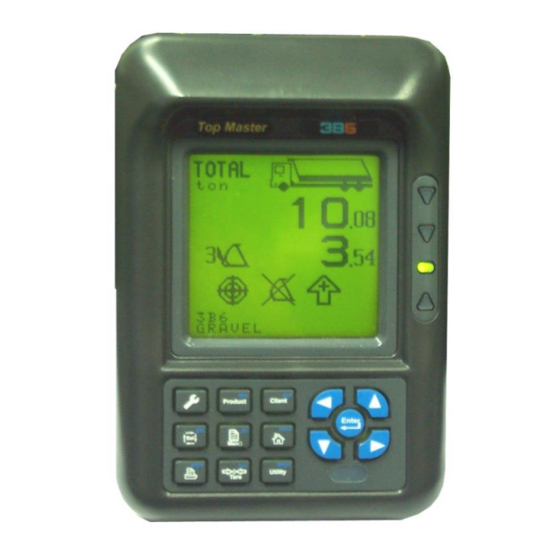
Page 4: Main Unit
Top Master User Manual Main Unit Signal lamps indicate that the maximum Displays load set has been reached P roduct P roduct Client Enter Enter Enter Setting and Depth S e l S e l S e l R adius Menù... - Page 5 Top Master User Manual Displays TOTAL Display of truck loading with respect to the maximum load set. The tank fills in percentage with respect to the maximum load set. Display of the total weight Display of the partial weight Display of the type of weighing...
- Page 6 Top Master User Manual Setting and Operating Pushbuttons P roduct Client Enter S e l Menù pqrs wxyz Utility T a re Used to access Diagnostic and Calibration Used to access Target, Maximum Load S e l pqrs Used to execute Printer functions...
-
Page 7: Operating The Remote Control
Top Master User Manual Operating the Remote Control Printer command switch (to request the ticket or end of the day ticket, end of the day ticket press and hold for 10 seconds.) Total Zeroing switch (before a new loading) Partial Zeroing Switch (of the last bucket load) -
Page 8: Dynamic Weighing Mode
Top Master User Manual Dynamic Weighing Mode The system is based on the measurement of the lift cylinder piston pressure (by means of the pressure transducer) and the calculation of the raise speed (with proximity switches or inclinometer). To perform the weighing completely close the bucket, raise the arm keeping the engine Rpm’s constant and the the lift lever full open and wait for the unit to give the audible... - Page 9 Top Master User Manual Setting a New Tare A new tare should be set when the bucket is changed or the oil changed in the hydraulic system, or when residual material is built up in bucket. When setting a new tare, the weight of the quantity deposited can be zeroed and only the material which is effectively loaded into the truck is weighed.
- Page 10 Top Master User Manual Disable the Weighing Feature During the loading process, the machine may be used for other reasons and you want to keep the value of the load performed so far, the weighing can be suspended temporarily and then resumed to finish loading the truck.
-
Page 11: Count Down Function
Top Master User Manual Count Down Function To activate or deactivate the Count Down function proceed as follows: Press and release the UTILITY pushbutton, the display appears as below: Tare Disable Count Down Machine Use IR MultiProduct Correction 100 Time Setting Press and release the UP or DOWN pushbutton to scroll to the Count Down line and press and release the ENTER pushbutton to enable the function. -
Page 12: Machine Function
Top Master User Manual Machine Function The Top Master display can be moved between 4 different machines and store 4 separate calibrations.The machine function can select the machine in use and thus its specific calibration at any time. To set the machine in use proceed as follows: Press and release the UTILITY pushbutton. - Page 13 Top Master User Manual Infrared Communication Optional To use this function you must have the Dispenser option to proceed as follows: Press and release the UTILITY pushbutton. The display looks as below Tare Disable Count DW Machine Use IR MultiProduct...
- Page 14 Top Master User Manual Multi-Product/Multi-Truck function To use this function you must have the Dispenser option to proceed as follows: Press and release the UTILITY pushbutton. The display looks as below Tare Disable Count DW Machine Use IR MultiProduct Correction 100 Time Setting Press and release the UP or DOWN pushbutton to scroll to the MultiProduct line.
- Page 15 Top Master User Manual Multi-Product/Multi-Truck function TOTAL TOTAL During a Multi-Product load you can see two icons on the display: : Last bucket load is displayed. : Total for the selected material is displayed. Switch between these visualizations by press and releasing the RIGHT (+) pushbutton.
-
Page 16: Correction Function
Example : If the TOP MASTER works with 5% less than the real weight the value of correction must be increased of 5 points percentage. (105%) If the TOP MASTER works with 5% more than the real weight the value of correction must be decreased of 5 point percentage. -
Page 17: Setting Date And Time
Top Master User Manual Setting Date and Time Press and release the UTILITY pushbutton. The display looks as below. Tare Disable Count DW Machine Use IR MultiProduct Correction 100 Time Setting Press and release the UP or DOWN pushbutton to scroll to the Time Setting line. - Page 18 Top Master User Manual Partial Zeroing, Partial x 2, Total, Totals and Tare Procedure Press and release the MENU pushbutton. The display looks as below. Delete Partial Partial x 2 Total Product Totals Tare Press and release the DOWN pushbutton to scroll to the proper line and press and Release the ENTER pushbutton to confirm.
- Page 19 Top Master User Manual Target, Unit of Measurement, Customer Code, Material, Operator, Truck, Project, and Project Press and release the SEL pushbutton. The display looks as below. Target Unit Meas. Customer Product Operator Truck N. Max N.W. Project Press and release the UP or DOWN pushbutton to scroll to the line you want to changes.
- Page 20 Top Master User Manual Target (Maximum Load) Press and release the DOWN pushbutton to scroll to the TARGET line.. Target Unit Meas. Customer Product Operator Truck N. Max N.W. Project Use the LEFT (-) or RIGHT (+) pushbutton to change the value required and confirm by pressing and releasing the ENTER pushbutton.
-
Page 21: Unit Of Measurement
Top Master User Manual Unit of Measurement Press and release the UP or DOWN pushbutton to scroll to the UNIT MEASURE line. Target Unit Meas. Customer Product Operator Truck N. Max N.W. Project Use the LEFT (-) or RIGHT (+) pushbutton to set the unit of measurement required and press and release the ENTER pushbutton to confirm.The units of measurement which... - Page 22 Top Master User Manual Customer,Material,,Operator,Truck,Max NW,Project No. Press and release the UP or DOWN pushbutton to scroll to the proper line. Target Unit Meas. ---------- Customer ---------- Press and release the ENTER Product ---------- Operator pushbutton to change to the ---------- Truck N.
- Page 23 Top Master User Manual Customer: 8 Lines of 16 characters can be set. To scroll the page down (maximum 1000 code No.) position the cursor on the last code No. displayed and press and release the SEL pushbutton. To scroll the page up position the cursor on the first code No. displayed and press and release the SEL pushbutton.
- Page 24 Top Master User Manual Density Function (Specific Gravity) Print load in Cubic Yards/Meters Press and release the UP or DOWN pushbutton to scroll to the Material line. Target Unit Meas. Customer Product Operator Truck N. Max N.W. Project Press and release the ENTER pushbutton to access the following screen.
- Page 25 Top Master User Manual Display Totals for Materials Press and release the Print pushbutton and using the UP or DOWN pushbutton to scroll to the Display Totals. TOTALS PRINT M 0... Partial M 1... Press and release the ENTER Total M 2...
- Page 26 Top Master User Manual Printer function (optional printer) 1/3 The following information is printed on the ticket: • Company name • Date and time • Operator code No. or name • Material code No. or name • Customer code No. or name •...
- Page 27 Top Master User Manual Printer function (optional printer) 2/3 PRINT Total Actual load Options Totals saved print Total of the day Ticket n. Print Header Header 1 Header 2 Display Totals Press and release the MENU pushbutton, scroll down to the TOTAL line or Press and release the ENTER pushbutton on the OPTIONS line and the following screen will appear.
- Page 28 Top Master User Manual Printer function (optional printer) 3/3 PRINT Total Actual load print Options Totals saved print Total of the day Ticket n. Print Header Header 1 Header 2 Display Totals To zero or change the ticket number scroll the cursor to Ticket No. using the LEFT and RIGHT pushbutton.
- Page 29 Top Master User Manual TICKET PRINTER HEADER With Ticket printer, you can select how, and in which order the ticket must be printed. Set in Header 1 the corresponding command. Line Feed Normal Character Double Width Character Double Height Character...
- Page 30 Top Master User Manual HOW TO USE THE HAND HELD KEYPAD (OPTIONAL Press the C key to access the set customers menu Press the M key to access the set materials menu Press the P key to access the set projects menu Press the N key to access the set truck No.
- Page 31 Top Master User Manual Memory capacity/Operating Faults The system has a maximum memory capacity. When any of the values are exceeded the pertaining value on the display will flash to alert the operator the memory is exceeded.See page 18 and perform the Product totals delete feature to correct this.
-
Page 32: Max Values
Top Master User Manual Max Values TOTAL Each value shown on the display has a limit. Loading truck with a fork lift / wheel loader we assume that after each truck (usually no more than 40 metric tons) the total is zeroed. - Page 33 Top Master User Manual Diagnostics MAIN MENU Press and release the WRENCH button and scroll to Access code the SENSOR line and press and release the ENTER Sensors pushbutton to enter the diagnostics menu. 0 1 2 3 4 5 6 7 KEY.1:...
Need help?
Do you have a question about the TOP MASTER and is the answer not in the manual?
Questions and answers