Advertisement
Quick Links
Advertisement

Subscribe to Our Youtube Channel
Related Manuals for Prostat PMT-872A


Summary of Contents for Prostat PMT-872A
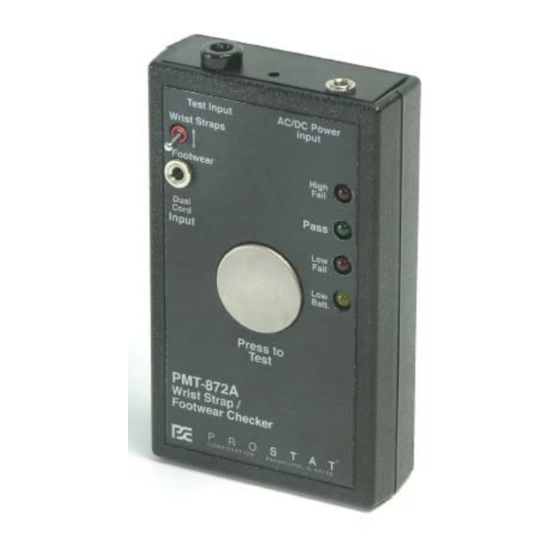
- Page 1 WRIST STRAP/FOOTWEAR AUDITOR PMT-872A User Manual...
-
Page 3: Table Of Contents
General Specifi ca ons Copyright © 2012 by Prostat® Corpora on. All rights reserved. Printed in the United States of America. No part of this manual may be used or reproduced in any manner whatsoever without wri en permission. For informa on contact Prostat Corpora on, 1072 Tower Lane, Bensenville, IL 60106 USA Prostat is the registered trademark of Prostat®... -
Page 4: Before Using The Instrument
B. The PMT-872A self-test sequence is ac vated each me the unit is used. Upon comple on of an acceptable self-test and ba ery check, the unit’s Yellow “Low Ba .” LED Light will go off . -
Page 5: Accuracy
Ohms and less than 3.5x10 Ohms c. Low FAIL Measurements less than 8.0x10 Ohms IV. Accuracy A. The PMT-872A func onal test ranges and accuracy are as follows: Factory Adjusted Measurement Ranges & Accuracy: WRIST STRAPS: 8.0x10 Ohms to 1.0x10 Ohms <±5% (Factory Default) FOOTWEAR: 8.0x10... -
Page 6: Ba Ery Installa On & General Maintenance
B. Ini al Opera onal Check Once the ba ery is installed in the PMT-872A check its ini al func on without any lead connec- ons to the “Test Input”, as follows. Rev. A / December 2006... -
Page 7: Normal Opera Ons
These procedures assume that a fresh ba ery is properly installed and the unit has been func onally tested for proper opera on. For informa on regarding comprehensive tes ng of the PMT-872A, refer to Sec on VII “Func onally Tes ng the PMT-872A”, on Page 13. - Page 8 Make sure that the wrist strap is fi rmly ghtened around your wrist b. Do not a empt to test a wrist strap that hangs loosely from your wrist c. An improperly worn wrist strap will indicate a FAIL on the PMT-872A 4. Insert the wrist strap grounding cord male banana plug into the test “Test Input”...
- Page 9 PMT-872A Wrist Strap/Footwear Auditor a. Make sure that you hold the cuff opposite (180 ° ) from the metal cuff buckle NOTE Do not test a wrist strap while holding the buckle as it may give you a false PASS indicator.
- Page 10 1. Individually Tes ng Each Conduc ve Sec on: Cuff to Plug a. Place the PMT-872A toggle switch in the UP, Wrist Strap posi on. b. A ach the wrist strap ground cord to the wrist strap cuff assembly according to the manu- facturer’s instruc ons.
- Page 11 5. Push the “Press to Test” bu on with your index fi nger. You will no ce that the LED’s light up while a emp ng to automa cally “range”. With acceptable Footwear the PMT-872A indica- ons may be as follows:...
- Page 12 1.0x10 ohms. The PMT-872A will indicate HIGH FAIL. This is a correct indica on. b. When standing on the plate with both shoes in contact with the plate, the shoes form a “parallel”...
-
Page 13: Func Onally Tes Ng The Pmt-872A
This is also a correct indica on. VII. Func onally Tes ng the PMT-872A A. The PMT-872A has no internal parts you can adjust, so verifi ca on of calibra on can be achieved using the following process. If verifi ca on cannot be achieved, the unit should be returned to the supplier. - Page 14 9.0x10 ohms. Using the metal banana plug end of the second reference lead, press the PMT-872A’s “Push to Test” bu on and observe the instrument’s indica on LED lights. The following PMT-872A indica ons should occur within approximately 1 second: 1.
- Page 15 Set the Variable Resistance Reference to 9.0x10 ohms. Using the metal banana plug end of the second reference lead, press the PMT-872A’s “Push to Test” bu on and ob- serve the instrument’s indica on LED lights. The following PMT-872A indica ons should occur within approximately 1 second: 1.
- Page 16 PMT-872A Wrist Strap/Footwear Auditor 1. Ini ally, the HIGH FAIL and LOW BATT. LED’s should light briefl y. 2. The HIGH FAIL LED remains on and the LOW BATT. LED goes off . Rev. A / December 2006...
-
Page 17: General Specifi Ca Ons
PMT-872A Wrist Strap/Footwear Auditor PMT-872A Wrist Strap/Footwear Checker Specifi ca ons Test Voltage & Current: Nominal 9 volts and 0.006 μA to 1.0 mA. Test Voltage & Current: One (1) standard 9-volt ba ery, PROCELL, Eveready #216 (NEDA 1604, JIS 006P, IEC 6F22);... - Page 18 PMT-872A Wrist Strap/Footwear Auditor NOTES Rev. A / December 2006...
- Page 20 Specifi ca ons are subject to change without no ce. All Prostat trademarks and trade names are the property of Prostat Corpora on. All other trademarks and trade names are the property of their respec ve companies. P R O F E S S I O N A L...
Need help?
Do you have a question about the PMT-872A and is the answer not in the manual?
Questions and answers