Table of Contents
Advertisement
Advertisement
Table of Contents

Related Manuals for btsr SMART MATRIX WINDINGFEEDER


Summary of Contents for btsr SMART MATRIX WINDINGFEEDER
- Page 1 SMART MATRIX WINDINGFEEDER Operating Manual ENGLISH Rev. 1.2 – July 2012...
- Page 2 BTSR reserves the right to change at any time the contents of this Manual, without notice. For any technical or commercial problem, please contact your local BTSR dealer or call directly BTSR customer service center.
- Page 3 Introduction...
- Page 5 WINDINGFEEDER devices; in addition, it provides a real time monitoring of device behavior and production efficiency. Manual Objectives This manual has been written to provide the users of SMART MATRIX WINDINGFEEDER system with the essential information required to: •...
- Page 6 (e.g. IDENTIFY) within the menu item (e.g. SETUP). Reference Documentation For detailed information about the operation, interface and local programming mode of WINDINGFEEDER devices, please refer to the WINDINGFEEDER Manual – Edition March 2011. SMART MATRIX WINDINGFEEDER - ii -...
-
Page 7: Table Of Contents
SMART MATRIX ↔ WINDINGFEEDER ↔ PC Connection................1 SMART MATRIX ↔ WINDINGFEEDER/PC Interface..................2 2 – Operating Instructions SMART MATRIX WINDINGFEEDER Operation.....................3 SMART MATRIX WINDINGFEEDER Menu Structure ..................11 Device Configuration and Numbering......................12 SMART MATRIX WINDINGFEEDER Code ....................14 I/O Configuration on SMART MATRIX/WINDINGFEEDER ................15 Efficiency Calculation Mode ..........................16... - Page 8 Indice SMART MATRIX WINDINGFEEDER - iv -...
-
Page 9: Connections And Electrical Interface
Connections and Electrical Interface... -
Page 11: Smart Matrix ↔ Windingfeeder ↔ Pc Connection
The following diagram shows the interconnections among: SMART MATRIX terminal, WINDINGFEEDER devices and PC. The PC is mainly used for firmware update operations on SMART MATRIX WINDINGFEEDER Terminal. For a correct connection of WINDINGFEEDER device supply and interface cables, please refer to Section 2 of WINDINGFEEDER Operating Manual. -
Page 12: Smart Matrix ↔ Windingfeeder/Pc Interface
(*) Confirm that the LV green Led shows a double flashing (communication speed on Cv232/485/9 = 115 kbps). If necessary press the small P button. Technical characteristics of SMART MATRIX WINDINGFEEDER terminal Power supply voltage 24 VDC ± 10% Current absorption... -
Page 13: Operating Instructions
Operating Instructions... -
Page 15: Smart Matrix Windingfeeder Operation
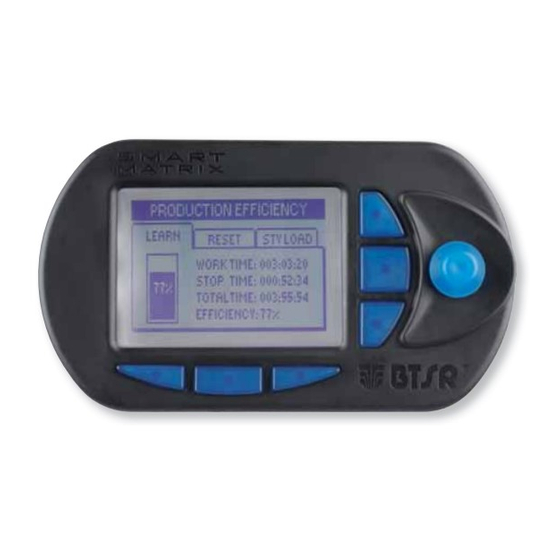
SMART MATRIX WINDINGFEEDER Operation All the Configuration, Parameter Setting, Data & Error Display operations, etc. can be managed by the Operator in quick and intuitive way, using the SMART MATRIX WINDINGFEEDER control terminal. The SMART MATRIX ↔ Operator interface consists of: A - Graphic display showing: •... - Page 16 SMART MATRIX WINDINGFEEDER Operation Navigation throughout the Display Windows Many configuration/parameter setting functions of SMART MATRIX WINDINGFEEDER system require a number of parameters distributed among multiple display windows. All the “Window Selection”, “Parameter Selection within a Window” and “Parameter Setting” functions on SMART MATRIX terminal, can be carried out using exclusively the multi-function Rotary Selector, through a navigation technique based upon “Pointing”, “Selecting”...
- Page 17 SMART MATRIX WINDINGFEEDER Operation Navigation within the Selected Window (SMART MATRIX) Turn the selector to “Point” in sequence the various items of the window → → → → OUT). (SMART MATRIX The frame indicates the “Pointed” field. Click to “Select” the pointed item. The field name will be shown in riverse.
- Page 18 SMART MATRIX WINDINGFEEDER Operation 2 – Windows Swap Turn the selector to “Point” the label of the current window (SMART MATRIX) and click to hoghlight it. Example: SMART MATRIX window highlighted Turn the selector to “Point” the remaining window (WINDINGFEEDER).
- Page 19 SMART MATRIX WINDINGFEEDER Operation 3 – Entering Alphanumeric Values Some functions of SMART MATRIX WINDINGFEEDER terminal require typing alphanumeric data fields (e.g. Style Name setup or change). To make this operation easier, a soft keyboard has been implemented, which allows entering capital/small letters, numbers and graphic symbols.
- Page 20 SMART MATRIX WINDINGFEEDER Operation To enter the Style Name (e.g. STYLE1), operate as follows: Press repeatedly the indicated button to clear the Default Style Name. NOME ARTICOLO DI DEFAULT Select, in sequence, the S, T, Y, L, E keys. Press twice indicated button to select the numeric keypad.
- Page 21 SMART MATRIX WINDINGFEEDER Operation Immediate Function Activation through the SMART MATRIX WINDINGFEEDER Buttons The 6 blue buttons (B1 ~ B6) allow you to directly activate some system functions without passing through the menu items. Such functions are indicated by the icons associated with the buttons, as shown on the following figure.
- Page 22 SMART MATRIX WINDINGFEEDER Operation Interpretation of Operating Screens • System working in Control status • No errors detected! • At least one WINIDINGFEEDER device running • System in STOP status • No errors detected! • All WINIDINGFEEDER devices stopped •...
-
Page 23: Smart Matrix Windingfeeder Menu Structure
Struttura dei Menu SMART MATRIX WINDINGFEEDER SMART MATRIX WINDINGFEEDER Menu Structure Alternating Error Error details Main Menu Style configuration Style loading System configuration In the description of the various functions, the following graphic symbols will be used: Turn the selector to point the desired option Select the desired option and click to confirm. -
Page 24: Device Configuration And Numbering
The CURRENT field on SMART MATRIX terminal increases by 1. • Repeat the above procedure for all connected WINDINGFEEDER devices. At the end of the numbering operation, the configuration menu will re-appear. SMART MATRIX WINDINGFEEDER - 12 -... - Page 25 (e.g. 007). c) the CURRENT field on SMART MATRIX terminal increases by 1. To leave the identification procedure once you have re- numbered the desired device. EXIT to return to configuration menu. SMART MATRIX WINDINGFEEDER - 13 -...
-
Page 26: Smart Matrix Windingfeeder Code
SMART MATRIX WINDINGFEEDER Code SMART MATRIX WINDINGFEEDER Code → SETUP MATRIX CODE This function allows you to assign an identification code to the SMART MATRIX WINDINGFEEDER terminal, in case of application that uses multiple terminals. Enter the SETUP menu. Select MATRIX CODE. -
Page 27: I/O Configuration On Smart Matrix/Windingfeeder
(sec) = impulsive signal of duration specified according to the defined polarity To activate the saving function. SAVE to save the choice, BACK to return to the previous screen without saving, EXIT to return to menu. SMART MATRIX WINDINGFEEDER - 15 -... -
Page 28: Efficiency Calculation Mode
INCLUDED (power down times included in the calculation) or EXCLUDED. To activate the saving function. SAVE to save the choice, BACK to return to the previous screen without saving, EXIT to return to menu. SMART MATRIX WINDINGFEEDER - 16 -... -
Page 29: Keycode Setting
(MEASURE, ERROR COUNTERS, EFFICIENCY) available to the new user. (*) User name and password can be set character by character turning the selector and clicking to confirm (you may set numeric and alphabetic characters). SMART MATRIX WINDINGFEEDER - 17 -... - Page 30 (SETUP, STYLE LOAD, STYLE EDIT, etc.) When you try to access a password-protected function, the following prompt will appear: Choose the user name and set the password to access the selected function. SMART MATRIX WINDINGFEEDER - 18 -...
-
Page 31: Communication Test
RETRY). A maximum of 5 transmission retries are repeated for each device. Global efficiency index. Number of the selected device (1) Status of communication between SMART MATRIX and selected WINDINGFEEDER device (either COMM OK COMM ERROR). SMART MATRIX WINDINGFEEDER - 19 -... -
Page 32: Device Offset
(if desired) on which to carry out the offset operation. We remind that, prior to confirm the offset execution, it is necessary to remove the yarn from the loading cell. SMART MATRIX WINDINGFEEDER - 20 -... -
Page 33: Language Selection
Select the desider language (ITALIAN, ENGLISH, FRENCH, SPANISH, GERMAN, JAPANESE) SAVE to save the selection. LANGUAGE SET message indicated that the visualization language on the display of connected WINDINGFEEDER devices is going to change. SMART MATRIX WINDINGFEEDER - 21 -... - Page 34 Checking the SMART MATRIX WINDINGFEEDER I/O Signals Checking the SMART MATRIX WINDINGFEEDER I/O Signals SETUP → SERVICE → I/O CHECK This function allows you to view the status of the external interface signal supplied to SMART MATRIX WINDINGFEEDER terminal (PRX, ZPX, STC).
-
Page 35: Smart Matrix Lcd Display Adjustment
Adjust: • CONTRAST, • BRIGHTNESS, • DISPLAY AUTO OFF. To activate the saving function. SAVE to save the settings, BACK to return to the previous screen without saving, EXIT to return to the menu. SMART MATRIX WINDINGFEEDER - 23 -... -
Page 36: Information About Smart Matrix Windingfeeder
Information about SMART MATRIX WINDINGFEEDER SETUP → INFO This function allows you to detect the Hardware, Firmware, OS and Boot Program versions. These values shall be communicated to BTSR Service Department when requiring technical support to solve specific problems. Enter the SETUP menu. -
Page 37: Style Programming
PROFILE window. Graphic profile of the yarn tension depending on programmed values. For the explanation of the various parameters, please refer to Section 3 “Summary table of Style Programming Parameters” and “Profile Programming Examples SMART MATRIX WINDINGFEEDER - 25 -... - Page 38 Programming Parameters” Parameters Programming within the CONFIG window Setup in sequence the parameters of CONFIG window.. For the explanation of the various parameters, please refer to Section 3 “Summary table of Style Programming Parameters” SMART MATRIX WINDINGFEEDER - 26 -...
- Page 39 Set the style name, for instance: APPLICATION01, instead of the device name WINDINGFEEDER (*), operating as described of paragraph Navigation Throughout the Display Windows. Once you have set up the style name (*) Maximum style name lenght = 15 characters SMART MATRIX WINDINGFEEDER - 27 -...
- Page 40 Style Programming to save the style (APPLICATION01) List of styles contained in the database (including the APPLICATION01 style) To leave the function: Programming a New Style EXIT to return to the main menu. SMART MATRIX WINDINGFEEDER - 28 -...
- Page 41 This function allows you to remove a style from the database. Once you have activated the STYLE EDIT function from main menu, choose the style you want to remove (e.g.: APPLICATION01) Press CLR Confirm the operation. APPLICATION01 style will be removed from the database. SMART MATRIX WINDINGFEEDER - 29 -...
-
Page 42: Style Loading
APPLICATION01. Select LOAD. A temporary LOADING STYLE window will appear. At the end of the loading operation, the style list will automatically re-appear. To leave the function. EXIT to return to main menu. SMART MATRIX WINDINGFEEDER - 30 -... - Page 43 Select the LOAD menu item. Press MAP. STYLE column lists the articles (styles) loaded on the WINDINGFEEDER devices of the machine, while RANGE column lists the device intervals where the various styles are loaded. SMART MATRIX WINDINGFEEDER - 31 -...
-
Page 44: Graphics Display
(S) on the vertical scale. The continuous line indicates the Tension value. The dotted line indicates the Speed value. To move to the following screen, that allows you to reset the “METER COUNT” counters SMART MATRIX WINDINGFEEDER - 32 -... - Page 45 To move to the device selection screen To select the device range (in this example the METER COUNT parameter will be reset on devices from 002 to 004) To reset the METER COUNT parameter on the selected device range SMART MATRIX WINDINGFEEDER - 33 -...
-
Page 46: Alarm Counter Display
EXIT to return to Alarm Counters screen without clearing the counter. Press this button to switch from global alarm visualization to individual WINDINGFEEDER device alarm visualization. SMART MATRIX WINDINGFEEDER - 34 -... - Page 47 Alarm Counter Display To select the desired device (FEEDER#n) To scroll-down the alarm list ( ) To scroll-up the alarm list ( ) SMART MATRIX WINDINGFEEDER - 35 -...
- Page 48 Alarm Counter Display Page left intentionally blank SMART MATRIX WINDINGFEEDER - 36 -...
-
Page 49: System Information
System Information... -
Page 51: Smart Matrix Windingfeeder Error Messages
CONTROL STOP ->. The error and failure messages can be classified as follows: Errors detected by the SMART MATRIX WINDINGFEEDER power-on self-diagnostic Error on EEPROM of SMART MATRIX terminal Error on RAM of SMART MATRIX terminal Error on internal communication bus of SMART MATRIX terminal... - Page 52 SMART MATRIX WINDINGFEEDER Error Messages Excessive temperature on the motor of a Windingfeeder device. Internal error on a Windingfeeder device. Target reached by a Windingfeeder device. Supply voltage lower than 15 VDC. For detailed information about errors and possible solutions, please refer to the Windingfeeder manual.
-
Page 53: Summary Tables Of Style Programming Parameters
(**)The value set on “TARGET METER” can be modified by the user (device by device), in such a way as to compensate possible slipping between yarn and WINDINGFEEDER device wheel. During the style saving, the question: “EDIT TARGET CALIBRATION?” will appear; by answering “YES” you can introduce a correction factor (%) for each device. SMART MATRIX WINDINGFEEDER - 41 -... - Page 54 NO or NC Polarity of EXC input P4.7 DISPLAY NORMAL or FLIP NORMAL Image rotation of WINDINGFEEDER device Corresponding parameter of WINDINGFEEDER device. For more detail about the indicated operation/control parameters, please refer to WINDINGFEEDER manual. SMART MATRIX WINDINGFEEDER - 42 -...
-
Page 55: Tension Profiler
The Smart Matrix Windingfeeder System allows you to adjust in dynamic and predefined way the yarn tension during the textile machine operation. This “dynamic and pre-defined” adjustment is called “Tension Profiler” and allows you to obtain several processing combinations to meet the specific application needs. - Page 56 Target is reached (TARGET TENS). This condition can be useful to facilitate the “doffing” operation. The three tension values (START TENS, WORK TENS TARGET TENS) can be freely chosen depending on the application needs: SMART MATRIX WINDINGFEEDER - 44 -...
- Page 57 Profiles” Example 1 of parameter setup in the PROFILE window: START METER = 200 START TENS = 10 WORK TENS INC/DEC METER = 2000 INC/DEC TENS = -0.1 TARGET METER = 50000 TARGET TENS SMART MATRIX WINDINGFEEDER - 45 -...
- Page 58 Tension Profiler Exsample 2 of parameter setup in the PROFILE window: START METER START TENS WORK TENS INC/DEC METER 2000 INC/DEC TENS TARGET METER 50000 TARGET TENS SMART MATRIX WINDINGFEEDER - 46 -...
- Page 59 DISTRIBUTORE BTSR International S.p.A. Via S. Rita 21057 OLGIATE OLONA (VA) Tel. 0331-323202 Fax 0331-323282 Internet: www.btsr.com REV. 1.2 – 02/12...
Need help?
Do you have a question about the SMART MATRIX WINDINGFEEDER and is the answer not in the manual?
Questions and answers