Maretron MPOWER CLMD16 User Manual
16channel dc load controller module
Hide thumbs
Also See for MPOWER CLMD16:
- Quick start manual (8 pages) ,
- Configuration manual (58 pages) ,
- User manual (90 pages)
Table of Contents
Advertisement
Quick Links
Advertisement
Table of Contents

Related Manuals for Maretron MPOWER CLMD16


Summary of Contents for Maretron MPOWER CLMD16
- Page 1 ___________________________________________________________ CLMD16 16 Channel DC Load Controller Module User’s Manual Revision 1.6 Copyright ©2020 Carling Technologies, Inc. 60 Johnson Ave. Plainville, CT 06062 USA All Rights Reserved http://www.maretron.com...
-
Page 2: Table Of Contents
Figure 4 - Required Deutsch Wire Crimping Tools ...................... 10 Table 3 - Required Deutsch Plug Components ......................11 Connecting J1-J3 Using Maretron Accessory Cable Assemblies ........................12 Figure 5 - Accessory Cable Assemblies ........................12 Figure 6 - Recommended Cable Assembly Connection Example ................12 “J1”... - Page 3 ___________________________________________________________ SWITCHING APPLICATION ............................. 24 ..................................24 OUNTERS ..................................26 IMER ELAY ....................................26 LASH ................................... 27 ATCHES Set/Reset Latch ......................................28 Table 8 - Latch Function Truth Table .......................... 28 .................................... 28 OGGLE Toggle Latch ........................................29 Table 9 - Toggle Function Truth Table ........................29 ....................................
- Page 4 ___________________________________________________________ Temp 12A Groups 1 to 3 ..................................41 Temp 25A Group ...................................... 41 Temp MCU ....................................... 41 Supply Voltage ......................................41 Input Supply ......................................41 Over Voltage Fault ....................................41 Under Voltage Fault ....................................41 Execution Time Metrics ....................................41 Max Time .........................................
- Page 5 ___________________________________________________________ Pressure ........................................54 Tank Capacity ......................................54 Tank Number ......................................54 Tank Type ......................................... 54 Data Damping Period ....................................55 Realtime Resistance ....................................55 Realtime Current ...................................... 55 ..............................55 EVELS ALIBRATION Manual Table ........................................ 55 Figure 24 - Current Loop Manual Table Calibration Tank, Initial Window Dialog Box ..........56 Fluid Density ......................................
- Page 6 ................................74 NVIRONMENTAL ..............................74 NVIRONMENTAL ESTING TECHNICAL SUPPORT ............................75 Figure 35 - Product Manual QR Code ......................... 75 MARETRON (2 YEAR) LIMITED WARRANTY ......................75 : ............................76 ARRANTY ETURN ROCEDURE ® APPENDIX A – NMEA 2000 INTERFACING ......................77 ®...
-
Page 7: Introduction
The Maretron CLMD16 is designed to operate within the harsh demands of the marine environment. However, no piece of marine electronic equipment can function properly unless installed, configured, and maintained in the correct manner. -
Page 8: Clmd16 Features
___________________________________________________________ CLMD16 Features Features: • 16 Total Output Breakers o 12x12A, 4x25A Breaker Maximum Current Ratings (resistive, capacitive, and inductive load capable) o Short Circuit Protected o Up to 32VDC Switching Voltage o Voltage back feed protection (back-to-back Field Effect Transistor (FET)) for all power outputs o All Breaker Outputs Support Soft Start o Parallel Breaker Capability. -
Page 9: Theory Of Operation
The breakers can be controlled and monitored through use of the Breaker/Switch component in the Electrical Distribution category of the Maretron display products listed above. In addition, the current through each breaker may be monitored through the Breaker/Switch Current component in the Electrical Distribution category of Maretron display products. -
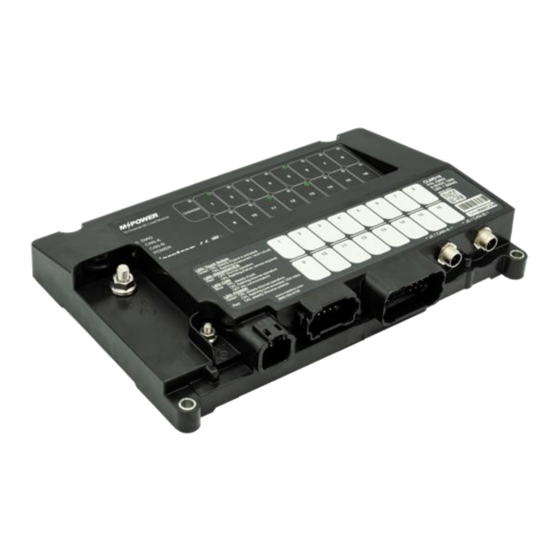
Page 10: Clmd 16 Hardware Description
___________________________________________________________ CLMD 16 Hardware Description Figure 1 - Hardware Description Front View Figure 2 - Hardware Description Bottom View... -
Page 11: Installation
Installing the Maretron CLMD16 involves the following steps. Unpacking the Box When unpacking the box containing the Maretron CLMD16, you should find the following items: 1 – CLMD16 – 16 Channel DC Load Controller Module 1 – CLMD16 Quick Start Guide 1 –... - Page 12 ___________________________________________________________ Figure 3 - Required Connections WARNING The CLMD16 must be wired in accordance with the regulations set forth by ABYC or other applicable agencies. If the unit is liable to get wet, ensure that cable connections incorporate a suitable drip loop where applicable.
-
Page 13: Main Dc (+) Connection
CLMD16 User’s Manual Main DC (+) Connection The unit’s main DC (+) connection is made using commonly available components not included with the CLMD16. Connect a source of DC (+) with a ring terminal to the 5/16”-18 stud on the front of the device and torque the connection within the specified range of 30 –... - Page 14 ___________________________________________________________ Table 1 - Main DC (+) Load Calculation Table Example In Column A, list the loads maximum operating In Column B, list the loads maximum operating current that must be available for continuous duty current for loads that are for intermittent use or use during normal operation considering possible would not be used in a continuous duty manor.
-
Page 15: Main Dc (-) Connection
CLMD16 User’s Manual Main DC (-) Connection The unit’s main DC (-) connection is made using commonly available components and are not included with the CLMD16. Connect the Main DC (-) connection with a ring terminal to the #10 stud on the front of the device and torque the connection within the specified value of 10 –... -
Page 16: Iring J1 - J3 Connectors
The J1-J3 receptacles on the CLMD16 Unit were designed to accept Deutsch brand DTP, DT, and DRC series plugs. Maretron supplies optional premade 2m harnesses for the J1 and J2 connections and a 2m wiring kit for the J3 connection. Alternatively, the installer may choose to wire the plugs directly. - Page 17 CLMD16 User’s Manual Table 3 - Required Deutsch Plug Components Part Number Picture Mating Receptacle Description Quanity Required DTP06-4S J1 (Output) 4 Pos. DTP Series Plug Housing WP-4S J1 (Output) 4 Pos. DTP Series Plug Wedgelock 0462-203-12141 J1 (Output) 12-14 Awg. Socket Contact Match Qty.
-
Page 18: Connecting J1-J3 Using Maretron Accessory Cable Assemblies
___________________________________________________________ Connecting J1-J3 Using Maretron Accessory Cable Assemblies If you choose to use the premade cable assemblies, you will need to splice the ends of the cable assemblies or connect them to a terminal block See Figure 6 for terminal block connection depiction. -
Page 19: "J1" (25 Amp Breaker) Position Description
CLMD16 User’s Manual “J1” (25 Amp Breaker) Position Description Table 4 - J1 Connector Pin Description Description Connector Pin No. (Location) 25 A (Breaker #13) 25 A (Breaker #14) 25 A (Breaker #15) 25 A (Breaker #16) “J2” (12 Amp Breaker) Position Description Table 5 - J2 Connector Pin Description Description Connector Pin No. -
Page 20: "J3" (General Purpose / Analog) Position Description
___________________________________________________________ “J3” (General Purpose / Analog) Position Description Table 6 - J3 Connector Pin Description Description Connector Pin No. (Location) Address Input #1 Analog / Digital Input #1 Analog / Digital Input #5 4 to 20mA sense current loop Positive Analog Input #9 (Resistive 0-1000 Ω) Reserved for future use –... -
Page 21: Nmea 2000® Connections
CLMD16 enclosure labeled “J4 / CAN-A” and “J5 / CAN-B”. See these connectors in Figure 4. These connectors are known as DeviceNet micro connectors. Connect the CLMD16 to a NMEA 2000 network using a Maretron NMEA 2000 cable (or compatible cable) by connecting the female ®... -
Page 22: Breaker (Output) Features
___________________________________________________________ Breaker (Output) Features Soft Start Soft Start is a function that ramps up the voltage, of an output channel when it is turned on to reduce the inrush current to the device being powered. (See: Figure 8) Figure 8 - Soft Start Voltage Ramp Soft Start ramps the voltage of the load output, over a 1 second period. -
Page 23: Paralleling Breakers
CLMD16 User’s Manual WARNING The breaker being used as a dimming module will provide an active high output at full battery voltage to the LED control module. Verify that the LED control module can accept this type of input prior to use. When a breaker is configured to provide a PWM output (dimming), the PWM frequency is 200 Hz (channels 3-10) or 20 kHz (channels 1, 2, 11, 12). -
Page 24: Half Bridge Operation
___________________________________________________________ Please note that the maximum current rating when multiple breakers are paralleled is typically, 180% of the single channel rating. (Example: 18A maximum for two 10A breakers in parallel). • When two breakers are configured in parallel, the lowest-numbered breaker controls the pair. - Page 25 CLMD16 User’s Manual...
-
Page 26: Load Shedding
___________________________________________________________ Figure 10 - Full Bridge Operation Concept Load Shedding Load shedding is a way to extend the time the system can keep working when the battery voltage is getting low. As the battery voltage drops, the CLMD16 will turn off low priority loads. This is based on 3 priority levels. -
Page 27: Overcurrent Protection
CLMD16 User’s Manual There are three load shedding levels: • Low • Medium • High (default) Each channel has a load shedding priority which is user configurable. The Medium and Low load shedding priorities have a user-configurable deactivation threshold and an activation threshold voltage level. -
Page 28: Binary Event Monitor
___________________________________________________________ Figure 11 - Current vs Time Graph The nominal current that can flow through an ECB is determined by the power it can dissipate continuously without exceeding its own thermal limits. When an overcurrent condition is detected, the CLMD16 will trip, turning off the current to the supplied load. The breaker can be reset by ®... - Page 29 CLMD16 User’s Manual The voltage levels at which these discrete states are calculated are individually programmable for each of the input channels. There are eleven binary event monitors in the CLMD16. Each of the eight analog/digital inputs, the two resistive inputs, and the current loop input has an associated binary event monitor. There are two programmable voltage levels: •...
-
Page 30: Switching Application
___________________________________________________________ Each channel of the Binary Event Monitor produces three signals that are available to the Switching Application: Binary Event x Low – the Binary Event Monitor for channel x is in the LOW state Binary Event x Float – the Binary Event Monitor for channel x is in the FLOAT state Binary Event x High –... - Page 31 CLMD16 User’s Manual Each counter has the following input signals: • Increment – causes the counter to increase in value* • Decrement – causes the counter to decrease in value* • Reset – causes the counter to be set to the Min Set Point value Each counter has the following output signal: •...
-
Page 32: Timer Delay
___________________________________________________________ Timer Delay The CLMD16 provides eight instances of a timer delay function. The Timer Delay function provides the Switching Application the ability to postpone the activation of load output channels upon receiving channel activation commands up to 65,535 seconds for each. This is not to be confused with the Soft Start function as the timer delay function does not contribute to the load PWM output. -
Page 33: Latches
CLMD16 User’s Manual The Flash function has the following input signals: • Input – the flashing function is enabled as long as this signal is asserted (ON) The Flash function has the following output signals: • Flash Output – while the input signal is asserted this signal will be enabled allowing for the configurable parameters to take control of the Flash Output function. -
Page 34: Set/Reset Latch
___________________________________________________________ Set/Reset Latch The truth table of a Set/Reset Latch is as shown in Table Table 8 - Latch Function Truth Table Set Input Reset Latch Output Input Previous State Undefined Toggle The switching application provides eight instances of a toggle latch. Each toggle latch maintains its logic state until the single input signal to the toggle latch transitions from a On to Off. -
Page 35: Toggle Latch
CLMD16 User’s Manual Toggle Latch Where “1” is On and “0” is Off, each state change of the Toggle Input from Off to On changes the state of the Toggle Output. (see: Table 9) Table 9 - Toggle Function Truth Table Toggle Input Previous Toggle Output Toggle Output 1→0... -
Page 36: Alarm Output
___________________________________________________________ Each Logic function consists of a three-input lookup table. There are eight rows in the table, one row for each possible combination of values of the three inputs. For each of the eight rows, you specify an output value for the logic function, either 0 or 1. For an example, where “1” is On and “0” is off, consider the logic function ((A and B) or not C). -
Page 37: Available Signals
NMEA 2000 ® network. There are several configurable items within the CLMD16, which are detailed in the remainder of this section. The CLMD16 is configured using Maretron N2KAnalyzer ® V3 software. The following subsections describe the configurable parameters in the CLMD16. -
Page 38: General Tab
Figure 13 - General Configuration Tab Dialog Box Label This text box allows you to assign a text label to the device. This label is visible in Maretron analysis and supported display products and allows you to easily identify the particular device. -
Page 39: Breaker #(N)
CLMD16 User’s Manual Breaker #(n) This section contains settings for the specified electronic circuit breaker. One of these sections is present for each of the breakers in the unit. Label This text box allows you to configure a text label for the breaker to identify it (for example, “RUNNING LIGHTS”... -
Page 40: Current Rating
___________________________________________________________ • Soft Start Full-Bridge – if both breakers in a full-bridge pair (i.e., 1 and 2, or 11 and 12) are configured to Soft Start Full-bridge, then the two breakers will work together as a full-bridge (H-bridge) with the soft start feature enabled. The full bridge may be controlled OFF and ON, and its direction may be controlled. -
Page 41: Current
CLMD16 User’s Manual Current This read-only field shows the real-time current passing through the breaker. Status This group of indicators show real-time status of the breaker. Tripped When lit, this read-only field shows that the breaker is in the TRIP state. Instant Trip When lit, this read-only field indicates that the breaker has tripped due to the instant trip feature. -
Page 42: Open Circuit
___________________________________________________________ Open Circuit When lit, this read-only field indicates an Open Circuit (no load) condition. The breaker is turned ON but there is little, or no current being drawn. There are several possible reasons: • External switch controlling load is in the OFF position •... -
Page 43: Control Tab
CLMD16 User’s Manual Control Tab The Control tab allows you to toggle the configured Network Input channels of the CLMD16. Each On / Off control number corresponds with Network Input numbers 1-16. When a Network Input is turned on in this dialog, the associated circuit that the Network Input is configured to control will be controlled. -
Page 44: Alarm Tab
___________________________________________________________ Alarm Tab The Alarm tab allows you to select an internal signal to be used to control the alarm outputs of the CLMD16. You may select from the list of signals in Table 11 - Available Signal Table. See Figure 15 for Alarm Tab detail. -
Page 45: Advanced Tab
CLMD16 User’s Manual Advanced Tab The Advanced tab is used to configure and observe parameters that do not normally require changing. See figures Figure 16 & Figure 17 for Advanced Tab detail. Figure 16 - Advanced Configuration Tab (Upper Portion) Dialog Box... -
Page 46: Device Instance
___________________________________________________________ Figure 17 - Advanced Configuration Tab (Lower Portion) Dialog Box Device Instance This parameter allows you to configure the NMEA 2000 ® device instance used by the device. This value is also used as the data instance in the 127501 Binary Status Report messages transmitted by the device and can be seen on the General Tab as well as the Inputs Tab labeled as “Instance”. -
Page 47: Model Version
CLMD16 User’s Manual Model Version This read-only field shows the internal version number of the CLMD16 application software. Temperatures Temp 12A Groups 1 to 3 These read-only fields (a and b) display the temperature measured by the two temperature sensors in the CLMD16 located near the 12 Amp channels 1,2, and 3. -
Page 48: Unit Status
___________________________________________________________ Unit Status Over Current Fault This read-only indicator shows steady red if the CLMD16 has been shut down because the total current through the CLMD16 is more than the 125 Amp specification. Runtime Metrics Run Time This read-only field displays the total amount of time the CLMD16 has been operational since it was last powered on. -
Page 49: Counter Tab
CLMD16 User’s Manual Counter Tab The CLMD16 has eight counter elements. See: Figure 18 for Counter Tab detail. Please refer to “Counters” on page 24 for details on the implementation of this function. Figure 18 - Counter Configuration Tab Dialog Box Increment Signal This parameter allows you to select a signal to cause the counter to increment in value. -
Page 50: Decrement Signal
___________________________________________________________ Decrement Signal This parameter allows you to select a signal to cause the counter to decrement in value. You may select from the list of signals in Table 11 - Available Signal Table. When One Button Smooth Scroll Counter Type is selected the Decrement Signal is ignored as a control input. Reset Signal This parameter allows you to select a signal to cause the counter to reset to a chosen value as selected in the Min Set Point field. -
Page 51: Min Set Point
CLMD16 User’s Manual Min Set Point This parameter allows you to configure the minimum value that the counter can reach. This is also the value to which the counter is set when the Reset input is asserted high Max Set Point This parameter allows you to configure the maximum value that the counter can reach. -
Page 52: Flash Tab
___________________________________________________________ Flash Tab The CLMD16 has eight flash elements. See: Figure 19 for Flash Tab detail. Please refer to “Flash” on page 26 for details on the implementation of this function. Figure 19 - Flash Configuration Tab Dialog Box On Period This parameter allows you to configure the time period during which the Flash output signal will be asserted high (ON) for each flash cycle. -
Page 53: Number Of Cycles
CLMD16 User’s Manual Number of Cycles This parameter allows you to configure the number of cycles that the Flash element will run once the input signal is turned on. If the Flash input is turned off before this number of cycles has been run, then the Flash output signal will stop changing. -
Page 54: Grouping Tab
___________________________________________________________ Grouping Tab Various combinations of the breakers in the CLMD16 can be paralleled together to enable the paralleled breakers to handle higher currents than a single breaker can handle. See Figure 20 for channel grouping tab detail. See Paralleling Breakers on page 17 for additional details. Figure 20 - Grouping Configuration Tab Dialog Box Groups 1 through 4 This parameter allows to configure which breakers operate in parallel. -
Page 55: Group 2
CLMD16 User’s Manual Group 2 You may choose from the following: • No Parallel Outputs – All four breakers operate independently. • 3 & 4 – Breakers 3 and 4 operate in parallel, while breakers 5 and 6 operate independently. Group 3 You may choose from the following: •... -
Page 56: Inputs Tab
___________________________________________________________ Inputs Tab This tab allows you to configure the operation of the analog/digital input signals. See: Figure 21 & Figure 22 for Inputs Tab details. Figure 21 - Inputs Configuration Tab (Active High/ Low/ Float Channels) Dialog Box... -
Page 57: Input # (N)
CLMD16 User’s Manual Figure 22 - Inputs Configuration Tab (Resistive Input and Current Loop Channels Dialog Box) Input # (n) Label This box allows you to configure a text label to identify the input signal, (for example, “HIGH WATER ALARM” or “BILGE BLOWERS”). It is suggested that a descriptive name is chosen so that you can easily identify it on display devices. -
Page 58: On Level(S)
___________________________________________________________ On Level(s) This field allows you to select the input signal level that causes the corresponding field in the 127501 Binary Status Report message to be set to ON. You may select from one of the following values: • LOW When the digital input is set to active low the corresponding field in the 127501 Binary Status Report message will be set to ON when the input signal level is less than the Low Threshold. -
Page 59: Low Threshold
CLMD16 User’s Manual Low Threshold This numeric field allows you to program a voltage, resistance, or current value such that when the detected value on the input signal transitions from below this value to above this value, the state of the signal shall change from LOW to FLOAT. -
Page 60: Enable
Label Type a description of the tank being monitored in the field marked Label. Maretron display products will display this label text when you are selecting data to display. If the channel is disabled, no further configuration is required. -
Page 61: Data Damping Period
CLMD16 User’s Manual Data Damping Period You can configure a damping parameter to smooth the tank level or pressure/vacuum readings or make them more responsive. The data damping is configurable between 0.2 – 25.0 seconds. The default data damping for a channel is 15.0 seconds. Realtime Resistance (Resistive Channels Only) This read-only field shows the resistance currently being measured on the applicable resistive input... -
Page 62: Fluid Density
___________________________________________________________ Figure 24 - Current Loop Manual Table Calibration Tank, Initial Window Dialog Box Fluid Density To convert the pressure measured the channel must know the density of the fluid being measured. This control allows you to program the channel with the proper fluid density. You may choose from Diesel Fuel 20, Diesel Fuel 60, Fresh Water, or you may enter a different numeric density value appropriate to the fluid whose depth is being measured. -
Page 63: Step Fill Table
CLMD16 User’s Manual Step Fill Table In the Step Fill Table method, you start with an empty tank, and then fill the tank with fluid, stopping at intermediate points to enter the amount of fluid put into the tank thus far, ending once the tank is full. - Page 64 ___________________________________________________________ Figure 26 - Current Loop Step Fill Tank Calibration Dialog Box 3) Enter “0” into the Current Level text box, and press “Step”. You have now entered the first point of the table. 4) Partially fill the tank. Enter the amount of fluid pumped into the tank into the “Current Level”...
-
Page 65: Latch Tab
CLMD16 User’s Manual Latch Tab The CLMD16 provides eight latches for use in the development of switching applications. Each latch element consists of a single SET-RESET latch. Please refer to “Latches” on page 27 for details on the implementation of this function. See Figure 28 for Latch Tab detail. Figure 28 - Latch Configuration Tab Dialog Box Set Signal This parameter allows you to select the internal signal to be connected to the SET input of the latch... -
Page 66: Load Shedding Tab
___________________________________________________________ Load Shedding Tab The CLMD16 implements load shedding, which allows specified loads to be turned off when the DC supply voltage drops below programmed levels. Please refer to “Load Shedding” on page 20 for details on the implementation of load shedding. See Figure 29 for Load Shedding tab detail. Figure 29 - Load Shedding Configuration Tab Dialog Box Channel (x) Priority This programmable parameter allows you to specify the priority level of the breaker channel. -
Page 67: Medium Priority Deactivate Loads Below
CLMD16 User’s Manual Medium Priority Deactivate Loads Below This programmable parameter allows you to specify a voltage value such that when the DC supply voltage drops below this level, channels with MEDIUM priority will be disabled. Medium Priority Activate Loads Above This programmable parameter allows you to specify a voltage value such that when the DC supply voltage rises above this level, channels with MEDIUM priority will be enabled. -
Page 68: Logic Tab
___________________________________________________________ Logic Tab The CLMD16 provides eight logic elements for use in development of applications. Each logic element consists of a three-input lookup table, enabling any three-input Boolean logic function to be realized. See Figure 30 for Logic Tab detail. Please refer to “Logic” on page 29 for details on the implementation of this function. -
Page 69: Input A
CLMD16 User’s Manual Input A This signal is connected to the first input of the lookup table for this logic element. You may select from the list of signals in Table 11 - Available Signal Table. Input B This signal is connected to the second input of the lookup table for this logic element. You may select from the list of signals in Table 11 - Available Signal Table. -
Page 70: Timer Tab
___________________________________________________________ Timer Tab The CLMD16 provides eight timer elements for use in constructing switching applications. Please refer to “Timer Delay” on page 26 for details on the implementation of this function. See Figure 31 for Timer Tab detail. Figure 31 - Timer Configuration Tab Dialog Box Delay Signal This parameter allows you to select the internal signal to connect to the input of the timer element. -
Page 71: Delay Type
CLMD16 User’s Manual Delay Type This parameter allows you to select the type of delay implemented by this timer function. You may select from one of the following choices: • No Delay – the input signal is passed through to the output signal with no delay introduced. -
Page 72: Toggle Tab
___________________________________________________________ Toggle Tab The CLMD16 provides eight toggle flip-flop elements for use in developing switching applications. Please refer to Toggle on page 28 for details on the implementation of this function. See Figure 32 for Toggle Tab detail. Figure 32 - Toggle Configuration Tab Dialog Box Toggle Signal This parameter allows you to select the internal signal to connect to the input of the timer element. -
Page 73: Discrete I/O Tab
CLMD16 User’s Manual Discrete I/O Tab When a device transmitting the 127501 Binary Status Report message is part of the installation, it can be configured to create an input signal for the CLMD16. Up to sixteen Discrete I/O signals can be programmed. -
Page 74: Indicator
___________________________________________________________ Indicator This parameter allows you to configure the indicator number within the 127501 Binary Status Report status message whose instance field matches the “Data Instance” parameter for this channel that will be used to create this discrete I/O signal. Installation Description Tab This tab allows you to set values for the installation description properties of the device. -
Page 75: Operating The Clmd16
CLMD16 User’s Manual This device, along with all other certified NMEA devices, has two user-programmable installation description fields. You may program these fields with information specific to the device, such as date installed, the initials/name of the installer, the physical location of the device, etc. This configuration option will allow you to program the values of these fields. -
Page 76: Breaker Status Led Indicators
Failure to do so can result in serious bodily harm. Maintenance Regular maintenance is important to ensure continued proper operation of the Maretron CLMD16. Perform the following tasks periodically: • Clean the unit with a soft cloth. Do not use chemical cleaners as they may remove paint or markings or may corrode the CLMD16 enclosure or seals. -
Page 77: Troubleshooting
• Check the security of all input and output connections to the unit and tighten if necessary. Troubleshooting If you notice unexpected operation of the Maretron CLMD16, follow the troubleshooting procedures in this section to remedy simple problems. If these steps do not solve your problem, please contact Maretron Technical Support. -
Page 78: Technical Specifications
• If you are controlling the load via N2KView software, breaker/switch ensure that you have a switch control license for the software. • Please refer to the CLMD16 product page on the Maretron Any other problems website for additional troubleshooting suggestions. Technical Specifications As Carling is constantly improving its products, all specifications are subject to change without notice. -
Page 79: Electrical
CLMD16 User’s Manual Electrical Parameter Value Comment Voltage Input Range 8 to 32 VDC DC Voltage ® Power Consumption 50 mA NMEA 2000 Interface ® Load Equivalence Number (LEN) NMEA 2000 Spec. (1LEN = 50 mA) Reverse Battery Protection 5 minutes 12V: 87V, 200ms pulse, 1Ω... -
Page 80: Environmental
___________________________________________________________ Environmental Parameter Value IEC 60945 Classification Exposed Degree of Protection IP67 Operating Temperature -30°C to 70°C Storage Temperature -40°C to 70°C Electric Field 30V/m Ignition Protection Ignition Protected Environmental Testing Parameter Standard Conditions Duration 96hrs, T max = 70°C High Temperature Soak EN 60068-2-2:2007 96 hrs, T min = -30°C... -
Page 81: Technical Support
CLMD16 User’s Manual Technical Support If you require technical support for Maretron products, you can reach us in any of the following ways: Telephone: 1-866-550-9100 Fax: 1-602-861-1777 E-mail:marine.support@carlingtech.com World Wide Web: http://www.maretron.com Mail: Carling Technologies, Inc. Attn: Maretron Technical Support 120 Intracoastal Pointe Dr. -
Page 82: Warranty Return Procedure
Carling reserves the right to modify or replace, at its sole discretion, without prior notification, the warranty listed above. To obtain a copy of the then current warranty policy for Maretron ® products, please go to the following web page:... -
Page 83: Appendix A - Nmea 2000 Interfacing
CLMD16 User’s Manual Appendix A – NMEA 2000 ® Interfacing This appendix is intended to relate specific characteristics of the CLMD16 to how they are communicated via NMEA 2000 ® messages in order to help ascertain whether the messaging implemented by the CLMD16 is compatible with other NMEA 2000 ® products. It is not a complete description of the messages. -
Page 84: Pgn 130314 - Actual Pressure
___________________________________________________________ The state will be one of the following values: “OFF” – The digital input voltage level is outside the range(s) programmed for “ON” levels “ON” – The digital input voltage level is inside the range(s) programmed for “ON” levels Please refer to Binary Event Monitor on page 22 for details 19 to 25: Indicates the state sensed by the digital input on input channel 2 to 8 respectively. -
Page 85: Pgn 127751 - Dc Voltage/Current
CLMD16 User’s Manual 4: Tank Capacity – This field is used to indicate the tank capacity. This field is programmable through the NMEA command PGN. The CLMD16 ships from the factory with a default value of 0xFFFFFFFF indicating “Data Not Available”. 5: Reserved –...
Need help?
Do you have a question about the MPOWER CLMD16 and is the answer not in the manual?
Questions and answers