Table of Contents
Advertisement
Quick Links
Advertisement
Table of Contents

Related Manuals for SkyMed SURETEST

Summary of Contents for SkyMed SURETEST
- Page 1 Blood Glucose Monitoring System Owner’s Manual Ver.05 03/2020 311-4227300-XXX...
- Page 2 Dear SureTest System Owner: This manual contains important information you must know about the system. Please read it thoroughly and carefully. The greatest feature of this system is its Bilingual Speaking Function, which is an acoustic aid for users especially with visual disability.
-
Page 3: Important Safety Instructions
IMPORTANT SAFETY INSTRUCTIONS PLEASE READ THIS BEFORE USING The following basic safety precautions should always be taken. 1. Close supervision is necessary when the device is used by, on, or near chil- dren, or handicapped persons. 2. Use the device only for the intended use described in this manual. 3. -
Page 4: Table Of Contents
Appearance of the Test Strip PREPARATION BEFORE USE Battery Replacement Setting the Meter and Deleting the Memory BEFORE TESTING Checking with SureTest Control Solutions Important Control Solution Information Performing a Control Solution Test TESTING YOUR BLOOD Testing Procedure Expected Test Results... -
Page 5: Important Information
IMPORTANT INFORMATION • Severe dehydration and extreme fluid loss may cause inaccurate results. If you believe you are suffering from severe dehydration, consult a healthcare professional immediately. • Test results below 3.3 mmol/L* mean low blood glucose (hypoglycemia). Test results greater than 13.3 mmol/L* mean high blood glucose (hyperglycemia). -
Page 6: About Alternative Site Testing (Ast)
ABOUT ALTERNATIVE SITE TESTING (AST) Important: There are limitations for doing AST. Please consult your healthcare professional before you do AST. What is AST? Alternative site testing (AST) means that people use parts of the body other than fingertips to check their blood glucose levels. This system allows you to test on the palm, the forearm, and the upper arm with the equivalent results to fingertip testing. -
Page 7: Introduction Of The System
Do NOT use AST if: • You think your blood glucose is low. • You are unable to notice symptoms of hypoglycemia. • Your AST results do not match the way you feel. • You are testing for hyperglycemia. • Your routine glucose results are often fluctuating. •... -
Page 8: Contents Of The System
These products have been designed, tested, and proven to work together as a system to produce accurate blood glucose test results. Use only the SureTest test strips and SureTest control solution with your SureTest meter. -
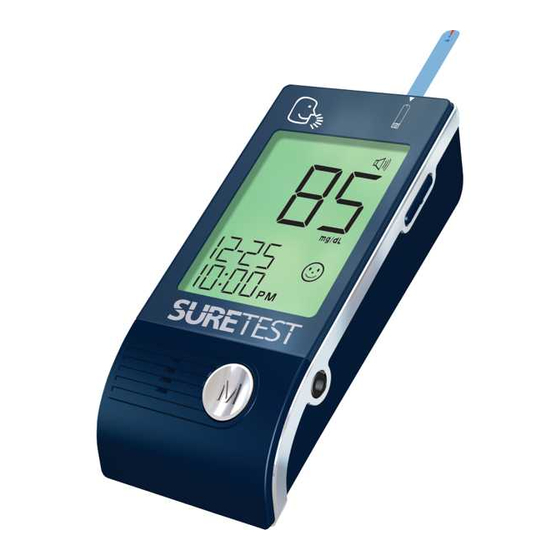
Page 9: Appearance And Key Function Of The Meter
Appearance and Key Function of the Meter TEST SLOT The test slot is where you insert the test strip for testing. The meter will turn on automatically when you insert a test strip. DISPLAY Your test results are displayed here. The large, easy-to-read display guides MAIN BUTTON you through the test using... -
Page 10: Meter Display Segments
Meter Display Segments Test Strip Symbol Appears when the meter is on. Test Result Area Blood Drop Symbol Test results are displayed here. This symbol tells you when to apply the sample. Voice Symbol Indicates speaking function is Temperature Symbol on/off. -
Page 11: Speaking Function
Speaking Function When the volume symbol is on the meter, it means that the meter provides speaking function. It “speaks” step by step and leads you through a blood glucose test. The following table tells you when and what the meter “speaks”. WHEN WHAT does the meter say? -
Page 12: Appearance Of The Test Strip
Appearance of the Test Strip Your system measures the amount of sugar (glucose) in whole blood. Blood is applied to the self wicking port of the test strip and is automatically drawn into the reaction cell where the reaction takes place. The test strip consists of the following parts: Contact Bars Insert this end of the test strip into the meter. -
Page 13: Preparation Before Use
PREPARATION BEFORE USE Battery Replacement Your meter comes with two 1.5V AAA size alkaline batteries. The meter will alert you when the power is getting low by displaying two different messages: 1. The symbol appears together with other display messages: the meter is functional and the result remains accurate, but it is time to change the batteries. -
Page 14: Setting The Meter And Deleting The Memory
To replace the batteries, make sure that the meter is turned off. 1. Press the buckle on battery cover and lift up to remove cover. 2. Remove the old batteries and replace with two new 1.5V AAA size alkaline batteries. Please ensure that batteries are correctly oriented, and firmly seated. 3. - Page 15 STEP 1 Set the Year. The year will appear first, with the year segment flashing. Press and release the button to advance one year. To move faster, keep pressing the button until the desired number appears. With the correct year on the display, press the Set button and then the month segment flashes.
- Page 16 STEP 5 Set the Minutes. Press and release the button to ad- vance one minute. To move faster, hold button down. With the correct minute on the display, press the Set button and then the current unit of temperature starts flashing. STEP 6 Delete the Memory When “dEL”...
- Page 17 STEP 7 Select Speaking Function The meter displays “VOL”, “ ” and flashing number. Press the button to select speaking volume from 0 to 7. Then press the Set button to proceed to the next step. Number 0 indicates that the speaking function is turned off, where “...
-
Page 18: Before Testing
Do not refrigerate. PLEASE NOTE The control solution range printed on the test strip vial is for SureTest control solution only. It is used to test meter and test strip performance. It is not the recommended range for your blood glucose level. -
Page 19: Performing A Control Solution Test
Performing a Control Solution Test STEP 1 Insert the Test Strip Insert a test strip with contact bars end first and facing up, into the test slot. The meter turns on automatically and displays the followings in sequence: “CH” and “ ”... - Page 20 STEP 4 Apply Control Solution. Hold the meter to move the self wicking port of the test strip to touch the drop. Once the confirmation window fills completely, the meter will begin counting down. To avoid contaminating the control solution, do not directly apply control solution onto a strip.
-
Page 21: Testing Your Blood
TESTING YOUR BLOOD Be sure to read this section and the test strip package insert found in the test strip box carefully before testing. Make sure you have all items needed to test: 1. Blood Glucose Meter 2. Test Strip 3. -
Page 22: Testing Procedure
Testing Procedure WASH AND DRY YOUR HANDS FIRST BEFORE STARTING. The SureTest lancing device offers you 6 depths of skin penetration. Shallow Deep Soft or thin skin Average skin Thick or calloused skin The longer the length of the indicator line, the greater the depth of penetration. - Page 23 Select the depth of penetration by turning the adjustable tip in either direction so that the arrow on the cap points to the desired depth. Pull the cocking control back until it clicks. You will see a color change inside the re- lease button when it is ready.
- Page 24 • For collecting blood samples from sites other than the fingertip, use the clear cap. Lancing the finger Press the SureTest lancing device’s tip firmly against the lower side of your fingertip. Press the release button to prick your finger. A click indicates that the puncture is complete.
- Page 25 STEP 5 Obtain an Accurate Result in 6 Seconds The result of your blood glucose test is shown after the meter counts to 0. This reading is automatically stored in the meter. PLEASE NOTE • Do not push your finger (with blood on it) against the test strip or try to apply a smeared sample on the test strip.
-
Page 26: Expected Test Results
60%* 3 . The results you get with the SureTest system can help you and your healthcare professional monitor and adjust your treatment plan to gain better control of your diabetes. - Page 27 While at the lab: Make sure that the samples for both tests (the meter test and the lab test are taken and tested within 15 minutes of each other). • Wash your hands before obtaining a blood sample. • Never use your meter with blood that has been collected in a gray-top test tube.
-
Page 28: Using The Meter Memory
USING THE METER MEMORY View Results on the Meter Your meter stores the 450 most recent blood glucose test results with date and time in its memory. It also provides you with 7, 14, 21, 28, 60 and 90-day averages of your blood glucose test results. - Page 29 STEP 2 Recall Test Results After the 90 day average, the most recent test result with date and time will be shown. Press the button once and the next most recent test result will appear. Each time you press and release the button, the meter will recall up to your last 450 test results in order.
-
Page 30: Viewing Results On A Personal Computer
call at 1-888-315-4133 for help. -
Page 31: Caring For Your Meter
CARING FOR YOUR METER To avoid the meter and test strips attracting dirt, dust or other contaminants, please wash hands thoroughly with soap and water before and after use. Cleaning Why the cleaning and disinfection should be performed Cleaning and disinfection are different. Cleaning is the process of removing dirt (e.g. - Page 32 3. Allow the meter surface to dry completely. 4. Discard the used wipes and never reuse them. Improper system cleaning and disinfection may result in meter malfunction. If you have a question, please contact Customer Care at 1-888-315-4133 for assistance. This device has been validated to withstand 260 cycles of cleaning and disinfec- tion, using the recommended disinfecting wipe, to simulate one cleaning and disinfection cycle per week over 5 years of use.
-
Page 33: Storage
• If you do get moisture in the test strip slot, wipe it away with a corner of tissue. • Always dry the meter thoroughly before using it • Do not spray the meter directly with cleaning solutions especially those con- taining water (i.e. -
Page 34: Problem-Solving Guide
PROBLEM-SOLVING GUIDE Following is a summary of some display messages and symbols. These messages help to identify certain problems but do not appear in all cases when a problem has occurred. Improper use may cause an inaccurate result without producing an error message or a symbol. -
Page 35: Error Message
Error Message MESSAGE WHAT IT MEANS ACTION Appears when the Replace the batteries im- batteries can not provide mediately. enough power for a test. Appears when inserting a Test with a new test strip. used test strip. Appears when ambient System operation range is temperature is below 10~40°C. - Page 36 2. If the test does not start after applying the sample: PROBABLE CAUSE WHAT TO DO Insufficient blood sample. Repeat the test with a new test strip and a larger sample. Defective test strip. Repeat the test with a new test strip. Sample applied after automatic shut- Repeat the test with a new test strip;...
-
Page 37: Specifications
SPECIFICATIONS Model No.: TD-4227 Dimension &Weight: 96mm(L) x 20mm(W) x 46mm(H), 69.87 g Expected service life: 5 years Power Source: two 1.5V AAA alkaline batteries Display: LCD Memory: 450 measurement results with date and time averaging Auto electrode inserting detection Auto sample loading detection Auto reaction time count-down Sleeping Mode: Power consumption less than 80uA... -
Page 38: Warranty/Customer Care
SkyMed will repair or replace any Product found to be defective and return it to you. (Any replacement product may be new, refurbished or a different model.) This warranty will not apply if the defect or malfunction results from: subjecting the Product to any but the speci- fied voltage;... - Page 39 Symbol Referent In vitro diagnostic medical device Do not reuse Consult instructions for use Humidity Limitations Temperature limitation Use by Manufacturer Batch code Serial number Caution, consult accompanying documents...
Need help?
Do you have a question about the SURETEST and is the answer not in the manual?
Questions and answers