
Related Manuals for Micronics JX30WB


Summary of Contents for Micronics JX30WB
- Page 1 JX30WB VL/ISA SYSTEM BOARD MANUAL Specification Subject to Change Without Notice Copyright 1994, Micronics Computers, Inc. All Rights Reserved Printed in USA...
- Page 3 MICRONICS JX30WB VL/ISA SYSTEM BOARD MANUAL Document Number: 06-00192-01, Rev 1B August 1994 232 E. Warren Ave., Fremont, CA 94539-7085...
-
Page 4: Copyright Notices
Micronics assumes no responsibility for any inaccuracies that may be contained in this document. Micronics makes no commitments to update or to keep the information in this manual at a current level when changes are made to the product. -
Page 5: Table Of Contents
Chapter 1: Introduction ..............1-1 Features ..................1-2 Software Compatibility .............. 1-3 Chapter 2: Setting Up the JX30WB ..........2-1 Precautions ................. 2-1 Static Electricity ................. 2-1 Office Environment ..............2-1 JX30WB Components ........ - Page 6 1MB of Level 2 Cache ............3-10 Write-Through ..............3-10 Write-Back ............... 3-10 Chapter 4: Installing and Configuring the JX30WB ....4-1 Installation ................. 4-1 Tools Required ................4-1 Equipment Required ..............4-2 Configuration ........
- Page 7 Glossary ..................G-1 Limited Warranty ................. W-1 List of Figures Figure 2-1. JX30WB Rev. 1B System Board ........ 2-2 Figure 3-1. Inserting a VESA Local Bus Card ....... 3-2 Figure 3-2. Installing the SIMM ............ 3-3 Figure 3-3.
- Page 8 Table 2-12. Peripheral and Case Connections ......2-10 Table 3-1. DRAM Memory Configuration ........3-4 Table A-1. POST Messages ............A-1 Table B-1. Beep Codes ..............B-2 Table C-1. Hard Disk Types ............C-1 Micronics Computers, Inc.
-
Page 9: Chapter 1: Introduction
In addition, the JX30WB utilizes level 1 write-back cache now available on the latest 486 processors. The JX30WB is also a "Green board," which means it adheres to the Environmental Protection Agency’s strict Energy Star efficiency guidelines. The system board can reduce power to consume less energy, thus making it a more efficient system board. -
Page 10: Features
• EPA Energy Star compliant when used with other energy efficient components. User-defined time intervals. • Micronics’ JX30WB chip set, with Mode 3 VL IDE controller. • Supports up to 128MB of on-board Memory. • 4-layer, Baby AT form-factor (13" X 8.5"). -
Page 11: Software Compatibility
JX30WB System Board Introduction Software Compatibility The JX30WB system board has been tested thoroughly under a variety of software packages. A sampling of programs include products by Microsoft, Novell, IBM, and Santa Cruz Operation. Micronics Computers, Inc. - Page 13 Introduction ................... 1-1 Features ..................1-2 Software Compatibility .............. 1-3 Micronics Computers, Inc.
-
Page 14: Chapter 2: Setting Up The Jx30Wb
Static Electricity The JX30WB is shipped in an anti-static bag; however, it is still important that you and your work area are static free. Ground yourself first and then ground the board. -
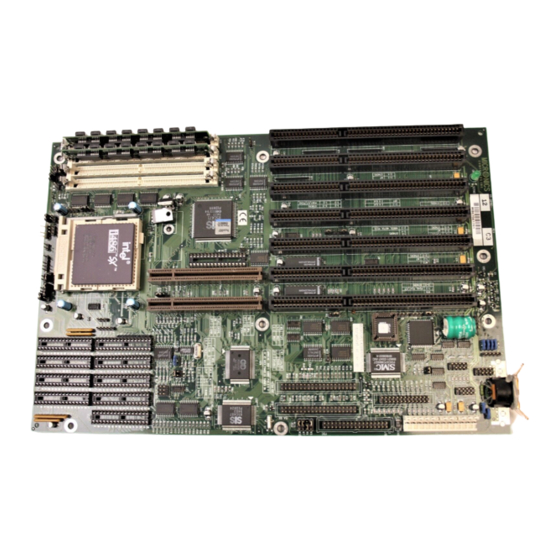
Page 15: Jx30Wb Components
Danger of explosion if battery is incorrectly replaced. The battery should only be replaced by an authorized technician, using the same or equivalent recommended by the manufacturer. Discard used batteries according to the manufacturer’s instructions. Figure 2-1. JX30WB Rev. 1B System Board Micronics Computers, Inc. -
Page 16: Jumper Settings
Refer to your computer dealer for the Flash Utility diskette and the special recovery diskette, or call Micronics’ BBS number at (510) 651-6837 to download the utility. Table 2-2 lists jumper settings for the type of video monitor display used with the system board. - Page 17 Setting Up the JX30WB JX30WB System Board Micronics Computers, Inc.
-
Page 18: Table 2-3. Printer Port Configuration Selection
JX30WB System Board Setting Up the JX30WB Jumper Settings (Cont’d) Table 2-3 lists jumper settings for the printer port configuration. Table 2-3. Printer Port Configuration Selection Jumper Function Setting ECP uses DMA1 ECP uses DMA3 ECP Disabled (Default) Open ECP uses DMA1... -
Page 19: Table 2-5. Smi Configuration Selection
Setting Up the JX30WB JX30WB System Board Jumper Settings (Cont’d) Table 2-5 lists jumper settings for the SMI configuration. Table 2-5. SMI Configuration Selection Jumper Function Setting Break Switch Function Normal (Default ) Table 2-6 lists jumper settings for the Local Bus IDE. -
Page 20: Table 2-8. Cache Size Selection
JX30WB System Board Setting Up the JX30WB Jumper Settings (Cont’d) Table 2-8 lists jumper settings for level 2 cache configuration selections. Table 2-8. Cache Size Selection Cache 128K 1-2 & 3-4 Open 256K 2-3 & 4-5 Open 512K 1-2 & 3-4 2-3 &... -
Page 21: Table 2-9. Cpu Type Selection (Jumpers W11-W21)
Setting Up the JX30WB JX30WB System Board Jumper Settings (Cont’d) Table 2-9 lists jumper W11 through W21 settings for the type of 486 CPU used on the system board. Table 2-9. CPU Type Selection (Jumpers W11-W21) P24T Open Open P24CT... -
Page 22: Table 2-10. Cpu Type Selection (Jumpers W22-W28)
JX30WB System Board Setting Up the JX30WB Jumper Settings (Cont’d) Table 2-10 lists jumper W22 through W28 settings for the type of 486 CPU used on the system board. Table 2-10. CPU Type Selection (Jumpers W22-W28) P24T (5V) Open P24CT (3.3V) -
Page 23: Table 2-11. Reserved Jumpers
Setting Up the JX30WB JX30WB System Board Jumper Settings (Cont’d) Table 2-11 lists reserved jumpers with factory determined settings. Do not reconfigure these jumpers. Table 2-11. Reserved Jumpers Jumper Function Setting Reserved Reserved Open 2-10 Micronics Computers, Inc. -
Page 24: Table 2-12. Peripheral And Case Connections
JX30WB System Board Setting Up the JX30WB Jumper Settings (Cont'd.) Table 2-12 lists jumper settings for peripherals and case connections. Table 2-12. Peripheral and Case Connections Jumper Function Setting J1 & J2 Power Supply Connector Keyboard Connector External Keyboard External Battery Connector... - Page 25 Office Environment ..............2-1 JX30WB Components ............... 2-2 Jumper Settings ................. 2-3 Figure 2-1. JX30WB Rev. 1B System Board ........ 2-2 Table 2-1. BIOS Operation Selection ..........2-3 Table 2-2. Video Monitor Display Selection ........ . 2-3 Table 2-3.
-
Page 26: Chapter 3: Installing Add-On Peripherals And System Memory
Installing Add-On Peripherals and System Memory Options are available to improve performance on the JX30WB. These options are Local Bus peripherals, SIMMs, an enhanced processor chip, and level 2 cache memory. Before adding or removing any peripherals, make sure you have a clear work space and that you adhere to all anti-static precautions. -
Page 27: Cache Memory
Make sure the VESA Local Bus card is configured to accommodate the computer. Cache Memory The JX30WB supports 8K or 16K of level 1 write- through/write-back cache depending on the specific 486 processor installed. Options are available to support 128K, 256K, 512K, or 1MB of level 2 write-through/write-back cache. -
Page 28: System Memory
Installing Add-On Peripherals and System Memory System Memory The JX30WB has four banks of DRAM, which provide a maximum of 128MB using 1Mx36, 2Mx36, 4Mx36, or 8Mx36 SIMMs. The system board also supports x32-bit non-parity SIMMs without need for additional jumper or BIOS change. -
Page 29: Removing The Simms
Installing Add-On Peripherals JX30WB System Board and System Memory Removing the SIMMs Perform the following steps to remove the SIMMs: 1. With both thumbs (or fingers), press the release tabs away from the socket. The SIMM should now be free from the release tabs. -
Page 30: Simm-Types Supported
SIMM socket. Installing an Enhanced CPU The JX30WB is designed to support Intel OverDrive processors, including 486 DX2, DX4, and Pentium OverDrive versions. A processor upgrade can significantly improve system performance. -
Page 31: Installing Cache Memory
Installing Cache Memory The JX30WB supports 8K or 16K bytes of level 1 write- through/write-back cache depending on the 486 processor installed. Level 2 write-through/write-back cache is also available to provide 128K, 256K, 512K, or 1MB options. -
Page 32: 128K Of Level 2 Cache
JX30WB System Board Installing Add-On Peripherals and System Memory Installing Cache Memory (cont’d) 128K of Level 2 Cache Write-Through For 128K bytes of level 2 cache, install four 32Kx8-20ns SRAMs into sockets U57 through U60. The sockets have four additional pins, or an additional row of pins, to support 128Kx8 SRAMs for 512K and 1MB configurations. -
Page 33: 256K Of Level 2 Cache
Installing Add-On Peripherals JX30WB System Board and System Memory Figure 3-3. Installing 128K of Level 2 Cache NOTE: Make sure the notches on SRAMs match the notches on the sockets. Installing Cache Memory (Cont’d) 256K of Level 2 Cache Write-Through... -
Page 34: 512K Of Level 2 Cache
JX30WB System Board Installing Add-On Peripherals and System Memory Figure 3-4. Installing 256K of Level 2 Cache NOTE: Make sure the notches on SRAMs match the notches on the sockets. Installing Cache Memory (Cont’d) 512K of Level 2 Cache Write-Through For 512K bytes of level 2 cache, install four 128Kx8-20ns SRAMs into sockets U53 through U56. -
Page 35: 1Mb Of Level 2 Cache
Installing Add-On Peripherals JX30WB System Board and System Memory Figure 3-5. Installing 512K of Level 2 Cache NOTE: Make sure the notches on SRAMs match the notches on the sockets. Installing Cache Memory (Cont’d) 1MB of Level 2 Cache Write-Through... -
Page 36: Figure 3-6. Installing 1Mb Of Level 2 Cache
JX30WB System Board Installing Add-On Peripherals and System Memory Figure 3-6. Installing 1MB of Level 2 Cache NOTE: Make sure the notches on SRAMs match the notches on the sockets. Micronics Computers, Inc. 3-11... - Page 37 Figure 3-4. Installing 256K of Level 2 Cache ....... 3-8 Figure 3-5. Installing 512K of Level 2 Cache ....... 3-9 Figure 3-6. Installing 1MB of Level 2 Cache ......3-10 Table 3-1. DRAM Memory Configuration ........3-4 Micronics Computers, Inc. 3-12...
-
Page 38: Installation
Consult the computer user manual when installing the JX30WB, or contact your dealer’s Technical Support department. Before installing the JX30WB, make sure you have a clear work space available and adhere to all anti-static precautions. Tools Required... -
Page 39: Equipment Required
Installing and Configuring the JX30WB JX30WB System Board Equipment Required Micronics recommends using the following equipment with the JX30WB: • Chassis with standard hardware • Standard power supply capable of providing continuous power within a 5 volt range, plus or minus 5% (e.g., 4.75 to 5.25). -
Page 40: Initial Boot Up
JX30WB System Board Installing and Configuring the JX30WB Initial Boot Up Boot-up the JX30WB. If after power-up the system doesn’t properly boot, check all connections and peripherals. You may also get beep codes or other messages. If this occurs, consult Appendices A and/or B for a guide to possible problems. -
Page 41: Running The Setup Procedure
(i.e., A:\ or C:\), press the <CTRL>, <ALT>, and <ESC> keys simultaneously to begin the Setup procedure. The JX30WB system board has two CMOS configuration screens: the Main Screen (Figure 4-2) and the Extended Screen (Figure 4-3). To toggle between the screens, press the PgUp/PgDn keys. -
Page 42: Energy Saving Timer
JX30WB System Board Installing and Configuring the JX30WB Running the Setup Procedure (Cont'd.) Phoenix SETUP Utility (Version 1.00) (c) Phoenix Technologies Ltd. 1985, 1993 All Rights Reserved Page 2 of 2 System BIOS: Shadowed & Cached Video BIOS: Shadowed & Cached... -
Page 43: Setting The Cmos Main Screen
Installing and Configuring the JX30WB JX30WB System Board Setting the CMOS Main Screen System Time and Date To set the time, use the minus < -> key to decrease the number and the plus < +> key to increase the number. To move the prompt forward, use the right arrow <... -
Page 44: Video Card
CPU selection with the corresponding CPU. This selection is for user-upgradeable CPUs. Cache State The JX30WB has the option of activating or deactivating the internal 8K- or 16K-byte cache of the 486 microprocessor, and the external cache on the system board. -
Page 45: External Cache Mode
Installing and Configuring the JX30WB JX30WB System Board Setting the CMOS Main Screen (Cont'd.) External Cache Mode This option selects the type of level 2 cache installed in the system. The choices are WRITE-BACK or WRITE- THROUGH. Setting the CMOS Extended Screen System BIOS The system BIOS allows you to “shadow”... -
Page 46: On-Board Floppy
JX30WB System Board Installing and Configuring the JX30WB Setting the CMOS Extended Screen (Cont'd.) On-Board Floppy This selection allows you to disable or enable the on-board floppy. Use the < +/-> keys to toggle between the options. Primary IDE This selection allows you to disable or enable the on-board primary IDE controller. -
Page 47: Secondary Ide
Installing and Configuring the JX30WB JX30WB System Board Setting the CMOS Extended Screen (Cont'd.) Secondary IDE This selection allows you to enable or disable the on-board secondary IDE controller. The secondary IDE is a standard ISA connector suitable for slower IDE devices, such as tape backups and CD ROM drives. -
Page 48: Parallel Port Mode
JX30WB System Board Installing and Configuring the JX30WB Setting the CMOS Extended Screen (Cont'd.) Parallel Port Mode The parallel port mode selects either bi-directional mode or output mode for the parallel port. Output mode is selected when this is set to AT. Bi-directional mode is selected when this is set to PS/2. -
Page 49: Non-Cacheable Area
Installing and Configuring the JX30WB JX30WB System Board These selections will not recognize any mouse movement, only activity involving the keyboard. Setting the CMOS Extended Screen (Cont'd.) Energy Saving Timer (Cont’d) This selection can be set to one minute or in increments of fifteen minutes (up to 120 minutes). -
Page 50: System Password
JX30WB System Board Installing and Configuring the JX30WB Setting the CMOS Extended Screen (Cont'd.) System Password The password you select must be typed at boot up when this selection is ENABLED. The system will not boot up without the correct password. After entering the correct password, the system asks: “Do you want to change your... -
Page 51: Re-Configuring Your Computer
Installing and Configuring the JX30WB JX30WB System Board Re-Configuring Your Computer Press the <ESC> key to reach the Exit Pop-Up Screen. Now select < F4> to save and initialize the new Setup. Phoenix SETUP Utility (Version 1.00) (c) Phoenix Technologies Ltd. 1985, 1993 All Rights Reserved... - Page 52 Installing and Configuring the JX30WB ........4-1 Installation ................. 4-1 Tools Required ................4-1 Equipment Required ..............4-2 Configuration ................4-2 Initial Boot Up ................4-3 Setup ..................4-3 Running The Setup Procedure ........
- Page 53 Installing and Configuring the JX30WB JX30WB System Board Figure 4-2. CMOS Main Screen ............ 4-4 Figure 4-3. CMOS Extended Screen ..........4-5 Figure 4-4. Exit Pop-up Screen ........... 4-14 Micronics Computers, Inc.
-
Page 54: Appendix A: Post And Boot Error Messages
ALTERNATE correctly, or the primary check the primary video video adapter failed. adapter. ERRORS FOUND; The POST reports hard Rerun SETUP and DISK X FAILED disk configuration enter the correct hard INITIALIZATION information is incorrect. disk information. Micronics Computers, Inc. - Page 55 Appendix A POST and Boot Error Messages JX30WB System Board Table A-1. POST Messages (Cont’d) Number/Message Possible Cause Solution ERRORS FOUND; The POST reports the Enter correct memory INCORRECT size of base, or the size and rerun SETUP CONFIGURATION expansion memory, procedure.
- Page 56 JX30WB System Board Appendix A POST and Boot Error Messages Table A-1. POST Messages (Cont’d) Number/Message Possible Cause Solution KEYBOARD CLOCK The Keyboard logic Make sure the kybrd LINE FAILURE or failed. cable is connected KEYBOARD DATA correctly. LINE FAILURE KEYBOARD STUCK The Key(s) is jammed.
- Page 57 Appendix A POST and Boot Error Messages JX30WB System Board Micronics Computers, Inc.
-
Page 58: Appendix B: Beep Codes
Beep codes are a series of beeps sent through the speaker that indicate a problem during POST. If text appears on the video screen, the JX30WB has completed POST; any other tone from the speaker indicates something other than a POST error. -
Page 59: Table B-1. Beep Codes
Appendix B Beep Codes JX30WB System Board Table B-1. Beep Codes Beep Code Contents Description Port 80h None CPU register test in progress. 1-1-3 CMOS read/write failure. 1-1-4 ROM BIOS check failure. 1-2-1 Programmable interval timer failure. 1-2-2 DMA initialization failure. - Page 60 JX30WB System Board Appendix B Beep Codes Table B-1. Beep Codes (Cont’d) Beep Code Contents Description Port 80h 2-2-4 Bit 7 first 64K RAM failure. 2-3-1 Bit 8 first 64K RAM failure. 2-3-2 Bit 9 first 64K RAM failure. 2-3-3 Bit 10 first 64K RAM failure.
- Page 61 Appendix B Beep Codes JX30WB System Board Table B-1. Beep Codes (Cont’d) Beep Code Contents Description Port 80h 3-4-2 Search for video ROM in progress. None Screen running with video ROM. None Screen operable. None Screen running with video ROM.
-
Page 62: Appendix C: Hard Disk Types
Hard Disk Types Table C-1 lists the hard disk types compatible with the JX30WB. Table C-1. Hard Disk Types Type Size 1010 1010 1010 Not Valid (Unusable Parameters) 1023 Micronics Computers, Inc. - Page 63 Appendix C Hard Disk Types JX30WB System Board Table C-1. Hard Disk Types (Cont’d) Type Size 1023 1024 1001 1018 1024 1024 1001 1024 1023 1024 1023 Micronics Computers, Inc.
- Page 64 JX30WB System Board Appendix C Hard Disk Types Table C-1. Hard Disk Types (Cont’d) Type Size 1024 1024 1024 1023 1023 1024 1024 User Config. Auto Config. Micronics Computers, Inc.
-
Page 66: Appendix D: Specifications
486 DX 25 & 33MHz 486 DX2 50 & 66MHz 486 DX4 75 & 100MHz Pentium OverDrive Chip Set Micronics X30WB single chip Opti 611A Mode 3 VL IDE controller SMC 665 Super I/O controller CPU Clock Select Frequency synthesizer chip for... - Page 67 Appendix D Specifications JX30WB System Board Keyboard Standard AT style DIN connector BIOS Phoenix BIOS on 1MB Flash EPROM Mode 3 IDE driver support Auto detection of memory size Auto configuration of IDE hard disk drive types Cache 8K/16K of on-chip level 1...
-
Page 68: Battery Disposal
Mettre au rebut les batteries usagees conforement aux instructions du fabricant. Environmental Specifications The environment in which the JX30WB is located is critical. Micronics recommends the following environmental specifications: Temperature Range Operating: 50 degrees to 104 degrees Fahrenheit (10 degrees to 50 degrees Celsius). - Page 69 Appendix D Specifications JX30WB System Board Non-Operating: 5% to 90% Micronics Computers, Inc.
-
Page 70: Glossary
Setup: Steps used to configure the system board. SIMM: Single In-line Memory Mo dule. SIMMs are banks of memory used to increase the performance of the computer. SRAM: Static Random Access Memory. Micronics Computers, Inc. -
Page 72: Limited Warranty
Returned product should be shipped prepaid or hand carried to Micronics. The purchaser assumes risk of loss or damage in transit and, unless otherwise agreed to in writing by Micronics, will pay inbound shipping charges. - Page 73 Limited Warranty (Cont'd.) The exclusive remedy of the purchaser under this warranty above will be repair or replace at Micronics option, but if for any reason that remedy should fail of its essential purpose, the exclusive remedy of the purchaser shall then be actual damages up to amounts paid for the defective product by the purchaser.
- Page 74 Limited Warranty Non-Warranty Service After the one year warranty service is no longer in effect, service is still available for Micronics products. For more information, contact Micronics’ RMA department at (510) 651-2300. The RMA department is open between 8:30 A.M. and 5 P.M. Pacific Standard time.
- Page 76 User’s Comment Form: JX30WB What do you like about this manual? What would you change in this manual? Mail comments to: Micronics Computers, Inc. Technical Publications Department 232 E. Warren Avenue Fremont, CA 94539 Name: Dealer: Title: Date: Company: Telephone:...
- Page 77 DOCUMENT NUMBER: O6-00192-01, REV. 1B AUGUST 1994 PRINTED IN THE USA...
- Page 78 POST and Boot Error Messages ............1 Beep Codes ..................1 Hard Disk Types ................1 Specifications ..................1 Battery Disposal ................3 Environmental Specifications ............3 Temperature Range ..............3 Relative Humidity (Non-Condensing) ........
Need help?
Do you have a question about the JX30WB and is the answer not in the manual?
Questions and answers