Table of Contents
Advertisement
Available languages
Available languages
Quick Links
Advertisement
Chapters
Table of Contents

Subscribe to Our Youtube Channel
Summary of Contents for Techly IDATA EXTIP-VW
- Page 1 TRASMETTITORE / RICEvITORE HDMI OvER IP CON POE MULTIPLE DESKTOP MONITOR ARM WITH CLAMP Trasmettitore / Ricevitore HDMI over IP con PoE HDMI over IP with PoE Transmitter/Receiver Manuale d'istruzione User's manual IDATA EXTIP-VW IDATA EXTIP-VWR www.techly.com - info@techly.com www.techly.com...
-
Page 2: Table Of Contents
2.0 Impostazioni Guidata Video Wall......................7 2.1 Installazione di Software Video Wall e Apple® Bonjour.................7 2.2. Installazione guidata Video Wall ......................11 3.0. Impostazione tramite pagina di configurazione web................15 3.1. Preparativi per la connessione alla Configurazione Web..............15 3.2. Descrizione Configurazione Web......................15 Sicurezza del prodotto..........................21 www.techly.com... -
Page 3: Introduzione
Prima di iniziare l'installazione di questo prodotto, si prega di controllare e verificare il contenuto della confezione del prodotto, che dovrebbe includere i seguenti elementi: - 1x trasmettitore (IDATA EXTIP-VW)/ ricevitore (IDATA EXTIP-VWR) HDMI over IP con PoE - 1x Adattatore... -
Page 4: Specifiche Tecniche
5 ~ 95% (senza condensa) Temperatura di stoccaggio -10 ~ 80 ° C Umidità di Utilizzo 10 ~ 85% RH (senza condensa) Temperatura Di Utilizzo 0 ° C a 50 ° C Peso 0.65kg Approvazioni di regolamentazione CE, FCC www.techly.com... -
Page 5: Panoramica Applicazioni
TRASMETTITORE / RICEvITORE HDMI OvER IP CON POE MULTIPLE DESKTOP MONITOR ARM WITH CLAMP PANORAMICA APPLICAZIONI Punto-Multipunto Distribuzione multipla: 1 trasmettitore + 4 ricevitori Applicazione 1 × 4 Video Wall: 1 trasmettitore + 4 ricevitori www.techly.com... - Page 6 TRASMETTITORE / RICEvITORE HDMI OvER IP CON POE MULTIPLE DESKTOP MONITOR ARM WITH CLAMP Punto-Multipunto Applicazione 2 × 2 Video Wall: 2 trasmettitori + 4 ricevitori Multipunto Multipunto www.techly.com...
-
Page 7: Impostazioni Guidata Video Wall
Video Wall premendo il pulsante "Change...". Dopo aver deciso il percorso del file, premere il pulsante "Next>" per continuare. È possibile premere il pulsante "<Back" per tornare alla pagina di configurazione precedente, oppure premere il pulsante "Cancel" per annullare l'installazione. www.techly.com... - Page 8 "Cancel" per annullare l'installazione. 5. Installazione completata. Si prega di premere il pulsante "Finish" per completare l'installazione. 6. L'icona Setup della Guida Video Wall verrà visualizzata sul desktop del PC. È possibile eseguire il software facendo doppio clic sull'icona sul desktop. www.techly.com...
- Page 9 4. È possibile visualizzare le informazioni relative al Apple® Bonjour qui. Premere il pulsante "Next>" per avviare l'installazione. È possibile premere il pulsante "<Back" per tornare alla pagina di configurazione precedente, oppure premere il pulsante "Cancel" per annullare l'installazione. www.techly.com...
- Page 10 È possibile premere il pulsante "<Back" per tornare alla pagina di configurazione precedente, oppure premere il pulsante "Cancel" per annullare l'installazione. 6. Il sistema avvierà l’installazione di Apple® Bonjour. 7. Installazione completata. Si prega di premere il pulsante "Finish" per completare l'installazione. www.techly.com...
-
Page 11: Installazione Guidata Video Wall
Il numero massimo di monitor che è possibile utilizzare verticalmente è 8, e il numero massimo di monitor che è possibile utilizzare in senso orizzontale è di 16. Al termine premere il pulsante "Next>" www.techly.com... - Page 12 Abilitando questa funzione si riducono i ritardi video causati da reti instabili. • Show OSD: Verranno visualizzate delle informazioni aggiuntive sul monitor (numero seriale). Premere il pulsante "Next>" al termine delle operazioni. Per tornare alla precedente pagina di impostazioni, premere il pulsante "Back". www.techly.com...
- Page 13 Per aggiungere una nuova sorgente di ingresso, si prega di scegliere la sorgente di ingresso che si desidera utilizzare, scegliere il numero di monitor che si desidera utilizzare (verticale/orizzontale) e premere il pulsante "Add New View Source" come mostrato nella figura sopra. www.techly.com...
- Page 14 Virtuale, si prega di utilizzare i tasti direzionali (su, giù, sinistra e destra) per regolare la posizione. Premere il pulsante "Apply" quando hai finito e applicare tutte le impostazioni eseguite. Per tornare alla pagina di impostazione precedente, premere il pulsante "Back". www.techly.com...
-
Page 15: Impostazione Tramite Pagina Di Configurazione Web
Chrome, Mozilla o Internet Explorer), e digitare l'indirizzo IP del trasmettitore / ricevitore HDMI over IP con PoE che si desidera collegare. La seguente sezione vi fornirà descrizioni dettagliate relative alla configurazione web del trasmettitore / ricevitore HDMI over IP con PoE. www.techly.com... - Page 16 - Console API command: È possibile digitare i comandi API qui in questo campo. - Apply: Premere questo pulsante per immettere il comando digitato nel campo di immissione comando. - Output: Questo campo visualizza il sistema di uscita per il comando API inserito. www.techly.com...
- Page 17 In questa pagina sono riportate le statistiche di sistema. Video Wall A. Impostazioni di base Smussatura e compensazione del gap È possibile impostare le distanze per smussatura e compensazione del gap qui in questo menu. L'unità utilizzata qui è 0,1 millimetri (0,01 centimetri). www.techly.com...
- Page 18 PoE che si desidera configurare nel campo Choose Control Target. Ripristinare Impostazioni di base È possibile configurare tutte le impostazioni qui per le impostazioni di base. Si prega di premere il pulsante Reset per ripristinare la configurazione di base. www.techly.com...
- Page 19 Se l'ambiente di rete non è stabile, potrebbero verificarsi dei disturbi video sul Video Wall. Abilitando questa funzione si riducono i ritardi video causati da reti instabili. È possibile impostare il valore di ritardo (in microsecondi) anche qui. Dopo aver effettuato le vostre impostazioni, premere il pulsante Apply per applicare tutte le impostazioni eseguite. www.techly.com...
- Page 20 Tipo1, Tipo2, Tipo1 in modalità ospite e Tipo2 in modalità ospite. Inoltre, è possibile modificare le impostazioni della velocità di trasmissione (per la modalità operativa del tipo 2) qui in questa pagina. Per applicare le impostazioni eseguite, premere il pulsante Apply. www.techly.com...
-
Page 21: Sicurezza Del Prodotto
Contattate le autorità locali competenti per ottenere informazioni in merito allo smaltimento corretto della presente apparecchiatura. Si dichiara che questo prodotto è conforme alla Direttiva Europea EMC 2004/108/EC ed alla Direttiva Europea ROHS 2011/65/EU. www.techly.com... - Page 22 2.0 Setting via Video Wall Setup Wizard ....................27 2.1 Installing Video Wall Setup Wizard And Apple® Bonjour..............27 2.2 Video Wall Setup Wizard ........................31 3.0 Setting Via Configuration Webpage......................35 3.1 Preparations For Connecting To Configuration Webpage..............35 3.2 Configuration Webpage Description....................35 Product safety............................41 www.techly.com...
-
Page 23: Introduction
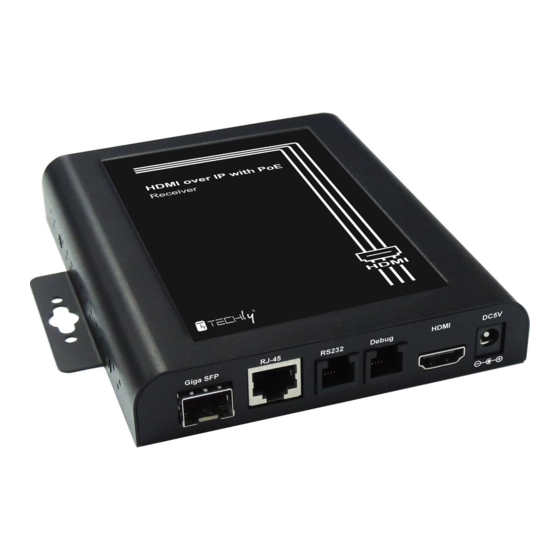
Before starting install this product, please check and verify the contents of the product package, which should include the following items: - One HDMI over IP with PoE Transmitter (IDATA EXTIP-VW)/Receiver (IDATA EXTIP-VWR) - One Adapter - One CD contains User’s Manual and Video Wall Setup Wizard Note: If any item listed in this table above is missing or damaged, please contact your distributor or retailer as soon as possible. -
Page 24: Technical Specification
142 x 107 x 25 mm Storage Humidity 5 ~ 95% (no condensation) Storage Temperature -10 ~ 80 ° C Operating Humidity 10 ~ 85% RH (no condensation) Operating Temperature 0 ° C to 50 ° C Weight 0.65kg Regulatory Approvals CE, FCC www.techly.com... -
Page 25: Application Overview
HDMI oVER IP WITH PoE TRAnsMITTER/REcEIVER MULTIPLE DESKTOP MONITOR ARM WITH CLAMP APPLICATION OvERvIEW Point-to-Multi Multiple Distribution: 1 Transceiver + 4 Receivers 1 × 4 Video Wall Application: 1 Transceiver + 4 Receivers www.techly.com... - Page 26 HDMI oVER IP WITH PoE TRAnsMITTER/REcEIVER MULTIPLE DESKTOP MONITOR ARM WITH CLAMP Point-to-Multi 2 × 2 Video Wall Application: 2 Transceiver + 4 Receivers Multi-to-Multi www.techly.com...
-
Page 27: Setting Via Video Wall Setup Wizard
Setup Wizard by pressing the “Change…” button. After you’ve decided the file path, please press the “Next>” button to continue. You can press the “<Back” button to go back to the previous setup page, or press the “Cancel” button to cancel the installation. www.techly.com... - Page 28 “Cancel” button to cancel the installation. 5. Installation complete. Please press the “Finish” button to finish the installation. 6. The Video Wall Setup Wizard’s icon will be displayed on your PC’s desktop. You can run the software by double-click the icon on the desktop. www.techly.com...
- Page 29 4. You can view information regarding to Apple® Bonjour here. Press the “Next>” button to start the installation. You can press the “<Back” button to go back to the previous setup page, or press the “Cancel” button to cancel the installation. www.techly.com...
- Page 30 You can press the “<Back” button to go back to the previous setup page, or press the “Cancel” button to cancel the installation. 6. The system is installing Apple® Bonjour. 7. Installation complete. Please press the “Finish” button to finish the installation. www.techly.com...
-
Page 31: Video Wall Setup Wizard
Transceivers you’ve installed in your network. The maximum number of monitor your can use vertically is 8, and the maximum number of monitor your can use horizontally is 16. Press the “Next>” button when you’re done. www.techly.com... - Page 32 Enabling this function will reduce the video delays caused by unstable network environments. • Show OSD: Addition information (serial number) will be displayed on the monitor. Press the “Next>” button when you’re done. To go back to the previous setting page, press the “Back” button. www.techly.com...
- Page 33 To add a new input source, please choose the input source you would like to use, choose the number of monitors you would like to use vertically/horizontally, and press the “Add New View Source” button as shown in the figure above. www.techly.com...
- Page 34 If you would like to change a input source’s display position on the virtual TV wall, please use the direction buttons (Up, Down, Left, and Right) to adjust the position. Press the “Apply” button when you’re done and apply all the settings you’ve made. To go back to the previous setting page, press the “Back” button. www.techly.com...
-
Page 35: Setting Via Configuration Webpage
Internet Explorer), and type in the IP address of the HDMI over IP with PoE Transmitter/Receiver you would like to connect. The following section will provide you detailed descriptions regarding to HDMI over IP with PoE Transmitter/Receiver’s configuration webpage. www.techly.com... - Page 36 - Command Inputting Field: You can type API commands here in this field. - Apply: Press this button to input the command you typed in the Command Inputting Field. - Output: This field displays system output for the API command you inputted. www.techly.com...
- Page 37 MULTIPLE DESKTOP MONITOR ARM WITH CLAMP D. Statistics This page displays the system statistics. Video Wall A. Basic Setup Bezel and Gap Compensation You can set the distances for bezel and gap compensation here in this menu. The unit used here is 0.1mm (0.01cm). www.techly.com...
- Page 38 HDMI over IP with PoE Transmitter/Receiver you would like to configure in the Choose Control Target field. Reset to Basic Setup You can set all the settings here to basic settings. Please press the Reset button to reset to basic setup. www.techly.com...
- Page 39 If the network environment is not stable, video noises might occur on the TV wall. Enabling this function will reduce the video delays caused by unstable network environments. You can set the delay (in microsecond) value here as well. After you’ve done with configuration, press the Apply button to apply all the settings you’ve made. www.techly.com...
- Page 40 Type 1, Type 2, Type 1 guest mode, and Type 2 guest mode. Also, you can change the baud rate settings (for Type 2 operation mode) here in this page. To apply the settings you’ve made here, please press the Apply button. www.techly.com...
-
Page 41: Product Safety
This product is marked with this symbol. It means that used electrical and electronic products should not be mixed with general household waste. There is a separate collections system for these products in compliance with EU Directive WEEE The product is compliance with European Directive EMC 2004/108/EC and ROHS 2011/65/EU www.techly.com... - Page 42 MULTIPLE DESKTOP MONITOR ARM WITH CLAMP www.techly.com - info@techly.com...
Need help?
Do you have a question about the IDATA EXTIP-VW and is the answer not in the manual?
Questions and answers