
Subscribe to Our Youtube Channel
Related Manuals for Drive DeVilbiss Healthcare MED AIRE FLEX WAVE


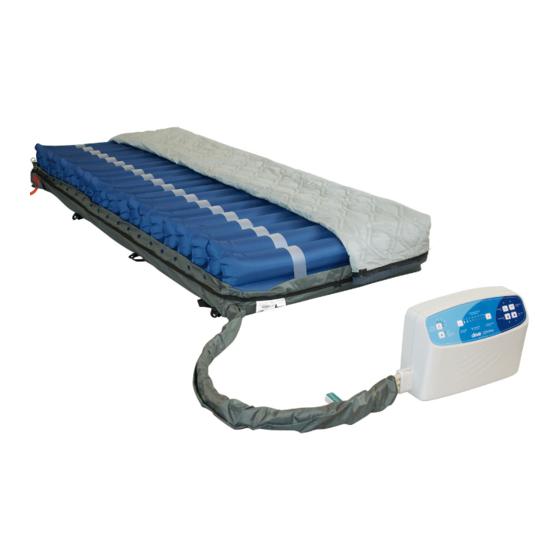
Summary of Contents for Drive DeVilbiss Healthcare MED AIRE FLEX WAVE
- Page 1 MED AIRE FLEX WAVE Gebrauchsanweisung - Instructions for use - Mode d’emploi - Gebruiksaanwijzing - Istruzioni per l’uso...
-
Page 2: Table Of Contents
Inhaltsverzeichnis Inhaltsverzeichnis ..............2 Vorwort ..................3 Konformitätserklärung .............3 Lebensdauer ................3 Entsorgung .................3 Typenschild .................3 Wiedereinsatz ................3 Gewährleistung .................3 Einleitung..................4 Indikation | Kontraindikation ..........4 Lieferumfang ................4 Sicherheitshinweise ..............4 Aufstellen des Systems ............5 Funktionserklärung ..............6 Inbetriebnahme .................7 Handcheck ..................7 Wechseldruckfunktion.............7 Statikfunktion ................7 Pflegefunktion ................7 Sitzfunktion .................7 Luftstrom ..................8 CPR (Cardiopulmonary resuscitation) .........8... -
Page 3: Vorwort
Vorwort Typenschild Wir danken Ihnen, dass Sie sich für ein Produkt aus dem Hause Drive DeVilbiss entschieden haben. Das Design, die Funktionalität und die Qualität dieses Produktes werden Sie nicht enttäuschen. Bitte lesen Sie diese Bedienungsanleitung vor dem ers- ten Gebrauch sorgfältig durch. Sie erhalten wichtige Sicherheitshinweise und wertvolle Tipps zur richtigen Benutzung und Pflege. -
Page 4: Einleitung
Einleitung Lieferumfang Bitte überprüfen Sie den Inhalt auf Beschädigungen Das Drive Medical Wechseldrucksystem Med Aire Flex- und Vollständigkeit. Sollte eines der aufgeführten Wave ist speziell entwickelt für die Dekubitusprophylaxe Teile fehlen, wenden Sie sich bitte an Ihren Fachhändler. und zur Therapieunterstützung. Dieses System ersetzt die vorhandene Matratze in Ihrem Bett. -
Page 5: Aufstellen Des Systems
• Das Aggregat darf nicht abgedeckt werden => • Platzieren Aggregat dafür Überhitzungsgefahr! vorgesehenen Haken am Fußende, auf dem Boden oder auf einer ebenen Fläche • Schließen Sie an das Gerät nur die dafür vorgesehene Matratze an. Nun verbinden Sie den Anschlussschlauch mit dem Aggregat (Bild 2). -
Page 6: Funktionserklärung
Funktionserklärung Gewichtseinstellung Pflegefunktion Einstellung Nutzergewicht Max. Erhöhung des Zelldrucks in allen Zellen Statik und Wechseldruck Tastensperre Einstellung statische Weichlagerung Automatisch aktiv nach 30 Sekunden Inaktivität oder dynamischer Wechseldruck aber durch Drücken der Taste „Tastensperre/ Lock“. Wechselzyklus Alarm „Aus“ Einstellbar 10/15/20/25 Minuten Akustisches Alarmsignal kann Stumm geschaltet wer- den und bleibt solange „Stumm“, bis die Taste erneut gedrückt wird! -
Page 7: Inbetriebnahme
Inbetriebnahme Wechseldruckfunktion Verbinden sie den Netzstecker mit dem Aggregat und Es werden alle Luftkammern gleichmäßig im Verhältnis eine dafür vorgesehenen Stromquelle (Bild 4). 1:1 be- und entlüftet. Ein Wechselzyklus beinhaltet je- weils das Be- und Entlüften einer Luftkammer und dauert Schalten Sie das Aggregat ein. -
Page 8: Luftstrom
Luftstrom Alarmfunktion Das Wechseldrucksystem hat neun Luftstromzellen. Niedriger - Druck Diese Luftkammergruppe ist am Rand mikroperforiert Die LED „Niedriger-Druck“ leuchtet immer dann, wenn und gewährleistet dadurch eine aktive Belüftung des das Aggregat zu wenig Druck in den Zellen feststellt. Wechseldrucksystem. Gleichzeitig ertönt ein akustisches Signal, sofern dieses nicht zuvor durch Drücken der „Alarm Aus“-Taste abge- schaltet wurde. -
Page 9: Patientenwechsel
• Bitte verwenden sie keine phenolhaltigen Lösungen • Prüfen Sie den Wechsel zwischen Be- und Entlüftung oder Scheuermittel. Dies kann die Oberfläche des in jedem Luftkammerkreis. Den Wechselzyklus ent- Aggregats angreifen. nehmen Sie dem Punkt Wechseldruckfunktion. • Bitte das Aggregat gründlich trocknen lassen. •... -
Page 10: Problembehebung
Problembehebung Symptom Abhilfe Aggregat funktioniert • Prüfen, ob der Stecker richtig eingesteckt ist. Schalten Sie das Aggregat erneut ein. nicht • Wenn die LED am EIN/AUS Schalter nicht leuchtet, prüfen Sie die Spannung der Steckdose oder verbinden Sie den Netzstecker mit einer anderen Steckdose. •... - Page 11 Table of contents Preface ..................12 Declaration of conformity ............12 Service life ................. 12 Disposal ..................12 Identification plate ..............12 Reuse ................... 12 Warranty ..................12 Introduction ................13 Indication | contraindication ............. 13 Scope of delivery ..............13 Safety instructions ..............
-
Page 12: Preface
Preface Identification plate Thank you for choosing a product from Drive DeVilbiss. You will not be disappointed by the design, functionality and quality of this product. Please read these operating instructions carefully prior to initial use. They contain important safety information and valuable tips for the proper use and care. -
Page 13: Introduction
Introduction Scope of delivery The Drive Medical alternating pressure system Med Aire Please check the contents for damage and complete- FlexWave is specially developed for the prophylaxis and ness. If one of the parts listed below is missing, please treatment of decubitus, up to and including grade 4 de- contact your specialist dealer. -
Page 14: Emc
• The unit should not be covered => Risk of overheating! Now attach the connection hose to the unit (photo 2). • Connect the device only to the mattress intended for it. Important! The connection hose must audibly click into •... -
Page 15: Explanation Of Functions
Explanation of functions Weight setting Autofirm function User weight setting Max. increase of cell pressure in all cells Static and alternating pressure Lock Adjustment of static pressure-relief positioning and Automatically enabled after 30 seconds of inactivity or dynamic alternating pressure. by pressing the „Tastensperre/Lock“... -
Page 16: Startup
Startup Alternating pressure function Connect the plug to the unit and an appropriate power All air chambers are evenly inflated and deflated in a 1:1 source (photo 4). ratio. An alternating cycle involves in each case the in- flating and deflating of an air chamber and takes approx. Switch on the unit. -
Page 17: Air Flow
Air flow Alarm function The alternating pressure system has nine air flow cells. Low pressure This group of air chambers is microperforated at the The „Low Pressure“ LED is lit whenever the unit detects edge and in this way, it ensures that the alternating pres- too little air in the cells. -
Page 18: Reuse/Patient Change
Cover Service • The cover can be cleaned by hand. To do this, use a Only original replacement parts and accessories from moist (not wet) cloth and a mild cleaning solution. Drive Medical may be used. If the system develops a de- fect or fault, please contact a trusted specialist dealer. -
Page 19: Troubleshooting
Troubleshooting Symptom Remedial action Unit does not work • Check whether the plug is correctly inserted. Switch on the unit again. • If the LED on the On/Off switch does not light up, check the voltage of the outlet or insert the plug into another outlet. - Page 20 Sommaire Avant-propos ................21 Déclaration de conformité ............21 Durée de vie ................. 21 Élimination ..................21 Plaque signalétique ..............21 Recyclage ..................21 Garantie ................... 21 Introduction .................. 22 Indication | contre-indication ..........22 Contenu de la livraison .............. 22 Consignes de sécurité...
-
Page 21: Avant-Propos
Avant-propos Plaque signalétique Nous vous remercions d'avoir choisi un produit de Drive DeVilbiss. Le design, la fonctionnalité et la qualité de ce produit sauront vous apporter pleine satisfaction. Avant d’utiliser le produit pour la première fois, veuil- lez lire attentivement le présent mode d’emploi. Vous y trouverez des consignes de sécurité... -
Page 22: Introduction
Introduction Contenu de la livraison Le système anti-escarres à pression alternée Med Aire Veuillez vérifier le système à la livraison pour vous assu- FlexWave de Drive Medical a été développé spéciale- rer qu’il est complet et qu’il n’est pas endommagé. Si l’un ment pour la prévention et le traitement des escarres des éléments mentionnés ci-dessous manque, veuillez jusqu’au stade 4 compris selon l’EPUAP. -
Page 23: Cem
• Ne pas recouvrir le compresseur => il risque de trop Raccorder le tuyau au compresseur (fig. 2). chauffer ! Attention ! Le tuyau doit s’emboîter correctement (on • Ne raccorder au compresseur que le matelas prévu à doit entendre un « clic ») afin d’empêcher une déconne- cet effet. -
Page 24: Explication Des Fonctions
Explication des fonctions Réglage du poids Fonction soins Réglage du poids du patient. Augmentation de la pression au maximum dans tou- tes les cellules. Statique et pression alternée Verrouillage des touches Réglage du positionnement statique et du position- Verrouillage automatique après 30 secondes d’inactivité nement dynamique à... -
Page 25: Mise En Service
Mise en service Fonction pression alternée Raccorder le cordon d’alimentation au compresseur et Toutes les cellules se gonflent et se dégonflent alterna- le brancher dans la prise de courant prévue à cet effet tivement de manière régulière (1/1). Le gonflage et le dé- (fig. -
Page 26: Cellules D'air
Cellules d’air Fonction alarme Le système Med Aire FlexWave a neuf cellules gonflab- Pression basse les Des microperforations sur les bords de ces cellules La LED « Pression basse » s’allume toujours lorsque le garantissent le gonflage actif du système Med Aire Flex- compresseur constate que la pression dans les cellules Wave. -
Page 27: Réutilisation / Changement De Patient
• Bien laisser sécher le compresseur. Si vous constatez des dommages ou des défauts, veuil- lez vous adresser à votre distributeur. Débrancher le • Lorsque le compresseur est bien sec, faire un essai de compresseur du secteur avant chaque contrôle visuel et fonctionnement. -
Page 28: Résolution Des Problèmes
Résolution des problèmes Symptôme Remède Le compresseur ne • Vérifier si le compresseur est bien connecté. Remettre le compresseur en marche. fonctionne pas • Si la LED de l’interrupteur marche/arrêt ne s’allume pas, vérifier la prise de courant ou brancher la fiche sur une autre prise de courant. •... - Page 29 Inhoudsopgave Voorwoord .................. 30 Verklaring van overeenstemming ........30 Levensduur ................30 Verwijdering ................30 Typeplaatje ..................30 Hergebruik ..................30 Garantie ..................30 Inleiding .................... 31 Indicatie | contra-indicatie ............31 Geleverd product ................. 31 Veiligheidsinstructies ..............31 EMC ....................32 Het systeem opstellen ...............
-
Page 30: Voorwoord
Voorwoord Typeplaatje Hartelijk dank dat u hebt gekozen voor een product van het merk Drive DeVilbiss. Het ontwerp, de functionaliteit en de kwaliteit van dit pro- duct zullen u niet teleurstellen. Lees deze bedieningshandleiding voor het eerste ge- bruik aandachtig door. De handleiding bevat belangrijke veiligheidsinstructies en waardevolle tips voor verant- woord gebruik en onderhoud. -
Page 31: Inleiding
Inleiding Geleverd product Het wisseldruksysteem Med Aire FlexWave van Drive Controleer de inhoud van de verpakking op beschadi- Medical is een systeem dat speciaal is ontwikkeld voor gingen en volledigheid. Als een van de onderstaande decubituspreventie en -therapie tot en met decubitus- onderdelen ontbreekt, neem dan contact op met uw graad 4 volgens EPUAP. -
Page 32: Emc
• Gebruik het apparaat alleen met de opgegeven span- • Bevestig het matrasvervangingssysteem met de daar- ning (230 V/50 Hz). voor bedoelde lussen aan de bewegende delen van de lattenbodem, zodat de werking van het systeem en • Het aggregaat mag niet worden afgedekt => gevaar van de verstelbare lattenboden niet worden gehinderd. -
Page 33: Functiebeschrijving
Functiebeschrijving Gewichtsinstelling Verzorgingsfunctie Instelling gebruikersgewicht. Max. verhoging van de celdruk in alle cellen Statische en wisseldruk Toetsenvergrendeling Instelling statische zachte modus en dynamische Automatisch actief na 30 seconden inactiviteit wisseldruk. of na een druk op de toets ‘Toetsenvergrendeling/ Lock’. Wisselcyclus Alarm “Uit”... -
Page 34: Ingebruikname
Ingebruikname Wisseldrukfunctie Sluit de netstekker aan op het aggregaat en op een ge- Alle luchtkamers worden gelijkmatig in een verhouding schikte stroombron (afb. 4). van 1:1 van lucht voorzien en ontlucht. Een wisselcyclus omvat telkens beluchting en ontluchting van een lucht- Schakel het aggregaat in. -
Page 35: Luchtstroom
Luchtstroom Alarmfunctie Het wisseldruksysteem heeft negen luchtstroomcellen. Lage druk Deze groep luchtkamers heeft aan de rand een micro- Het ledlampje ‘Lage druk’ gaat branden wanneer het ag- perforatie en garandeert daardoor een actieve ventilatie gregaat te weinig druk in de cellen detecteert. van het wisseldruksysteem. -
Page 36: Hergebruik / Wisseling Van Patiënt
• Gebruik geen fenolhoudende oplossingen of schuur- • Controleer alle ledlampjes, die bij de betreffende func- middelen. Deze kunnen het oppervlak van het aggreg- tie moeten branden. aat aantasten. Neem in geval van geconstateerde beschadigingen of • Laat het aggregaat volledig drogen. defecten contact op met uw speciaalzaak. -
Page 37: Probleemoplossing
Probleemoplossing Symptoom Remedie Aggregaat werkt niet • Controleer of de stekker goed in het contact is gestoken. Schakel het aggregaat opni- euw in. • Wanneer het ledlampje van de aan/uit-schakelaar niet brandt, controleert u of er span- ning op het stopcontact staat of steekt u de stekker van het netsnoer in een ander stopcontact. - Page 38 Indice Introduzione ................39 Dichiarazione di conformità ............. 39 Durata .................... 39 Smaltimento ..................39 Targhetta tipologica ..............39 Riutilizzo ..................39 Garanzia ..................39 Introduzione .................. 40 Indicazioni | Controindicazioni ..........40 Materiale in dotazione .............. 40 Avvertenze di sicurezza ............40 CEM ....................
-
Page 39: Introduzione
Introduzione Targhetta tipologica La ringraziamo di avere scelto un prodotto Drive DeVilbiss. Il design, la funzionalità e la qualità di questo prodotto non La deluderanno. Legga attentamente queste istruzioni per l’uso prima di utilizzarlo per la prima volta. Riceverà così importanti in- formazioni sulla sicurezza e preziosi consigli sull’uso e la manutenzione corretti. -
Page 40: Introduzione
Introduzione Materiale in dotazione Il sistema di pressione alternata Med Aire Flex-Wave Verificare che il contenuto sia completo e non dann- Drive Medical è stato sviluppato appositamente per la eggiato. Qualora mancasse una delle parti sotto elenca- profilassi e la terapia delle lesioni da decubito fino al IV te, rivolgersi al rivenditore. -
Page 41: Cem
• Non coprire l’apparecchio => pericolo Collegare ora il tubo al gruppo (fig. 2). surriscaldamento! Attenzione! Il tubo di allacciamento deve agganciarsi • Collegare l’apparecchio solo al materasso apposita- fino a percepire lo scatto per evitare che si stacchi acci- mente previsto. -
Page 42: Spiegazione Del Funzionamento
Spiegazione del funzionamento Impostazione del peso Funzione terapia Impostazione del peso del paziente. Max. aumento della pressione in tutte le celle Pressione statica e alternata Blocco tasti Regolazione su bassa pressione continua statica e Attivo automaticamente dopo 30 secondi di inattività pressione alternata dinamica. -
Page 43: Messa In Funzione
Messa in funzione Funzione pressione alternata Collegare la spina con il gruppo e la fonte d’energia pre- Tutte le celle vengono gonfiate e sgonfiate uniforme- vista (fig. 4). mente in rapporto 1:1. Ogni ciclo alternato contiene una fase di gonfiaggio e sgonfiaggio di una cella d’aria e dura Accendere il gruppo. -
Page 44: Corrente D'aria
Corrente d’aria Funzione allarme Il sistema di pressione alternata comprende nove celle Bassa pressione d’aria. Il gruppo di celle d’aria è perforato sui bordi garan- Il LED “Bassa pressione” si illumina sempre se il sistema tendo così l’aerazione del sistema di pressione alternata. rileva una pressione insufficiente nelle celle. -
Page 45: Reimpiego/Cambio Di Paziente
• Non utilizzare soluzioni contenenti fenoli né prodotti Se si riscontrano danni o difetti, rivolgersi al proprio ri- abrasivi. Potrebbero intaccare la superficie del gruppo. venditore. Per ogni ispezione a vista e riparazione il gruppo deve essere separato dalla rete di alimentazio- •... -
Page 46: Risoluzione Problemi
Risoluzione problemi Sintomo Rimedio Il gruppo non funziona • Controllare che la spina sia correttamente inserita. Accendere di nuovo il gruppo. • Se il LED sull’interruttore Acceso/Spento non è acceso, verificare la tensione della presa o inserire la spina in un’altra presa. •... - Page 47 NOTIZEN | notes | notes | notities | note Drive Medical GmbH & Co. KG | Stand: 14.07.2020 FLEX WAVE...
- Page 48 Ihr Fachhändler: Irrtum und Änderungen vorbehalten Stand: 14.07.2020 Version: MDR-1.0 Drive Medical GmbH & Co. KG Leutkircher Straße 44 • 88316 Isny|Allgäu • Germany T +49 7562 9724 0 • F +49 7562 9724 25 www.drivemedical.de • info@drivemedical.de...
Need help?
Do you have a question about the MED AIRE FLEX WAVE and is the answer not in the manual?
Questions and answers