Table of Contents
Advertisement
Quick Links
Advertisement
Table of Contents

Related Manuals for inbody S10


Summary of Contents for inbody S10
- Page 1 User’s Manual...
- Page 2 This manual might have typographical errors, and its content can be changed without a prior notice. InBody Co., Ltd shall not be liable for any errors, incidental, or consequential damages that occurred by not complying with the content of the User’s Manual.
-
Page 3: Table Of Contents
User’s Manual Contents I. Installation & Maintenance A. Contents of the Box B. Exterior & Functions C. Installation Instructions D. Transportation E. Repacking F. Maintenance II. Management & Results Description A. Cautions Before Measurement B. Exterior and Function of Keypad C. -
Page 4: Installation & Maintenance
Adapter (12V, 3.4A) 1EA ❸ Power cord (AC 125V, 10A, 1.8m) 1EA ❹ Electrode cable 4EA ❺ InBody carrying case 1EA ❻ Touch Type hand electrode 4 units ❼ Touch Type foot electrode 2 units ❽ Adhesive Type electrode 8 units ❾... - Page 5 NOTE DANGER Caution 참 고 주 의 참 조 주 의 To prevent physical shock, use InBody’s packing material when shipping or transporting the equipment. • Refer to this Chapter I, Section D: “Transportation.” UTION NOTE DANGER Note 참 고...
-
Page 6: Exterior & Functions
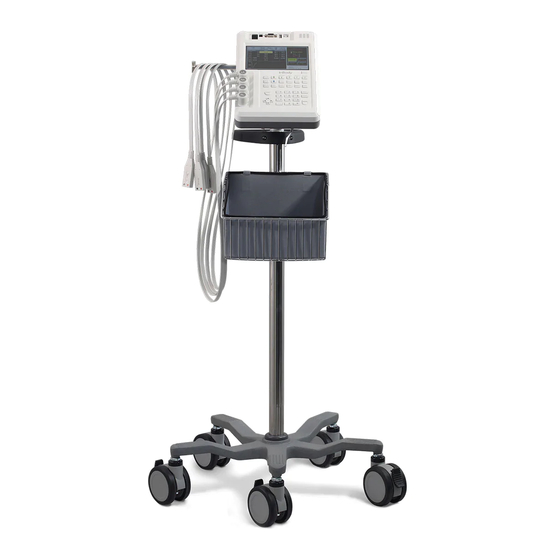
B. Exterior & Functions Individual part identification and functions with schematic sketches are provided below. Please inspect each component of the InBodyS10 before installation to ensure there are no scratches or damage. 1. LCD Monitor 2. Electrode Connection Unit 3. Operational Keypad 4. Control & Connection Unit 4. Control & Connection Unit 1. LCD Monitor 2. - Page 7 주 의 When you use the adapter cable, insert the adapter cable tightly into the InBodyS10. • Including the optional equipment, only the peripherals provided by InBody can be connected to the InBodyS10. • For any inquiry about peripherals, contact InBody.
-
Page 8: Installation Instructions
(5) Do not connect multiple peripherals to the same outlet. If it is plugged into a power outlet such as an electrical appliance, disconnect it and plug it into a different power outlet. 2. For InBody Carrying Case Users (1) When opening the box, check to make sure all the following items are inside. - Page 9 Installing Touch Type Electrodes: Installing Adhesive Type Electrodes:...
- Page 10 Touch Type ❶ Connect the black cable to the black port(V) of the electrode module, and connect the red cable to the red port(I) of the electrode module. <hand electrode> <foot electrode> Adhesive Type ❷ Connect the black cable to the black port(V) of the electrode module, and connect the red cable to the red port(I) of the electrode module.
- Page 11 (2) As shown below, adjust the direction and angle as desired. ❸ ❷ ❶ * HELP For left/right control ❶ Loosen the screw by twisting left. Fasten the screw by twisting right. For up/down control ❷ Loosen and adjust the angle degree. Fasten again.
- Page 12 (3) After installation, you can lock the wheels by pushing down the locking lever(as illustrated below). <Caster unlocked> <Caster locked> (4) Connect the electrode cables to the InBodyS10. Connect the RA(Right Arm), LA(Left Arm), RL(Right Leg), LL(Left Leg) electrodes to each corresponding part of the InBodyS10.
- Page 13 Installing the Adhesive Type Electrodes: Touch Type ❶ Connect the black cable to the black port(V) of the electrode module, and connect the red cable to the red port(I) of the electrode module. <hand electrode> <foot electrode> Adhesive Type electrode ❷...
- Page 14 • other equipment, turn off the InBodyS10 first. This is necessary to minimize electrical surges to the InBodyS10. Always use the specified adapter provided by InBody, as it is a part of the InBodyS10. Using other adapters may • result in a malfunction of the InBodyS10.
- Page 15 Installing the Printer onto the Cart Insert a power strip in the slot provided under the printer platform. ❶ Install the printer platform on the cart pole. ❷ Use a hex key to fasten the printer platform into place. ❸...
- Page 16 Use the USB cable to connect the printer to the unit. ❹...
-
Page 17: Transportation
Temperature range -10 ~ 70˚C (14 ~ 158˚F) Relative humidity 10 ~ 80%RH (No condensation) Atmospheric pressure range 50 ~ 106kPa 2. Transporting Before Installation Before installation, the InBodyS10 will be shipped in a box designed by InBody. UTION NOTE DANGER Warning 참 고 주 의... -
Page 18: Repacking
E. Repacking Be sure to turn off the power switch and unplug the power cable before repacking. Be careful to avoid severe physical shock, jarring or other damage while repacking, especially with regard to the electrode cables and touch type hand/foot electrodes. (1) Turn off the power switch. -
Page 19: Maintenance
Do not wipe the hands and foot electrode with a cleaning solution. If the liquid in cleaning solution enters • the electrode, corrosion may occur and the equipment may fail. To clean the electrode, use an InBody tissue containing alcohol or physiological saline and wipe lightly. -
Page 20: Management & Results Description
Children and people with limited mobility should be supervised or assisted when attempting to test on the • InBodyS10. After an individual with any kind of contagious disease or infection tests on the InBodyS10, use an InBody Tissue • to clean the equipment. -
Page 21: Exterior And Function Of Keypad
B. Exterior and Functions of Keypad The InBodyS10 has a keypad for data input. To input all information, press the relevant buttons on the keypad. The keypad is located below the LCD Monitor. It can be divided into two categories based on button function: 1. - Page 22 button ❺ You can check the accumulated analysis results of TBW/FFM(Ratio of Total Body Water to Fat Free Mass). button ❻ You can check the accumulated analysis results of Weight to Muscle Mass to Percent Body Fat. (2) Select electrode connection type button ❶...
- Page 23 (4) Others button ❶ Use the SETUP button when setting up the InBodyS10. button ❷ The DB button is to check, delete, print, and copy the results as well as copy them to or from a USB storage device. button ❸...
- Page 24 button ❹ This button is used to enter a decimal point or comma for height, age, I.D., and weight. button ❺ Used to delete entered data. button ❻ These buttons are used for gender input when entering a personal profile. button ❼ This button is used when data input is finished or to move on to the next item.
-
Page 25: Measurement Posture
C. Measurement Posture Maintaining the right posture during the test is essential to achieve reliable results and accuracy. It’s important for an examinee to maintain their posture for 10-15 minutes so that impedance can be measured accurately. 1. Lying Posture (1) It is recommended that the examinee lie down for about 10~15 minutes before the test, so that body water may be dispersed evenly inside the body. - Page 26 2. Seated Posture (1) It is recommended that the examinee sits in the testing posture for about 10~15 minutes before the test, so that body water may be dispersed evenly inside the body. (2) Make sure that the examinee's back is not touching the chair and is sitting straight. (3) Use a cushion to support the examinee's back.
- Page 27 Attention • Make sure that the examinee maintains a straight sitting position during the test. • It is recommended that the examinee maintain a seated posture for about 10~15 minutes prior to testing. • When measurement is taken on a chair or a wheelchair with any conductive materials on frame, any exposed frame should be covered by an insulating materials such as blankets.
- Page 28 The examinee should not rest his/her arm on the arm rest of the chair. The examinee should not slouch. Make sure bare feet do not touch the floor. Use a mat that does not conduct electricity. Make sure thighs do not touch each other. Do not position the examinee’s legs at a 90 degree angle, but stretch them slightly to the front.
- Page 29 Touch Type electrodes. Make sure to attach them as best as possible. • If examinees have dry hands and feet, wipe the equipment with an InBody tissue before testing. • Due to the weight of the cable, it is easy for the Adhesive Type electrodes to fall off during the test.
- Page 30 Make sure arms do not touch the torso and that the legs do not touch each other. Make sure bare feet do not touch the floor. Use a mat that does not conduct electricity.
-
Page 31: Connecting The Electrodes
D. Connecting the Electrodes InBodyS10 offers two types of electrodes: the Touch Type electrodes and the Adhesive Type electrodes. Check the RA, LA, RL, LL. (RA: Right Arm, LA: Left Arm, RL: Right Leg, LL: Left Leg) Check on the electrode part that will come into contact with examinee’s hands and feet. 1. - Page 32 Make sure to attach them as best as possible. • The test might not work properly or the results might be inaccurate if the examinee has dry hands/feet. Wipe the examinee’s hands and feet with an InBody tissue before testing.
- Page 33 2. Adhesive Type Attach the EKG electrodes to the examinee’s hands and feet as shown below. Then, connect the adhesive electrodes to the EKG electrodes. (1) Hand electrodes Find the ulna head(outer wrist bone) by feeling the wrist joint. Imagine or draw a line bisecting the ulna head, perpendicular to the arm.
-
Page 34: Power Connection & Getting Started
E. Power Connection & Getting Started (1) Connect the adapter cable to the power input port. (2) When the system switch is turned on, the screen shown below will be displayed and the device will begin warming up automatically. (3) While warming up, the InBodyS10 will proceed to self-test itself and make any necessary adjustments to the internal circuits. -
Page 35: Home Screen
F. Home Screen The InBodyS10 has a touch screen function for data input. Press the buttons on the LCD screen or use the keypad buttons to enter information. The home screen of the InBodyS10 has numerous options for both the user’s and the examinee’s convenience. (1) Personal Information Screen This is for I.D., weight , height , age and gender. -
Page 36: Measurement Settings
G. Measurement Settings 1. Select electrode connection type button ❶ Use when using Touch Type electrodes. button ❷ Use when using Adhesive EKG electrodes. 2. Select posture button ❶ Set for examinees who are lying down. button ❷ Set for examinees who are sitting down. button ❸... -
Page 37: Personal Profile
H. Personal Profile Weight and height are essential information for body composition analysis, and to provide a frame of reference for the data, age and gender are used to provide standard ranges. The InBodyS10 analyzes the measurement results based on the input data. To reduce errors and acquire more reliable results, input examinee data after reading the following carefully: (1) I.D. -
Page 38: How To Operate The Equipment
I. How to Operate the Equipment (1) Please select the electrode type. (Touch Type, Adhesive Type). (2) Please select the examinee’s posture type. (Lying Posture, Seated Posture, Standing Posture) (3) Please select whether you will be using ‘Dialysis Mode’ or not. (Enable, Disable) If examinees are receiving kidney dialysis, make sure to set the equipment to ‘Dialysis Mode’. - Page 39 (8) During the test, the LCD information screen will display the testing status and the analysis results screen will display impedance, reactance and phase angles. If you want to modify the examinee’s personal information during the test, please press the EXIT button. Move to the item you want to modify by using the direction button. After modifying the information, press the ENTER button to start the test again.
-
Page 40: Results
J. Results 1. Result Screen You can check the impedance results first. If you want to check other results, such as body water level, body composition, cumulative body water level, cumulative TBW/FFM, and cumulative weight/muscle/percent fat, press the relevant keypad button. Please refer to the help section of the information screen. (1) Impedance(Z)/ Reactance(Xc)/ Phase angle(θ) (2) Body Water (3) Body Composition... - Page 41 (4) TBW, ICW, ECW History (5) TBW/FFM History (6) Weight/Muscle/PBF History...
-
Page 42: Setup Establishment
III. Setup Establishment A. Setup The InBodyS10 has a setup menu to modify the settings for the user’s preference. The setup menu consists of Settings, Results Sheet Option, Results Output Option, Printer, Interface and Touch Alignment. The setup menu is shown below. If you want to save a change made in the setup menu, press ‘ENTER’. (1) Select the category that you wish to access. -
Page 43: Setup Menu
❷ (2) Automatic Printing Options Paper Type • InBody Paper: Select to use the printed results sheets provided by InBody. ❶ Number of Copies : You can decide the numbers of results sheet automatically printed after measurement. • Manual: When measurement is completed, results sheets are not printed automatically. To print the ❶... - Page 44 Logo Image: Select this when you input a logo using another computer connected to the InBodyS10. ❶ Users cannot input a logo directly. To modify the logo, please contact InBody USA. Text: You can input up to three logos using the letter buttons on the LCD. When you press ‘Text’, ❷...
- Page 45 6. Touch Alignment If a related function does not operate when pressing a part of the touch screen, there is a problem with the input system. Touch Alignment enables the user to solve this problem. When you run Touch Alignment, InBodyS10’s power will be turned on/off automatically. 7.
-
Page 46: Database
Data saved in the database is available to search, print, or delete. You can also view the results of the InBody Test, as well as backup/recover data. The InBodyS10 can save up to a maximum of 100,000 entries. 1. Data Search In the Database screen, all the data saved in the system will be automatically saved. To search for specific... - Page 47 USB storage device. Please ensure that you have backed up any data you wish to save from InBodyS10’s database before using this feature. Please contact InBody for information on which USB storage devices can be used with the InBodyS10. •...
-
Page 48: Problems & Solutions
Cause 2: Extension is not turned on (when using a surge protector) or the power does not flow into extension. Action 2: Check if the power flows into the extension and the electrical outlet where the extension is connected. Cause 3: An adapter other than the one provided by InBody is being used. Action 3: Use the adapter provided by InBody only. Cause 4: Adapter is not tightly inserted into the InBodyS10. Action 4: Insert the adapter into the power input port tightly. - Page 49 Cause 2: The examinee's hands and feet are too dry. Action 2: Electric currents will not flow well if examinee has dry hands and feet. Wipe examinee’s hands and feet with an InBody tissue before re-measuring impedance. Cause 3: Another cause not addressed in Cause 1 or Cause 2. Action 3: There’s a chance that the cable wire is disconnected due to external impact. Please try again.
- Page 50 5. The results sheets are not printing properly. Cause 1: The alignment is off. Action 1: Press the SETUP button, and then touch the “Printer” button on the screen. Touch ‘Result Sheet Alignment’ and adjust the X and Y axes. The X axis adjusts left and right and the Y axis adjusts up and down.
-
Page 51: Frequently Asked Questions (Faq)
We recommend that you test on the InBodyS10 once every two to four analysis? weeks to reliably see the changes. Do I have to use an InBody InBody Tissues are specifically designed for optimal testing, as opposed to • • Tissue? Can I just use a wet a wet cloth. -
Page 52: Other
V. Other A. Results Sheet 1. Results Sheet When using the InBodyS10 with a printer, it is strongly recommended to use the results sheet supplied by InBody. If more results sheets are needed, please contact InBodyUSA. Results sheet size 210 × 297 mm... - Page 53 External Battery. b. Adapter Connection Socket This is a socket for connecting the adaptor to recharge the External Battery. c. InBody Connection Socket This is a socket for connecting the InBodyS10 with connection cable. d. Remaining Battery LED It is an LED indicating the remaining battery.
- Page 54 2) How to Operate External Battery a. When using for the first time Check the remaining battery. If you press the LED ON button once, you will hear a beep. When you press the LED ON button once again, the remaining battery is displayed on the LED. b.
- Page 55 Connect the connection cable to InBodyS10 and External Battery. The connection cable has connection plugs on both sides, but the sizes are different. Connect the big plug to InBodyS10 and the small plug to the side labeled “InBody” on the External Battery.
- Page 56 b. Connect the adapter of the InBodyS10 to the External Battery. Connect the adapter cable to the side labeled “Adapter” on the External Battery, and connect the power cable to the power. c. Once the External Battery is properly connected, the power cable may be safely removed from the InBodyS10, and the device may be carried around.
- Page 57 AUTION NOTE DANGER Note 참 고 주 의 참 조 주 의 External Battery connection diagram • When using the InBodyS10 carrying case ► External Battery Connection Cable Adapter When using the InBodyS10 cart ► Connection Cable External Battery Adapter AUTION NOTE DANGER...
-
Page 58: Safety Information
C. Safety Information Indicators 9 pin Serial Port, Female (RS-232C) USB Port (Slave) Safety Symbols Warning, Caution, Note BF Type Equipment Adapter Power On Power Off Etc. Symbols Complies with UL 60601-1 European Conformity 0120 CSA C22.2 No. 601.1 0120 Manufacturer Serial number 0120... - Page 59 Follow instructions for use Suivez les instructions d’utilisation WARNING Electric shock hazard – do not dismantle. Dismantling will void the warranty. AVERTISSEMENT Risque de choc électrique - ne pas démonter. Le démontage annulera la garantie. DANGER Do not use this equipment with electrical medical device such as a pacemaker. Ne pas utiliser cet équipement avec des appareils médicaux électriques comme un stimulateur cardiaque.
-
Page 60: Classification
D. Classification Body Composition Analyzer of Direct Segmental Multi-frequency Bioelectrical Impedance Analysis Method Type of protection against electric shock: Class I • Type of the applied parts: BF Type • Degree of protection against water infiltration: IPX0 • EMC Immunity: Level A •... - Page 61 Possible to backup and transfer data to USB storage device (compatible with Excel and Lookin’Body software) It is recommended to use the USB storage device provided by InBody. Data Back-Up Possible to backup data through USB storage device and to restore the data to the InBody Printer Connection USB port Applied Rating Current Under 100µA(1kHz), 500µA(over 5kHz)
-
Page 62: Emc Declaration
F. EMC Declaration The InBodyS10 is intended for use in the electromagnetic environment specified below. The customer or the user of the InbodyS10 should ensure that it is used in such an environment. Electromagnetic emissions Emissions test Compliance Electromagnetic environment The InBodyS10 uses RF energy only for its internal function. RF emissions CISPR 11 Group 1 Therefore, its RF emissions are very low and are not likely to cause any interference in nearby electronic equipment. - Page 63 Power frequency Power frequency magnetic fields should be at (50/60 Hz) 3 A/m 3 A/m levels characteristic of a typical location in a magnetic field typical commercial or hospital environment. IEC 61000-4-8 NOTE U is the a.c. mains voltage prior to application of the test level. IEC 60601 Immunity test Compliance level Electromagnetic environment...
- Page 64 ©2019 InBody Co., Ltd. All rights reserved. BM-ENG-83-D-190710...
Need help?
Do you have a question about the S10 and is the answer not in the manual?
Questions and answers