Advertisement
Advertisement

Summary of Contents for AC Infinity CONTROLLER 76
- Page 1 CONTROLLER 76 WALL HANG SMART AC OUTLET USER MANUAL...
- Page 2 WELCOME Thank you for choosing AC Infinity. We are committed to product quality and friendly customer service. If you have any questions or suggestions, please don’t hesitate to contact us. Visit www.acinfinity.com and click contact for our contact information. EMAIL LOCATION support@acinfinity.com...
- Page 3 MANUAL CODE CTR682008X1 MODEL UPC-A PRODUCT CTR76A 819137021525 CONTROLLER 76...
-
Page 4: Table Of Contents
Manual Index ................. Page 5 Key Features ................. Page 6 Product Contents ................Page 7 Powering and Setup................ Page 8 Programming ................. Page 11 Other Settings ................Page 23 Other AC Infinity Products ............. Page 24 Warranty ..................Page 25... -
Page 5: Key Features
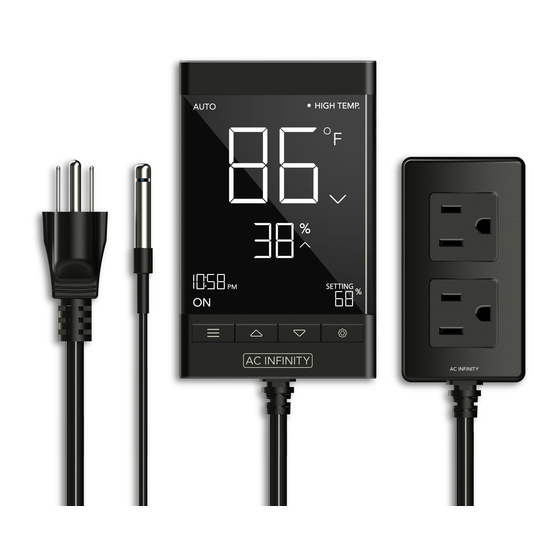
KEY FEATURES ACTIVE MONITORING SENSOR PROBE SMART CONTROLLER LED display shows key data The corded probe is Features automation controls like outlet power status, constructed of stainless steel that power electronics based on temperature, humidity, trends, to ensure precise temperature temperature, humidity, timers, clock, and countdowns. -
Page 6: Product Contents
PRODUCT CONTENTS WALL HANG SENSOR CONTROLLER PROBE (x1) (x1) WALL-HANG WIRE CABLE TIE WOOD SCREWS MOUNT (x2) (x1) (x1) -
Page 7: Powering And Setup
POWERING AND SETUP STEP 1 Locate the connector plug of the sensor probe and plug it into the sensor port at the bottom side of the controller. STEP 2 Position the corded sensor probe and secure it by using the wire tie and cable tie mount if needed. - Page 8 POWERING AND SETUP STEP 3 Locate a spot free on obstruction and secure the anchor into your wall. Twist the wood screw into the anchor. STEP 4 Hang the device on the screw using the hole on the backside of the controller.
- Page 9 POWERING AND SETUP STEP 5 Plug the controller’s power plug into an AC power outlet to power the controller. STEP 6 Plug your device (not included) into one of the two sockets to power your device with the controller.
-
Page 10: Programming
PROGRAMMING TIMER TO 1. MODE BUTTON Cycles through each of the controller’s mode: OFF, ON, AUTO (4 triggers), TIMER TO ON, TIMER TO OFF, CYCLE (On and Off), and SCHEDULE (On and Off). 2. UP / DOWN BUTTON Adjusts the parameters of the mode that you are in. In most modes, the up button increases and down button decreases the setting. - Page 11 PROGRAMMING 5. PROBE TEMPERATURE Current temperature that the probe is detecting. Displays “--“ if no probe is plugged in. Includes a trend indicator that signals a rise, fall or no change in temperature within the last hour. 6. PROBE HUMIDITY Current humidity that the probe is detecting.
- Page 12 PROGRAMMING CONTROLLER MODES Pressing the mode button will cycle through the controller’s available programming modes: OFF, ON, AUTO (4 triggers), TIMER TO ON, TIMER TO OFF, CYCLE (On and Off), and SCHEDULE (On and Off). OFF MODE Your device will be off regardless of temperature, humidity, or time-based triggers.
- Page 13 PROGRAMMING AUTO MODE (HIGH TEMPERATURE TRIGGER) Pressing the up or down button sets the high temperature trigger. Your device will turn on if the probe’s reading meets or exceeds this threshold. If the probe’s reading falls below this trigger point, your device will be turned off.
- Page 14 PROGRAMMING AUTO MODE (HIGH HUMIDITY TRIGGER) Pressing the up or down button sets the high humidity trigger. Your device will turn on if the probe’s reading meets or exceeds this threshold. If the probe’s reading falls below this trigger point, your device will be turned off.
- Page 15 PROGRAMMING TIMER TO ON MODE TIMER TO In this mode, press the up or down button to set a countdown time. During the countdown, your device will be set to OFF. Once the countdown ends, your device will trigger to turn ON. The countdown will begin if no buttons are pressed for 5 seconds.
- Page 16 PROGRAMMING CYCLE MODE (ON AND OFF) CYCLE In this mode, set an ON duration and an OFF duration for your device to cycle through continuously. Press the up or down button to first set a duration for your device to be on and then press the mode button again, to set a duration for device to be Off.
- Page 17 PROGRAMMING SCHEDULE MODE (ON AND OFF) SCHEDULE In this mode, set an ON clock-time and an OFF clock-time schedule for your device to follow through daily. Press the up or down button to set a clock time for your device to turn on. Then press the mode button and use the up or down button to set a clock time for your device to turn off.
- Page 18 PROGRAMMING CONTROLLER SETTINGS Pressing the setting button will cycle through the controller’s available settings: DISPLAY, F/C, CLOCK, CALIBRATION TEMPERATURE, CALIBRATION HUMIDITY, BUFFER TEMPERATURE, and BUFFER HUMIDITY. DISPLAY SETTING This setting adjusts the brightness of the display. Press DISPLAY the up or down button to cycle through 1, 2, 3, A2, and A3.
- Page 19 PROGRAMMING CLOCK CLOCK SETTING This setting adjusts the current clock time. Press the up or down button to increase or decrease the time. Every cycle past 12:00 will switch the time between AM and PM. The current clock time will be shown at the lower left corner of the display.
- Page 20 PROGRAMMING BUFFER TEMPERATURE SETTING The buffer used in the auto mode temperature trigger can be adjusted to prevent the device from turning on and off too quickly due to changing conditions in your BUFF. T° environment. In high temperature triggers, your device will turn on, only turning off when the measured temperature falls below the set temperature by the buffer number you have set here.
- Page 21 PROGRAMMING ALERT ICONS On the top left of the display is the alert icon section. Icons may flash when the controller wishes to alert you that a particular function or alarm is being triggered. TIMER TO TIMER ALERT This icon will flash when a countdown has completed in TIMER TO ON, TIMER TO OFF, CYCLE, or SCHEDULE Mode.
-
Page 22: Other Settings
OTHER SETTINGS FACTORY RESET To reset the controller back to factory settings, hold the mode button, the up button, and the down button simultaneously for four or more seconds. Resetting the controller will clear user settings in all modes and controller settings. CONTROLLER LOCK To lock the controller to prevent accidental changes or tampering, hold the settings button for two or more seconds. -
Page 23: Other Ac Infinity Products
AC INFINITY PRODUCTS Inline Fans The CLOUDLINE series is a line of duct fans designed to quietly ventilate AV rooms and closets, as well as various DIY air circulation and exhaust projects. Features a thermal controller with intelligent programming that will automatically adjust duct fan speeds in response to changing temperatures. -
Page 24: Warranty
WARRANTY This warranty program is our commitment to you, the product sold by AC Infinity will be free from defects in manufacturing for a period of two years from the date of purchase. If a product is found to have a defect in material or workmanship, we will take the appropriate actions defined in this warranty to resolve any issues. - Page 25 20cm between the radiator and your body. COPYRIGHT © 2020 AC INFINITY INC. ALL RIGHTS RESERVED No part of the materials including graphics or logos available in this booklet may be copied, photocopied, reproduced, translated or reduced to any electronic medium or machine readable form, in whole or in part, without specific permission from AC Infinity Inc.
- Page 26 www.acinfinity.com...
Need help?
Do you have a question about the CONTROLLER 76 and is the answer not in the manual?
Questions and answers