Advertisement
DO NOT PRINT THIS PAGE FOR ACTUAL MANUAL. INTERNAL USE ONLY.
PART
NUMBER
05603
MANUAL OWNER'S SERVICE CO2 HP
#
1
THIS COVERSHEET FOR INFORMATIONAL PURPOSES ONLY - DO NOT PRINT THIS PAGE IN MANUAL.
2
DESCRIPTION: MANUAL OWNER'S SERVICE FOR CARBON DIOXIDE PORTABLE EXTINGUISHERS
3
ACTUAL PRINTED MATERIAL TO CONSIST OF ATTACHED
4
OVERALL SIZE OF PRINTED DOCUMENT PAGES: 8-1/2" X 11" ON 20 LB PAPER
5
PRINTED MATERIAL TO MATCH ATTACHED IN SADDLE STITCHED BOOKLET FORM
6
PRINT MATERIAL IS TO BE HOLE PUNCHED 3 EACH 1/4" HOLES DOWN LEFT SIDE FOR STD 3-RING BINDER
7
CURENT REVISION DATE: 4/20
REV
E
UPDATE MANUAL & ADD MODEL 320/321
F
REFRESHED LAYOUT DESIGN
THIS DRAWING IS THE EXCLUSIVE AND CONFIDENTIAL PROPERTY OF AMEREX
CORPORATION. IT SHALL NOT BE DUPLICATED, USED OR DISCLOSED TO OTHERS
WITHOUT THE EXPRESS WRITTEN CONSENT OF AMEREX CORPORATION.
PN 05603
COVER SHEET
TITLE
DRAWING CHANGE
DATE CREATED
12/15/92
NOTES
BY
JA
CT
CREATED BY
REV.
HB
F
ECN#
DATE
7/2013
B002026
4/22/20
CK'D
04/2020
Advertisement
Table of Contents

Subscribe to Our Youtube Channel
Related Manuals for Amerex 321M


Summary of Contents for Amerex 321M
- Page 1 UPDATE MANUAL & ADD MODEL 320/321 7/2013 REFRESHED LAYOUT DESIGN B002026 4/22/20 THIS DRAWING IS THE EXCLUSIVE AND CONFIDENTIAL PROPERTY OF AMEREX CORPORATION. IT SHALL NOT BE DUPLICATED, USED OR DISCLOSED TO OTHERS WITHOUT THE EXPRESS WRITTEN CONSENT OF AMEREX CORPORATION. PN 05603 04/2020...
- Page 2 There are substitute parts available that may be incorrectly labeled as UL component parts, some are advertised as Amerex type. None of these meet UL requirements, and all of them void the Amerex extinguisher warranty and UL listing. DO NOT SUBSITUTE...
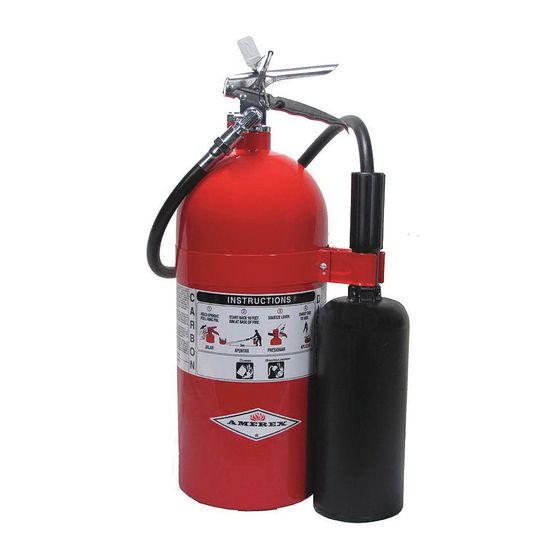
- Page 3 INSPECTING THE EXTINGUISHER This extinguisher must be inspected at regular intervals (monthly or more often if circumstances dictate) to insure that it is ready for use. Inspection is a “quick check” that a fire extinguisher is available and is in operating condition.
- Page 4 10. Inspect the 10, 15 & 20 lb. elbow and diffuser tip for blockage or damage. The Amerex 2½ & 5 lb. CO2 diffuser is built into the discharge tube. Check elbow and discharge tube for blockage or damage. Replace damaged parts with genuine factory replacement parts only.
- Page 5 4. Install the proper Amerex recharge adapter. Adapter must fit over diffuser tip on 2½ & 5 lb. discharge tube and elbow on 10, 15 & 20 lb. without blocking diffuser holes. Do not remove 2½ & 5 lb. discharge tube or 10, 15, 20 lb.
- Page 6 To depressurize – hold the extinguisher in a vertical position and slowly squeeze the discharge handle. Thoroughly clean all valve parts after depressurization and valve removal. Amerex CO2 valve bodies and aluminum cylinders are 1⅛"-12 UNF straight threads. Use a proper straight-thread adapter when hydrostatically testing. When reinstalling the valve assembly, the cylinder must be placed in a suitable securing vice.
Need help?
Do you have a question about the 321M and is the answer not in the manual?
Questions and answers