Table of Contents
Advertisement
Quick Links
DO NOT PRINT THIS PAGE FOR ACTUAL MANUAL. INTERNAL USE ONLY.
PART
NUMBER
05606
MANUAL OWNER'S SERVICE 600/695
#
1
THIS COVERSHEET FOR INFORMATIONAL PURPOSES ONLY - DO NOT PRINT THIS PAGE IN MANUAL.
2
DESCRIPTION: MANUAL OWNER'S SERVICE FOR 50/150 HALON 1211 WHEELED EXTINGUISHERS
3
ACTUAL PRINTED MATERIAL TO CONSIST OF ATTACHED
4
OVERALL SIZE OF PRINTED DOCUMENT PAGES: 8-1/2" X 11" ON 20 LB PAPER
5
PRINTED MATERIAL TO MATCH ATTACHED IN SADDLE STITCHED BOOKLET FORM
6
PRINT MATERIAL IS TO BE HOLE PUNCHED 3 EACH 1/4" HOLES DOWN LEFT SIDE FOR STD 3-RING BINDER
7
CURENT REVISION DATE: 4/20
REV
G
PUBLISHER FILE CREATED; REFRESHED LAYOUT DESIGN
THIS DRAWING IS THE EXCLUSIVE AND CONFIDENTIAL PROPERTY OF AMEREX
CORPORATION. IT SHALL NOT BE DUPLICATED, USED OR DISCLOSED TO OTHERS
WITHOUT THE EXPRESS WRITTEN CONSENT OF AMEREX CORPORATION.
PN 05606
COVER SHEET
TITLE
DRAWING CHANGE
DATE CREATED
3/4/98
NOTES
BY
CT
CREATED BY
MS
ECN#
DATE
B002026
4/29/20
REV.
G
04/2020
Advertisement
Table of Contents

Subscribe to Our Youtube Channel
Related Manuals for Amerex 600


Summary of Contents for Amerex 600
- Page 1 DATE PUBLISHER FILE CREATED; REFRESHED LAYOUT DESIGN B002026 4/29/20 THIS DRAWING IS THE EXCLUSIVE AND CONFIDENTIAL PROPERTY OF AMEREX CORPORATION. IT SHALL NOT BE DUPLICATED, USED OR DISCLOSED TO OTHERS WITHOUT THE EXPRESS WRITTEN CONSENT OF AMEREX CORPORATION. PN 05606...
- Page 2 There are substitute parts available that may be incorrectly labeled as UL component parts, some are advertised as Amerex type. None of these meet UL requirements, and all of them void the Amerex extinguisher warranty. DO NOT SUBSTITUTE.
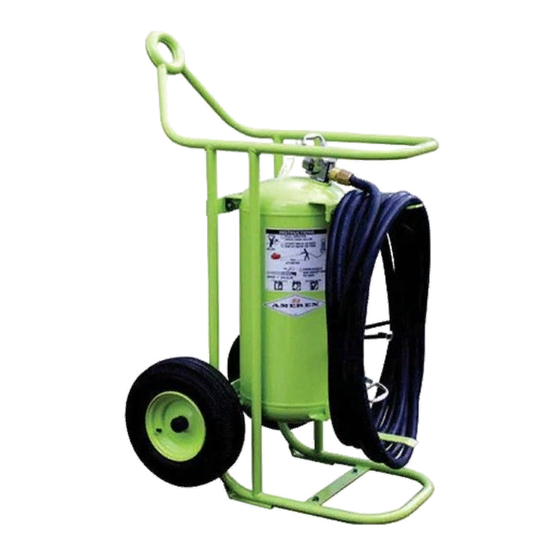
- Page 3 Amerex Wheeled Halon 1211 fire extinguishers provide "clean agent" fire-fighting capability far exceeding that achievable with hand-portable types. Models 695 (50 lb.) and 600 (150 lb.) are stored-pressure wheeled Halon 1211 liquefied gas extinguishers. Highly effective on Class-A (ordinary combustibles), Class-B (flammable liquids) and non-conductive in Class-C (energized electric) hazards.
- Page 4 1. Move the extinguisher to within approximately 30 feet (9 m) for 50 lb., 40 feet (12 m) for 150 lb. of the fire site. Keep the extinguisher upright. NOTE: The model 600 extinguisher may be operated in either the vertical or reclined position; however, it will discharge more agent in the vertical position. The model 695 MUST be operated in the UPRIGHT position.
- Page 5 The agent cylinder must be hydrostatically (proof-pressure) tested every 12 years to the test pressure indicated on the nameplate (will vary according to size). Model 695, 50 lb. (480 psi); Model 600, 150 lb. (500 psi). Discharge hoses must also be hydrostatically tested (proof pressure) every 12 years to 300 psi, or service pressure, whichever is higher.
- Page 6 6. If the Model 600 is so equipped, check the agent lever indicator. The indicator arrow shall be in the Green zone. Refer to the Trouble Shooting guide if there are any problems with the indicator. 7. Check pull pin for freedom of movement. Replace if bent or if removal appears difficult.
- Page 7 4. Thoroughly clean all parts of the disassembled valve with a soft bristle brush or soft cloth. Blow the valve out with dry nitrogen. 5. Install a NEW Amerex valve stem assembly after lightly lubricating the valve stem O-ring with V-711 or equivalent (do not lubricate the valve stem seal). Reassemble the spring and downtube. Carefully install a NEW collar o-ring which has been lightly lubricated with V-711 or equivalent.
- Page 8 Remove agent level gauge and discard. Replace agent level functioning (if so equipped) gauge with Amerex PN 06370 * Pressure gauge threads are coated with a special epoxy at the factory. For easy removal, soak the valve assembly in hot water (180°F/82°C) for two to four minutes. Remove gauge with a 7/16"...
Need help?
Do you have a question about the 600 and is the answer not in the manual?
Questions and answers