
Subscribe to Our Youtube Channel
Related Manuals for IXIA XGS2


Summary of Contents for IXIA XGS2
- Page 1 XGS2 Chassis Platform Release 9.10 Getting Started Guide Document version: 202008071937+05:30...
- Page 2 Technology Licenses computer software Notices documentation that is not The hardware and/or software customarily provided to the Copyright Notice described in this document are public; or (2) Relinquish to, or furnished under a license and © Keysight Technologies 2016- otherwise provide, the may be used or copied only in 2020 government rights in excess of...
- Page 3 A CAUTION notice denotes a hazardous situation that, if not avoided, could result in minor or moderate injury. A WARNING notice denotes a hazardous situation that, if not avoided, could result in death or serious injury. – iii –...
- Page 4 Contact Us Ixia headquarters 26601 West Agoura Road Calabasas, California 91302 +1 877 367 4942 – Toll-free North America +1 818 871 1800 – Outside North America +1.818.871.1805 – Fax www.ixiacom.com/contact/info Support Global Support +1 818 595 2599 support@ixiacom.com Regional and local support contacts:...
-
Page 5: Documentation Conventions
Documentation conventions Documentation conventions The following documentation conventions are used in this guide: Describing interactions with the UI You can interact with products by using different input methods: keyboard, mouse, touch, and more. So in most parts of the user documentation, generic verbs have been used that work with any input method. -
Page 6: Table Of Contents
Chapter 2 XGS2 Chassis Physical Setup Unpack and Connect the Unit Install XGS2 Chassis Rack Mounting and Ventilation Warning Installing the XGS2 chassis in an Equipment Rack Installing the XGS2 on a Flat Surface Record Product Information Chapter 3 XGS2-SD Configuration... - Page 7 Start a Windows Remote Desktop Connection Chapter 6 Troubleshooting LED Indicators IP Addressing Issues Troubleshooting Licensing Issues INDEX – vii –...
-
Page 8: Chapter 1 Xgs2 Chassis Platform Overview
XGS2 Chassis Platform Overview HAPTER This section provides an overview of the XGS2 chassis platform, the physical units and the indicators and controls on them. In this section: XGS2 Processor Modules Front Panel Indicators and Controls Product Specifications – 1 –... -
Page 9: Xgs2 Processor Modules
This chassis platform supports application and security testing with the Ixia IxLoad, IxNetwork and BreakingPoint software products. The model of the chassis platform supported on Windows 10 is XGS2-SD - Standard Performance Controller. This model provides support for IxLoad and IxNetwork but not BPS. -
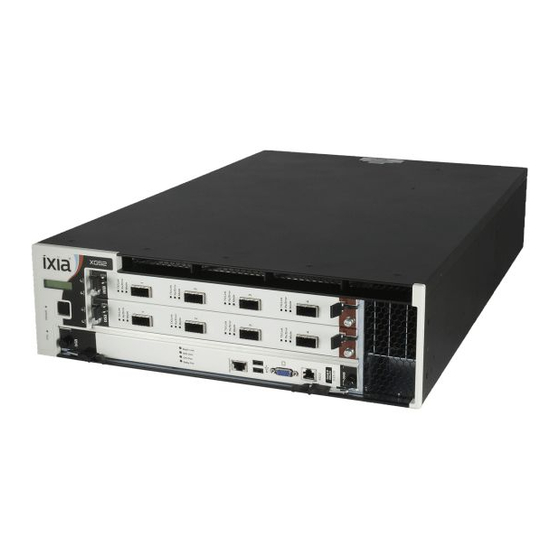
Page 10: Front Panel
Front Panel The XGS2-SD front panel: – 3 –... -
Page 11: Indicators And Controls
Chapter 1 XGS2 Chassis Platform Overview Indicators and Controls Power Indicates the current power state: Green: the system is ON and all power supplies are operational. Off: the system is powered off or one or more power supplies are not operational. - Page 12 Chapter 1 XGS2 Chassis Platform Overview Europe EN60950-1, 2nd Edition International CB Scheme: IEC 60950-1:2nd Edition EMI/EMC North America FCC part 15, Class A (USA) ICES-003 Issue 4, Class A (Canada) Europe EN 55022:2010 +C1 (Emissions, Harmonics, Flicker) EN 55024:2010 (Immunity)
- Page 13 Chapter 1 XGS2 Chassis Platform Overview Weight: 55 lbs. (25 kg) Thermal Operating Temp.: 0° to 40° C Operating humidity: 10 to 85% (RH), non-condensing Input Power INPUT 1/ALIMENTATION 1: 100-240VAC, 50/60Hz, 8A INPUT 2/ALIMENTATION 2: 100-240VAC, 50/60Hz, 8A INPUT 3/ALIMENTATION 3: 100-240VAC, 50/60Hz, 8A Note: Inputs 1 and 2 are required for normal operation.
-
Page 14: Chapter 2 Xgs2 Chassis Physical Setup
XGS2 Chassis Physical Setup HAPTER This section describes the tasks needed to physically set up the XGS2-SD unit for operation. In this section: Unpack and Connect the Unit Rack Mounting and Ventilation Warning Installing the XGS2 on a Flat Surface Record Product Information –... -
Page 15: Unpack And Connect The Unit
6. Connect the VGA and USB ports to the KVM infrastructure (or connect them to a local monitor, mouse, and keyboard). Using the provided USB to PS2 cable, connect the RS232 port on the XGS2 chassis platform to the workstation that you will use to manage the unit (described in Initial Configuration XGS2-SD on page 17... - Page 16 Chapter 2 XGS2 Chassis Physical Setup Insert the controller module in the lower slot in front of the chassis. Ensure that the module is fully seated. Ensure that the thumbscrews are screwed in properly. Take the Sync module and insert it in its slot on the back of the chassis.
- Page 17 Chapter 2 XGS2 Chassis Physical Setup When the Sync module is fully inserted, tighten its two screws. Insert a power supply in one of the power supply slots. Push the power supply until you hear a click and it is fully seated in its slot.
- Page 18 Chapter 2 XGS2 Chassis Physical Setup Repeat the same for the second supply. Note: If you have purchased the optional redundant power supply, you may have to repeat this step after removing the empty slot cover. The fully assembled chassis’s rear view looks like this.
-
Page 19: Rack Mounting And Ventilation Warning
Use the provided power cords to connect the chassis to the electrical power source. Rack Mounting and Ventilation Warning The XGS2 chassis are shipped with brackets and screws for rack mounting and rubber feet for stationing on a flat surface. - Page 20 Chapter 2 XGS2 Chassis Physical Setup when not racked. A) Elevated Operating Ambient - If installed in a closed or multi-unit rack assembly, the operating ambient temperature of the rack environment may be greater than room ambient. Therefore, consideration should be given to installing the equipment in an environment compatible with the maximum ambient temperature (Tma) pecified by the manufacturers.
-
Page 21: Record Product Information
Chapter 2 XGS2 Chassis Physical Setup Record Product Information You can use this page to record the product information required during initial system configuration (and for future reference). The Host Name, Part Number, and Windows Product Key are printed on the label on the back of the unit. -
Page 22: Chapter 3 Xgs2-Sd Configuration
XGS2-SD Configuration HAPTER This section describes the tasks needed to configure the XGS2-SD chassis. In this section: Connecting the XGS2-SD Processor module Initial Configuration XGS2-SD – 15 –... -
Page 23: Connecting The Xgs2-Sd Processor Module
Chapter 3 XGS2-SD Configuration Connecting the XGS2-SD Processor module This section describes the process of connecting the XGS2-SD Processor module. To connect the module you need to do the following: 1. Insert and remove the Processor Module. 2. Connect the RJ45 management port (4) as the designated management port to your lab management switch. -
Page 24: Initial Configuration Xgs2-Sd
1. Connect the monitor, USB mouse and keyboard, and then start the chassis. 2. When the chassis boots up, log on to the chassis. The user name is ixia and the password is the CPU module serial number found on the sticker located at the back of the chassis. - Page 25 Chapter 3 XGS2-SD Configuration 4. Select Properties . Select Internet Protocol Version 4 (TCP/IPv4) . 5. Select Properties and then select the Use the following IP address option. 6. Enter the IP address, subnet mask and default gateway. – 18 –...
-
Page 26: Chapter 4 Ixia Test Applications Support
Ixia Test Applications Support HAPTER This section provides the details of the Ixia Test Applications supported by XGS2 chassis platform. In this section: Ixia Applications support for XGS2-SD – 19 –... -
Page 27: Ixia Applications Support For Xgs2-Sd
3. Select XGS2 ports for configuration in the IxNetwork test: Select Ports in the navigation pane. Select the Add Chassis icon (in the Port Tools ribbon). Enter the XGS2 host name or IP address. 4. Assign ports from the XGS2 system to the current IxNetwork test scenario. - Page 28 Chapter 4 Ixia Test Applications Support Note: It is recommended that you periodically check the Ixia compatibility matrix https://support.ixiacom.com/support-overview/product-support/product-compatibility- matrix ) to determine the correct Ixia software application versions that are validated for interoperability. – 21 –...
- Page 29 This page intentionally left blank. – 22 –...
-
Page 30: Chapter 5 Common Administrative Tasks
Common Administrative Tasks HAPTER This topic describes, for reference, some of the common tasks that system administrators will perform on the XGS2 system. In this section: Start a Windows Remote Desktop Connection – 23 –... - Page 31 Start a Windows Remote Desktop Connection To start a Remote Desktop Connection session to the XGS2 system: 1. If you do not know the IxOS IP address, ping the unit's host name. The host name appears on the label on the back of the unit.
- Page 32 Troubleshooting HAPTER This section provides guidance for interpreting the operational status of your XGS2 unit, and troubleshooting issues that may arise. If you need assistance, contact Ixia Technical Support using the contact information provided in Contact Us on page iv In this section:...
- Page 33 The XGS2 chassis provides LED indicators that provide a visual presentation of the operational status of the device and its individual ports. LED/LCD Display The XGS2-SD chassis has front panel LEDs for each load module slot. The following table describes the purpose and meaning of each indicator: Label...
- Page 34 The XGS2-SD chassis model requires the following management IP addresses: the IxOS address If your network implements a DHCP service, the XGS2 IP addresses will automatically be assigned by that service, unless you choose to assign static IP addresses instead. When assigning static IP addresses, you must observe the following requirements: The two management IP addresses must be in the same subnet.
- Page 35 Licensing: An IxOS license is required to run both BreakingPoint and IxLoad. License invalidation: Time discrepancies between the network and theXGS2 system will invalidate the installed licenses. To avoid this, configure the XGS2 to use NTP (or manage the time setting manually, if NTP is not an available to you).
- Page 36 This page intentionally left blank. – 29 –...
- Page 37 3 indicators and controls 4 initial configuration XGS2-SD 17 IP addressing issues 27 ixia applications support for XGS2-SD 20 keyboard interactions v LED indicators 26 mouse interactions v Remote Desktop Connection, starting 24 touch interactions v...
- Page 38 © Keysight Technologies, 2020 Ixia, a Keysight Business 26601 West Agoura Road Calabasas, California 91302...
Need help?
Do you have a question about the XGS2 and is the answer not in the manual?
Questions and answers