Advertisement
Quick Links
Advertisement

Subscribe to Our Youtube Channel
Related Manuals for Dancover Pagoda EventZone 6x6m


Summary of Contents for Dancover Pagoda EventZone 6x6m
- Page 1 Pagoda EventZone 6x6m...
-
Page 2: Safety Advice
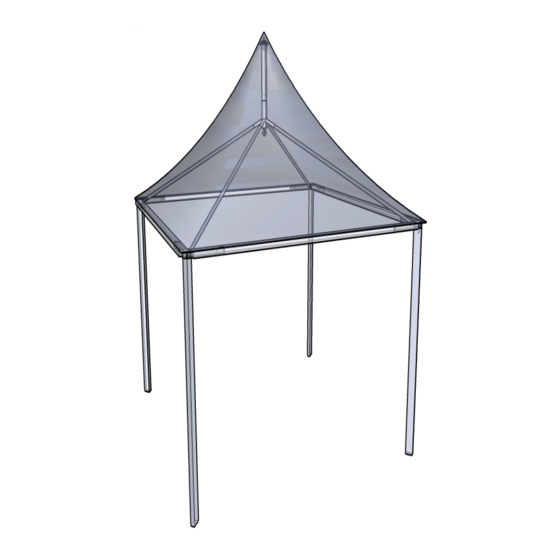
Safety Advice Attention In some countries approval is needed to set up a tent larger than 75 m2. The owner of the tent has the sole responsibility to make sure that these local rules are followed and that the mounting is correct. In case of bad weather conditions, it is your responsibility to ensure that people inside are safe and that the tent does not cause damage to others. - Page 3 Pagoda Parts 1) Spider / Roof Tensioner / Spine 2) Ground rails / ground Bars 3) Upright, inc. Folding eave Connection and base plate 4) Roof tubes 5) Eave Beams 6) Locking ‘P’ Device 7) Base plate fi tted to upright...
- Page 4 Step 1) Lay out all the eave beams and legs, making sure you fold the eave connectors up by removing the locking bolt and lifting the locking plate...
- Page 5 Step 2) insert eave beam (1) into legs (1&2) then insert eave beams (2&3) into legs (1&2) , next in- sert eave beam 4 into legs (3&4) . Once all eave beams are fi tted bolt together using M10 bolts. Eave beam Leg 3 Leg 4...
- Page 6 Step 3) to insert the fi nal eave and legs, you need to slide both legs in together, once fi tted bolt in place using M10 bolts. Leg 4 Leg 3 Eave beam 4...
- Page 7 Completed main frame, ready for roof tubes.
- Page 8 Step 4) insert the four roof tubes onto the steel tube on each of the eave knuckles. Once you have fi tted all four tubes you can fi t the spider / tensionor. The easiest way to fi t this is to insert opposite tubes together.
- Page 9 Step 5) once all the roof tubes are fi tted drape the cover over the frame being careful not to drag the cover as this can damage the fi nish. Once the cover is draped over you need to lift one side to allow access under cover to fi...
- Page 10 Step 6) fi t- if you have a pointed ting the centre top roof cover you pole assembly would once the roof (shown here cover is on, insert the with cover not centre pole, then the drawn) cone tube followed by the cone.
- Page 11 Step 7) fi tting the roof cover, Once you have got the cen- tre pole assembly fi tting installed you can start to secure the roof cover to the frame, this is done by the use of the P channel locking device you will need to slide the p channel onto the keder of the roof sheet (fi...
- Page 12 Step 8) Now you are ready to start to stand the pagoda up. Start by lifting one side, the legs should slowly fold down as you lift, but you may need to help them. Once the legs are fully extend- ed lock the in place with the locking plate and refi...
- Page 13 Step 9) once you have tensioned the roof cover you can lift the other side and fi t the legs making sure you lock them in place.
- Page 14 Step 10) Fitting the walls, if you want to fi t the walls to your pago- da this is done by fi rst fi tting the keder of the wall into the keder slot in the leg. But make sure you have the slight shinny side of the pvc on the outside and the plastic fi...
- Page 15 EATHER AND AFETY Relocatable aluminum beamed fabric structures have been used for decades. Even with millions of square feet of this and similar structures now in the world, the indus- try as whole has maintained an excellent safety record. The industry and the avail- able inventory continue’s to grow.
- Page 17 Contact information Head office: Dancover A/S For more information Nordre Strandvej 119 G please visit: 3150 Hellebæk www.dancovershop.com Denmark National contact Denmark: Spain: denmark@dancover.com espana@dancover.com Italy: uk@dancover.com italia@dancover.com Germany: Switzerland: germany@dancover.com schweiz@dancover.com France: Austria: france@dancover.com austria@dancover.com Sweden: Norway: sverige@dancover.com norge@dancover.com...
Need help?
Do you have a question about the Pagoda EventZone 6x6m and is the answer not in the manual?
Questions and answers